-
How to build a fire pit: easy garden DIY Guide
 Lee Burkhill: Award Winning Designer & BBC 1's Garden Rescue Presenters Official Blog

Gardens are becoming more multi-functional as people start to use them more as an additional room to their houses rather than just somewhere for a flower bed. A fire pit is a great way to relax and socialise in your garden space well into the late night. Keeping you both warm and offering a striking focal point. My guide will show you how to create an amazing fire pit with leftover building materials. So if you want an amazing upcycled fire pit then this guide is for you!
Quick Answer
To build your own fire pit, dig a circle in the lawn or lift paving, lay a fireproof gravel base over weed membrane, arrange reclaimed stone or bricks around a steel fire bowl, and dress with decorative gravel. The whole project takes a day, costs as little as £30 using salvaged materials, and creates a stunning focal point that lasts for years.
I’m a big fan of recycling and upcycling in the garden. It’s so easy to buy things online but there’s something really satisfying in making your own fire pit out of reclaimed materials. This creates a one of a kind bespoke fire pit which will really set your garden alight!
If you want to build your own fire pit in your garden that looks like it’s straight out of a garden design magazine then this guide will show you how. I’m going to demonstrate a fire pit in a lawn which is the easiest and safest place to have one. If you are building one on a paved area you can lift the paving slabs and follow the guide from there.
Jump To
How to build a fire pit
Building a fire pit in your garden couldn’t be easier, and there’s a wide variety of different styles and materials you can use. The basics of creating a fire pit follow the same steps, so this guide is universal.
There are two main approaches to a DIY fire pit. The first, which I demonstrate here, uses a reclaimed steel bowl or dustbin lid as the fire vessel, surrounded by arranged stone or rockery. The second is a fully built permanent brick-and-mortar structure, which is a more involved weekend project. Both are enormously satisfying and both will create a genuinely beautiful garden focal point. I’ll cover the key differences as we go.
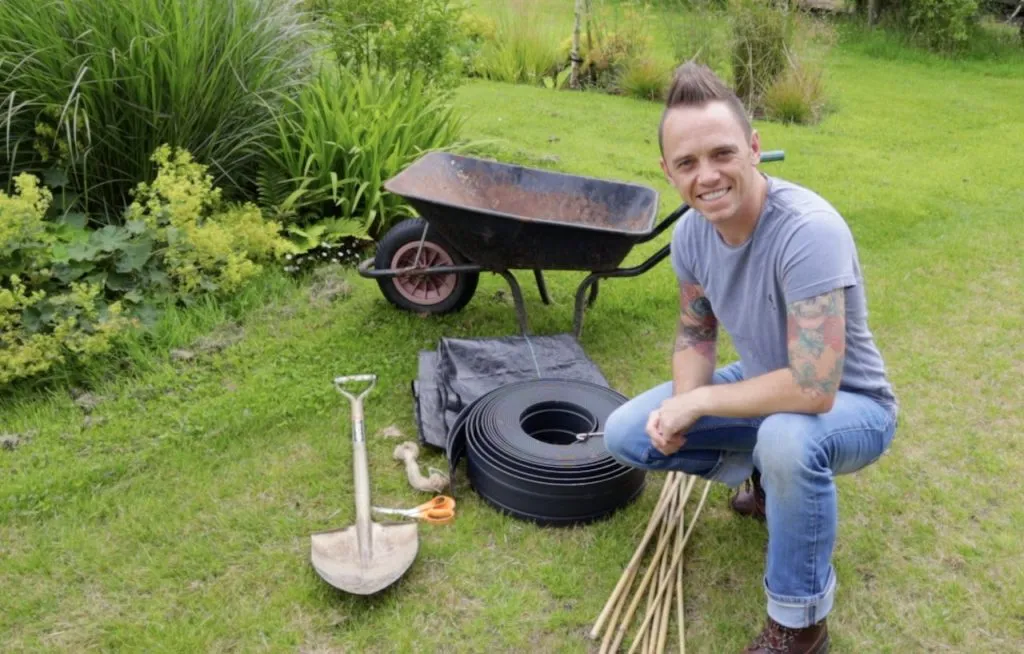
Equipment to build a fire pit
- Steel bowl, old metal dustbin lid or other fireproof containers
- Reclaimed flameproof building materials like stone, rockery stone, concrete, bricks or paving slabs
- Gravel or hardcore for the fireproof base
- Decorative gravel or pebbles
- Lawn edging (if fitting in a lawn)
- Weed membrane
- String and canes
- Scissors
- Sharp spade
- Tape measure
- Spirit level
Did you know that you can take my course and learn how to become a Garden Ninja yourself? Click here for details
Choosing a fire bowl for your DIY fire pit
The fire bowl is the heart of your DIY fire pit, so it’s worth spending a little time choosing the right one. From years of designing and building these in client gardens, I’ve found that the material of the bowl makes a real difference to how long your fire pit lasts and how well it performs on a cold evening.
Cast iron fire bowls are my favourite choice for a built-in DIY fire pit. Cast iron retains heat superbly, which means your fire stays warmer for longer even after you stop adding wood. It’s heavier, but once it’s bedded into your stone surround it won’t be going anywhere. The only maintenance required is an occasional wire brush and a wipe with a little vegetable oil to prevent surface rust. 🛒 Browse cast iron fire bowls on Amazon UK
Steel fire bowls are lighter, often cheaper, and perfectly good for a fire pit that you want to be able to lift out and clean easily. Steel does develop surface rust over time when left outdoors, so it’s worth treating the outside with a heat-resistant paint every couple of seasons if you want it looking its best. 🛒 Browse steel fire bowls on Amazon UK
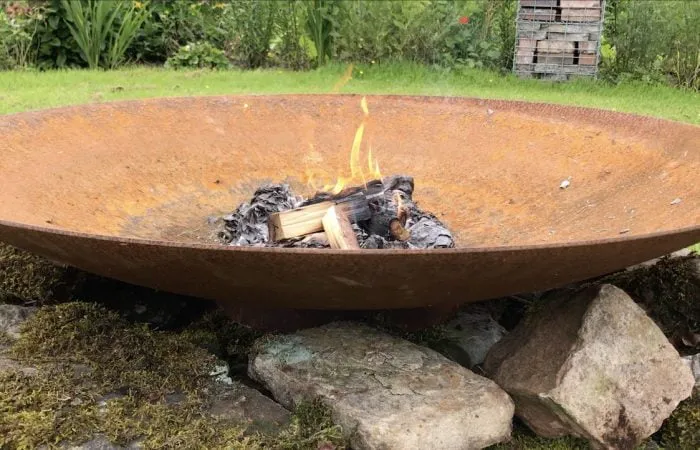
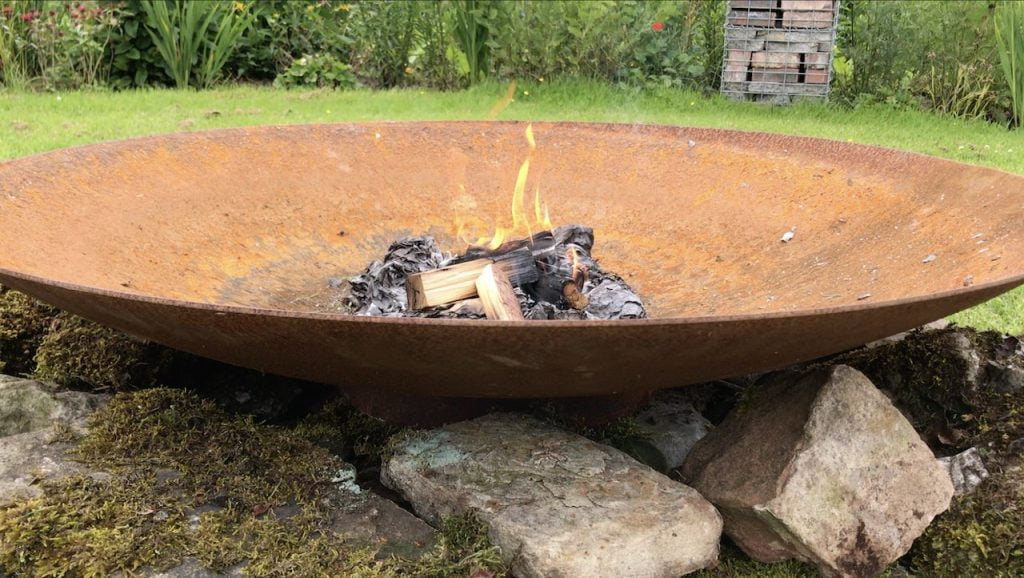
The reclaimed option is what I used for this project and it remains my top recommendation for anyone who wants to keep costs low and sustainability high. An old metal dustbin lid, an enamel washing-up bowl, or even a large steel wok can all work brilliantly as fire vessels. The key is to ensure the material is entirely metal with no plastic components, and that it’s deep enough to contain the fire safely. If in doubt, skip anything with a coating that might give off fumes when heated.
💡 Top Tip
Whatever bowl you choose, make sure it has enough depth to contain embers safely. I recommend a minimum depth of 15cm. Shallow bowls allow embers to blow out more easily in a breeze, which is both a fire hazard and deeply annoying when you’re trying to keep a fire going on a British summer evening.
If you decide to invest in a purpose-made fire bowl rather than using reclaimed materials, look for one with a spark guard or mesh lid included. This is especially important if you have children or pets, or if your fire pit is positioned on a lawn where stray embers could scorch the grass. 🛒 Fire pit bowls with spark guards on Amazon UK
Fitting a DIY Firepit
The fire pit I’m creating is going to be a circular design. I find circular focal points in gardens encourage people to sit around them and connect. You can create any shape you desire but I find circles to be the most relaxed and really help connect with any garden layout. Squares and rectangles can be a bit formal and, if you get the proportions wrong, can look uneven. I’m installing this in the Exploding Atom Garden. If you want to know more about this concept garden, then read the design guide here.
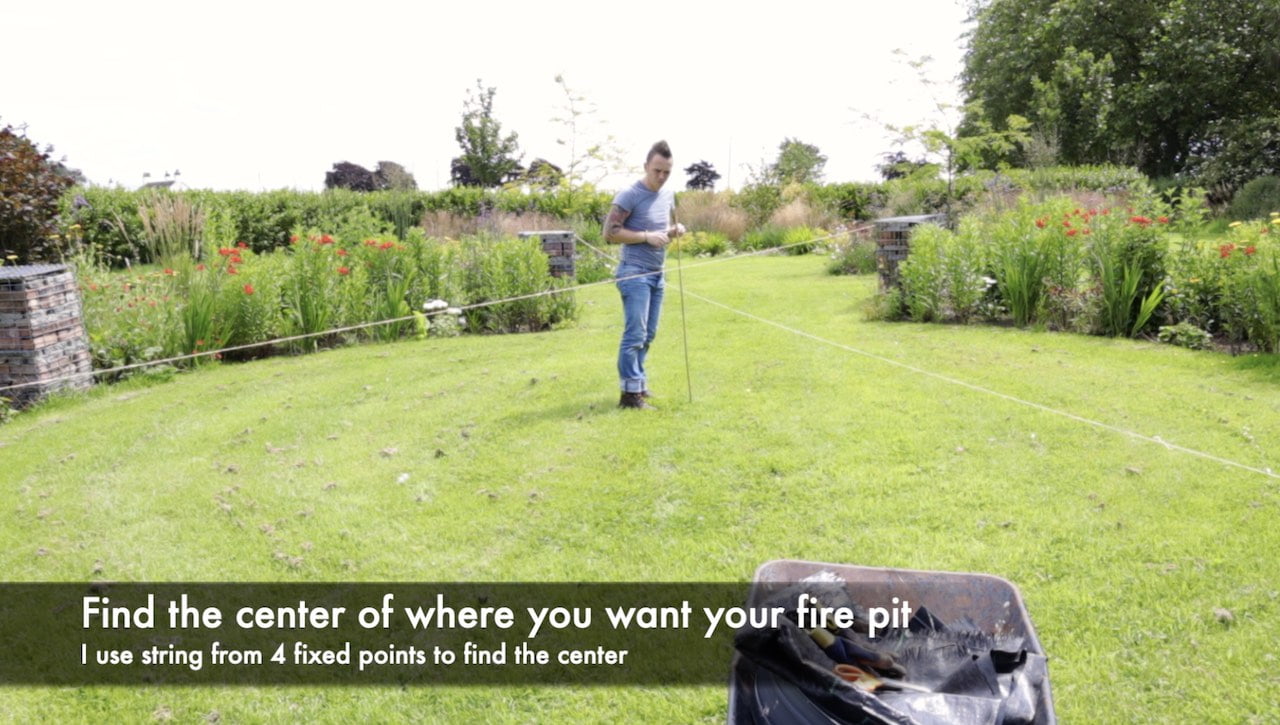
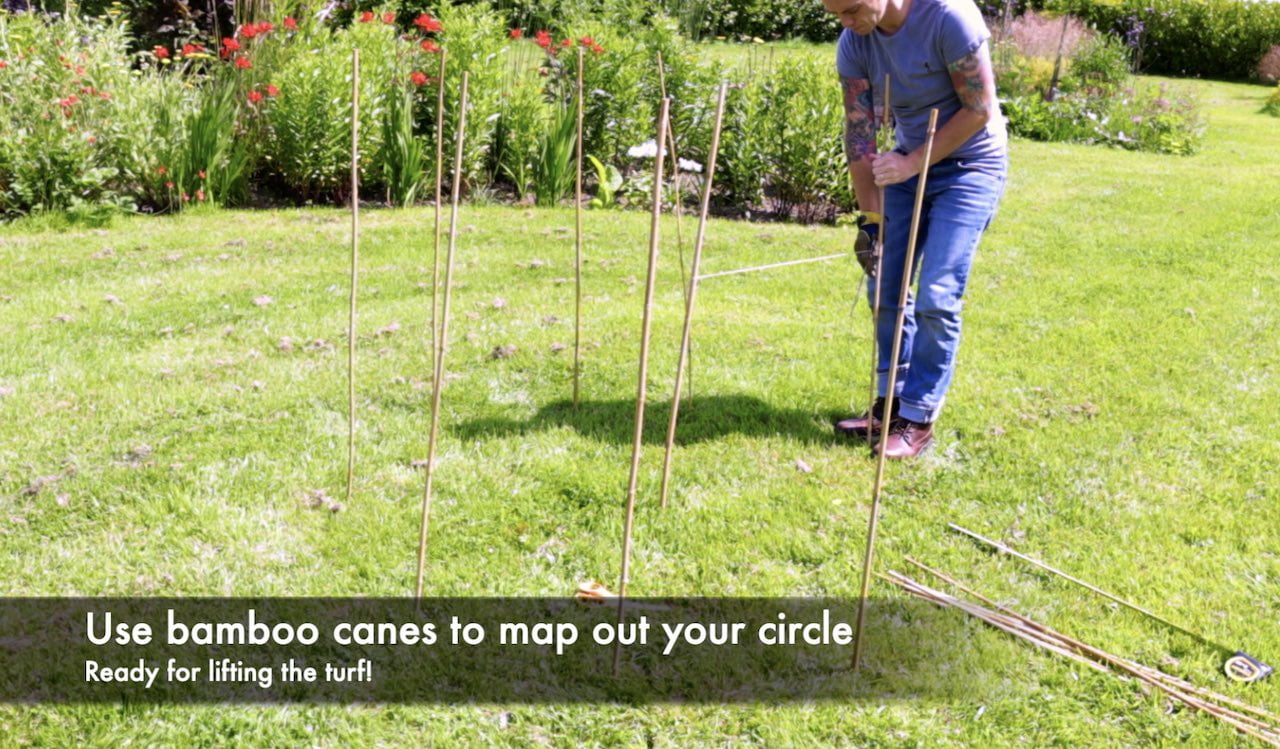
Step 1: Find the position where you want to fit your fire pit. Ensuring it’s not underneath any overhanging trees or wooden structures. I like to place mine centrally on a lawn, which gives easy access all around and draws your eye to it as a focal point. Use string to find the central point of your fire pit area. Put a cane on the lawn to mark the centre.
Step 2: Measure the diameter of your fire bowl or steel bowl. This is the width. You then need to add 30cm to 50cm as your final diameter. This is to allow for the fire pit’s surrounding rocks and ensure it’s a safe distance from the fire while you’re enjoying it.
Step 3: Tie a piece of string to the central cane and measure the radius, i.e. half the total diameter. Then, tie your tent peg to this string. You can then swivel the string around the cane to mark your circle. I use additional canes to map out the circle on the turf.
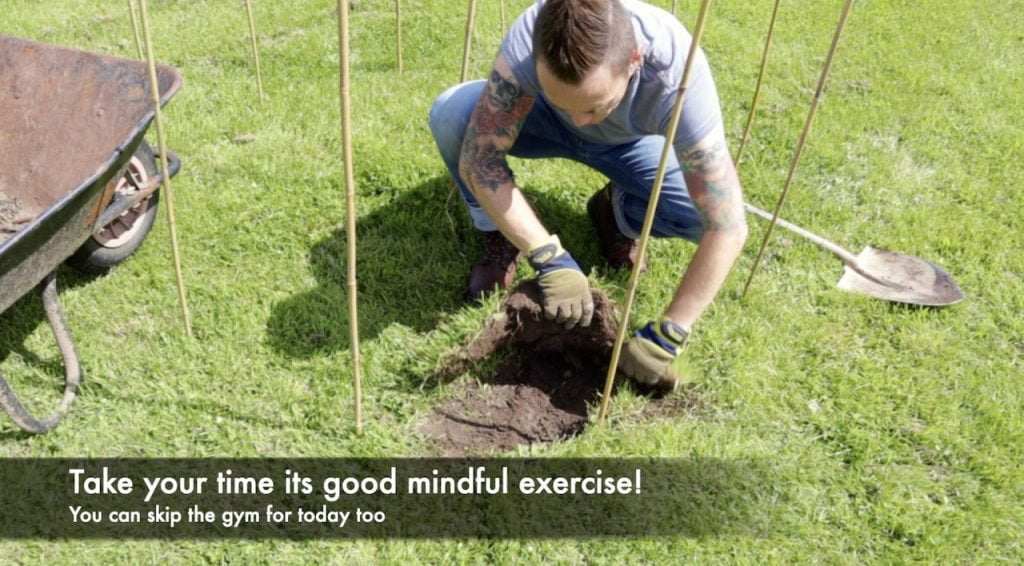
Step 4: Cut out the turf from your marked-out circle. I use a sharp spade and cut the turf into strips before lifting them. Aim to lift 1 to 1.5 inches of turf off. This turf can also be recycled by stacking it grass side down so it breaks down into gorgeous garden soil!
Step 5: Use a rake to level out the exposed circle. Remove any large rocks or debris you’ve uncovered.
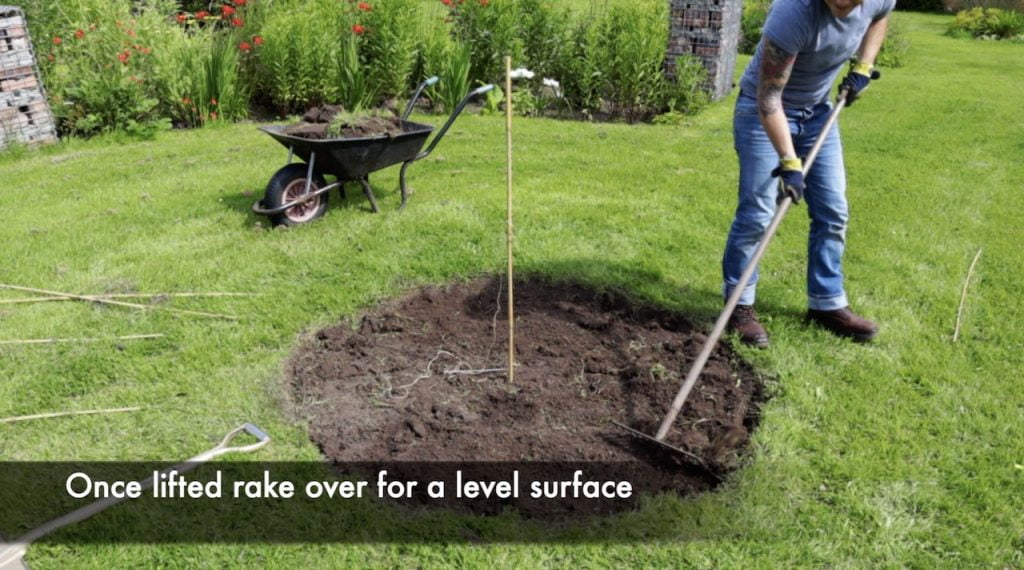
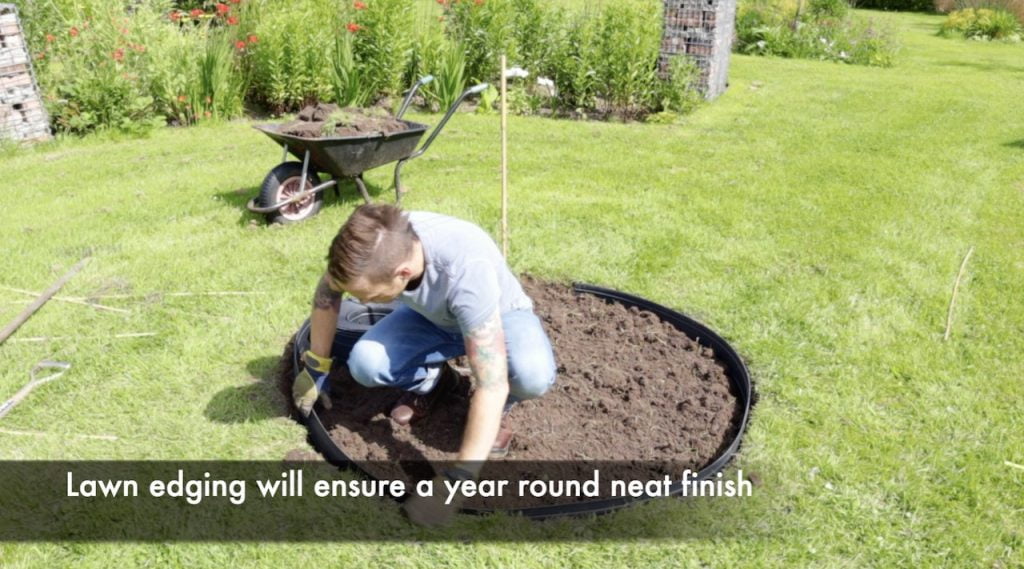
Step 6: If using an edging strip like metal or plastic then using your sharp spade cut around the circle, ready for you to fit your edge strip. If you’re using bricks to edge it you’ll need to dig a small trench and then bed these into either sand or cement.
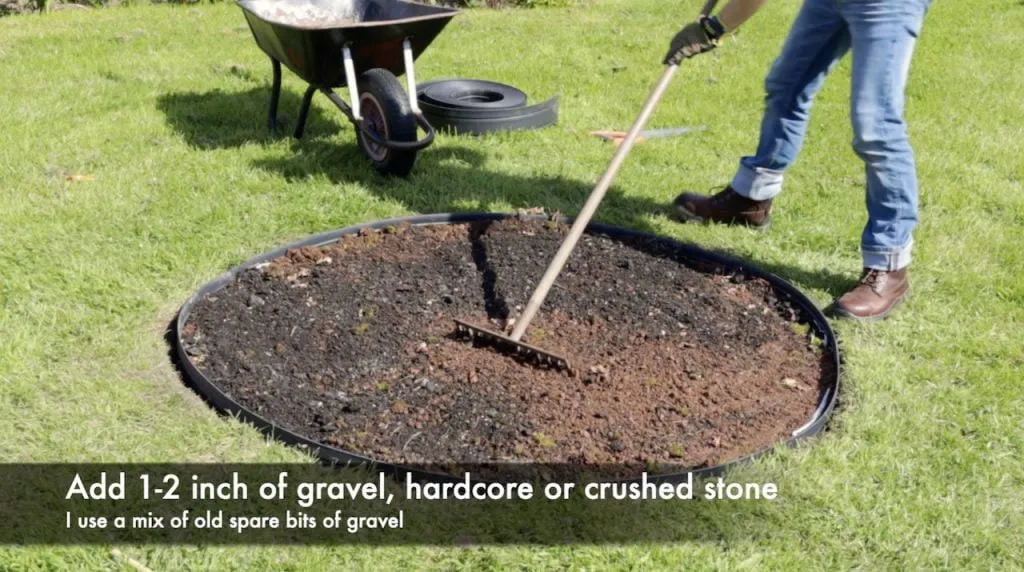
Step 7: Add your weed membrane, to stop any weeds from growing back up and then add 1 to 1.5 inches of gravel or hardcore into the circle. Use a rake to spread it out and compact it with your feet. This is now the fireproof base to protect the ground and you from the fire pit’s potential heat!
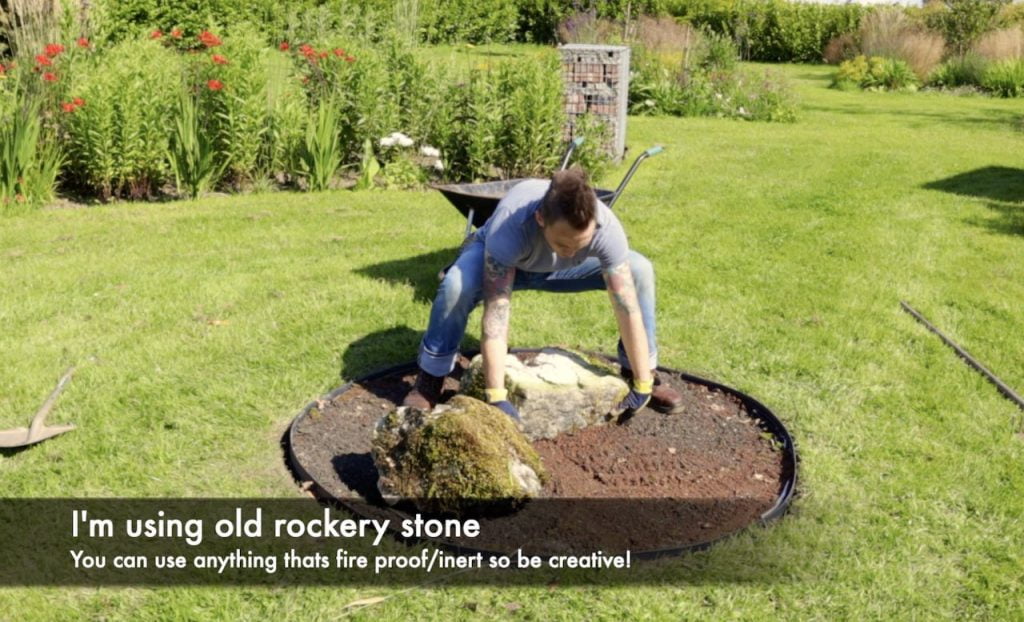
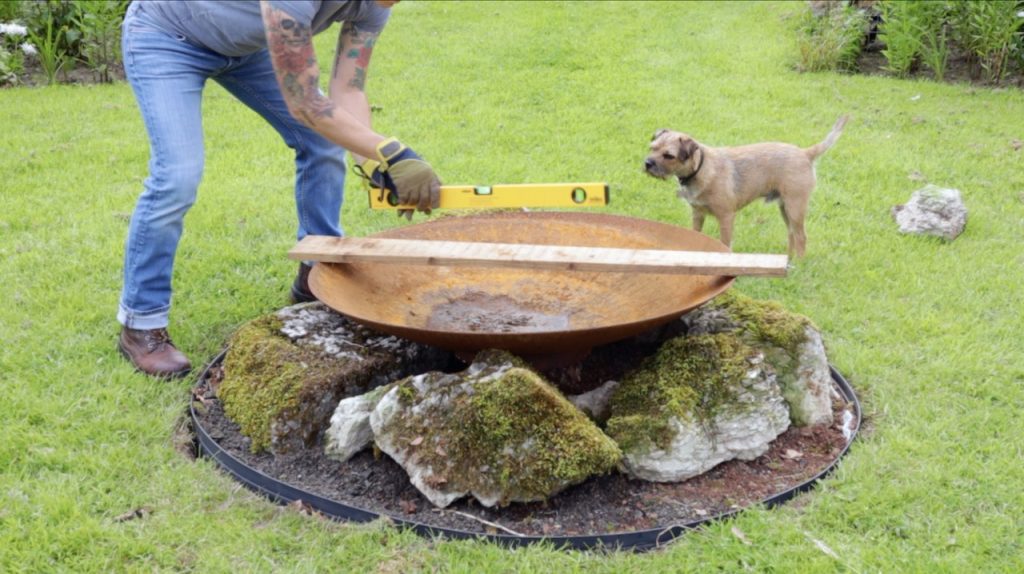
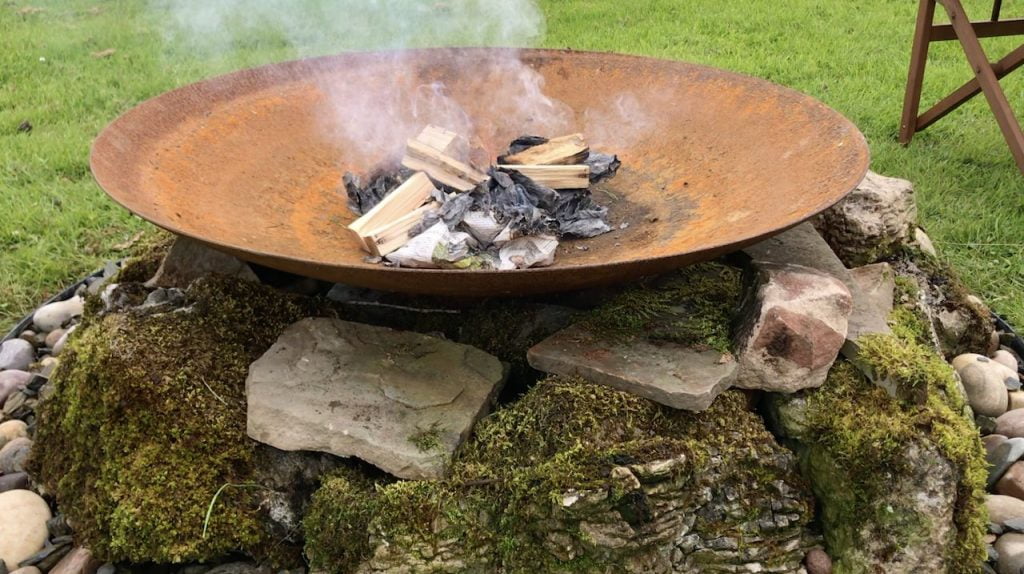
Step 8: This is the fun bit. Start arranging your rockery stone, concrete or reclaimed building materials into a circle in which the fire bowl will sit. Use bricks to create a flat area in the middle where the base of the bowl or dustbin lid can sit. Then, with a piece of wood and spirit level, make sure it’s level.
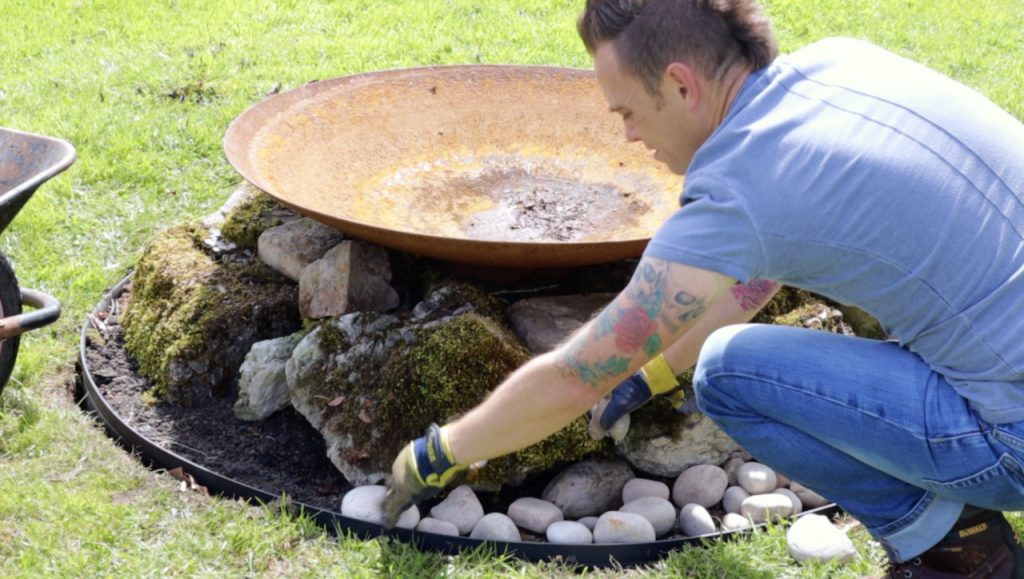
Step 9: Place your bowl in the middle and then using decorative gravel or chippings dress around the circle any gaps that there may be. This decorative step will start to make your fire pit look amazing. So take your time and use any recycled materials you can as long as they are heat resistant. Broken roof tiles or broken terracotta pots can look great too!
Step 10: Your fire pit is complete. Now, it’s time to sit back, light a fire, and enjoy your hard work!

Best wood for a fire pit
One of the questions I get asked most often on the forum is what wood to use in a fire pit. The answer matters more than people realise. Using the wrong wood will give you a smoky, spitting, underwhelming fire that drives everyone indoors. Using the right wood will give you a long, warm, low-smoke burn that makes an evening in the garden genuinely magical.
Hardwoods are the gold standard for fire pit fuel. Oak, ash, beech, hornbeam, and cherry all burn slowly and produce sustained heat with minimal smoke. Ash is particularly brilliant because it burns well even when not fully seasoned, which makes it the most forgiving choice if you’re new to fire pit use. If you have apple or pear trees in the garden, any prunings that have been dried for at least a year will produce a wonderfully fragrant fire with very little smoke.
From years of garden design, I always suggest to clients that they see their fire pit as a way to use up woody prunings rather than sending them to the green bin.
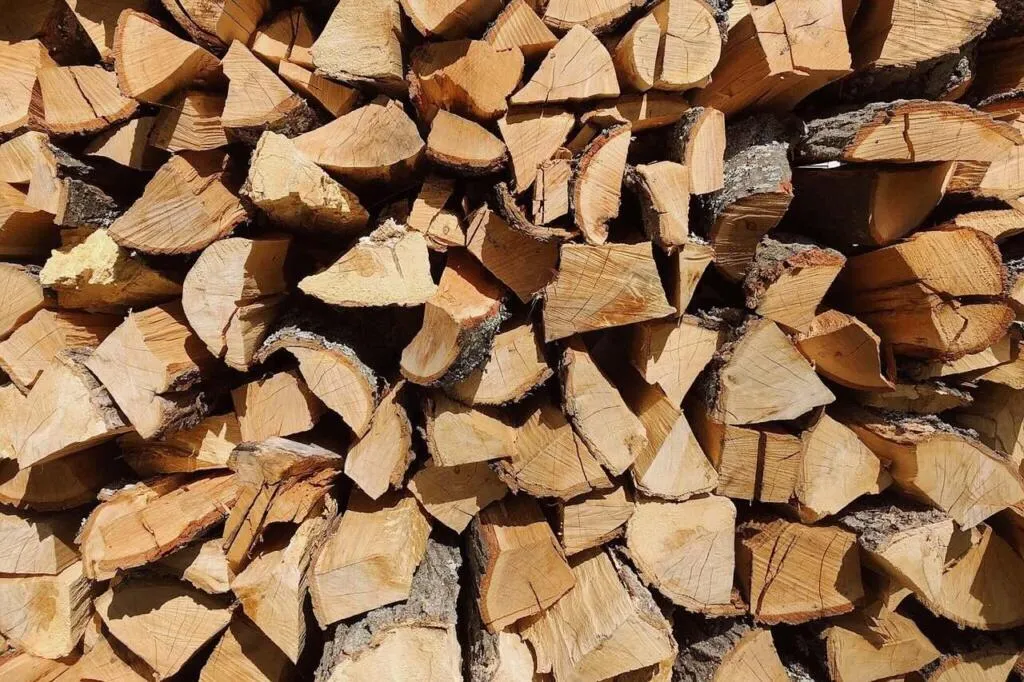
Seasoning is the single most important factor. Wood must be dried for a minimum of one to two years before burning. Freshly cut or unseasoned wood contains too much moisture, so the fire spends its energy evaporating it rather than producing heat. You’ll get thick smoke, a persistent smell, and a frustrating fire that keeps dying back.
Always look for wood with visible cracks at the end grain and a hollow sound when two pieces are knocked together. If you can, use a moisture meter before buying. Kiln-dried firewood available from garden centres and fuel merchants will consistently have moisture levels below 20%, which is the ideal threshold for a clean burn.
🛒 Buy kiln-dried hardwood logs on Amazon UK
⚠️ Never Burn These
Never burn treated timber, painted wood, MDF, plywood, chipboard, or any wood that has been pressure-treated or dipped. These release toxic fumes that are genuinely harmful to health. Burning plastics, rubber, or household waste in a fire pit is also illegal under the Environmental Protection Act 1990 and can attract substantial fines.
Softwoods like pine and spruce will burn, but they burn fast, produce more smoke, and spit more frequently as the resin pockets in the wood ignite. I’d use them only for getting a fire started, not as the main fuel. A handful of dry pine cones makes an excellent, fragrant fire starter if you have a pine tree nearby.
🛒 Natural eco fire starters on Amazon UK
How to light a fire pit
Getting a fire pit going from cold is a skill, and once you’ve mastered it you’ll wonder why you ever struggled. The secret is building your fire in layers and allowing air to circulate freely from the base. I use a version of the classic log cabin method, which I’ve refined over many years of using fire pits in client garden designs and in my own garden.
Start by placing a handful of dry natural tinder at the centre of your fire bowl. This can be crumpled newspaper, dry leaves, thin twigs, or a couple of natural firelighters. I make my own eco firelighters from garden prunings tied into small bundles, which works brilliantly and uses up twiggy material that would otherwise go in the green bin.
🛒 Natural wool firelighters on Amazon UK
Over your tinder, build a small pyramid or log cabin structure using the thinnest kindling you have, ideally dry sticks no thicker than a finger. Leave plenty of gaps for air to get in. Then build a second, slightly larger layer of kindling around that. Light the tinder at the base on two or three sides, then gently blow at the base to encourage the flame to spread. Once the kindling is well alight, you can start adding your hardwood logs. Place them in a similar pyramid arrangement rather than just piling them on, because fire needs oxygen and a tightly packed pile will smother itself.
💡 Top Tip
Resist the urge to use accelerants like firelighter fluid or petrol to get the fire going quickly. These can cause sudden, uncontrolled flares that are dangerous and will also taint the smell of the fire for the first 20 minutes. Patience and good dry kindling are far more reliable. A long-reach lighter makes lighting the tinder much easier and safer than matches. 🛒 Long reach lighters on Amazon UK
Once the fire is established, maintain it by adding one or two logs at a time rather than loading the bowl up all at once. This gives you much better control over the heat and keeps the fire looking tidy. A set of long-handled fire pit tools makes managing the fire much safer and more pleasurable.
🛒 Fire pit tool sets on Amazon UK
Fire pit safety and UK law
Before you light your first fire, it’s important to understand both the safety principles and the legal position around garden fires in the UK. I want to be clear here: this isn’t about being cautious for the sake of it. A fire pit used responsibly is perfectly safe, sociable, and a brilliant addition to any garden. But a few straightforward rules make the difference between a wonderful evening and a nasty incident.
Distance from structures. Position your fire pit at least three metres from any buildings, sheds, fences, or overhanging trees. This gives you a safe buffer zone against stray sparks and radiated heat. If your garden is compact, a spark guard fitted over the bowl is a sensible investment.
🛒 Fire pit spark guards on Amazon UK
UK law on garden fires. There is no blanket law against having a fire pit or bonfire in your garden in the UK, but you are legally required not to cause a nuisance to your neighbours. If smoke from your fire pit regularly drifts into neighbouring properties, they can complain to the local authority, who can issue a nuisance notice. Burning materials that produce toxic smoke, such as plastics, rubber, or treated timber, is an offence under the Environmental Protection Act 1990. Using your fire pit responsibly, with well-seasoned hardwood and with consideration for wind direction, means you are very unlikely to fall foul of any of these regulations.
Check the wind direction before you light. Spend five minutes in the garden before starting the fire and notice which way the breeze is blowing. You want smoke heading away from the house, away from neighbours, and away from your seating area. If the wind is blowing directly towards the house, either wait for it to shift or position seating so you’re upwind of the fire.
Extinguishing the fire safely. Never leave a fire pit unattended, and never go to bed while there are still live embers in the bowl. To extinguish the fire, stop adding fuel and allow the remaining wood to burn down naturally as much as possible. Then carefully pour water over the embers in stages, stirring between each application. The bowl will hiss and steam considerably.
Continue until there is no more steam and the ash feels cold to the back of your hand. A fire pit ash tool or dedicated poker makes this process much easier and keeps you at a safer distance. Dispose of the cold ash in the garden compost or spread thinly around the base of established trees and shrubs, where the potassium in wood ash acts as a gentle natural fertiliser.
💡 Top Tip
Keep a bucket of sand or a garden hose within easy reach whenever the fire pit is in use. Sand is particularly good for smothering a fire quickly if needed, as it starves the flames of oxygen without the steam and spatter that water can cause on very hot embers.
DIY Fire Pit advice
It goes without saying that you should always be sensible about fire safety and never leave the fire pit unattended. If you’re lifting heavy objects, make sure you get help from someone. Bend when you lift. Take your time. Always say please and thank you, that kind of stuff!
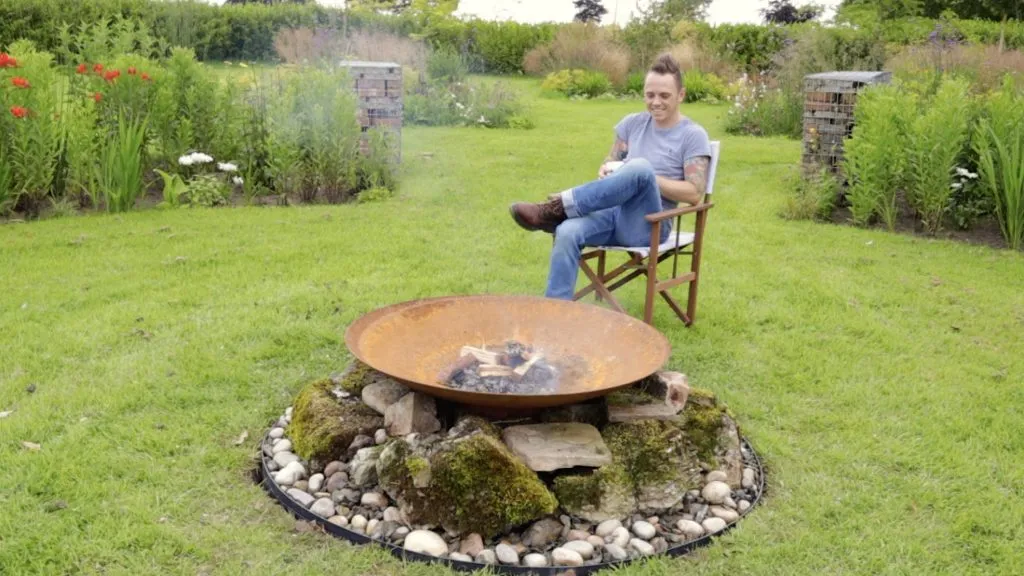
One thing that often gets overlooked is the seating arrangement around the fire pit. As a garden designer I spend a lot of time thinking about how people actually use a space rather than just how it looks. A fire pit with nowhere comfortable to sit is a missed opportunity.
Aim for seating that positions people roughly a metre and a half from the rim of the bowl. Any closer and the radiated heat becomes uncomfortable on warm evenings. Any further away and you lose the sense of gathering around the fire that makes a fire pit so sociable. Low-level seating such as log benches, stackable garden chairs, or rattan garden furniture all work brilliantly.
🛒 Browse fire pit garden seating on Amazon UK
If you want to take your fire pit to the next level, consider adding a swing-arm grill grate over the bowl. This transforms your fire pit into a cooking device as well as a heat source, and opens up the possibility of cooking over wood smoke, which produces extraordinary flavours. A simple cast-iron skillet placed over the grate can handle everything from toasted flatbreads to seared vegetables.
🛒 Fire pit cooking grill grates on Amazon UK
Frequently asked questions about DIY fire pits
Do I need planning permission to build a fire pit in my garden?
In the vast majority of cases, no. A DIY fire pit built in a domestic garden does not require planning permission in the UK. Planning permission only becomes relevant if you’re constructing a permanent structure above a certain height and size, which a reclaimed-bowl fire pit surrounded by loose stone certainly doesn’t reach. The main legal considerations are around nuisance (smoke affecting neighbours) and the Environmental Protection Act, which prohibits burning materials that produce toxic fumes. Burning dry hardwood responsibly places you well within the law.
How much does it cost to build a DIY fire pit?
Using entirely reclaimed materials, this project can cost as little as £10 to £30 for the gravel, weed membrane, and lawn edging, with the bowl itself sourced for free. If you purchase a purpose-made steel fire bowl, budget an additional £30 to £80. A cast iron fire bowl costs roughly £40 to £120 depending on size and quality. The stone surround can come from a builder’s skip, a reclamation yard, or even large rocks from elsewhere in the garden. It’s genuinely one of the most cost-effective garden design projects you can do.
Can I put a fire pit directly on grass?
You shouldn’t place a fire bowl directly on grass without first creating a fireproof base. The heat radiating downward from a fire bowl will scorch and kill the grass beneath it, and on very dry summers there is a small risk of the heat igniting dry turf. By lifting the turf and creating a gravel base as described in this guide, you protect the ground completely. If you want a movable fire pit rather than a permanent installation, place it on a large paving slab or a proprietary fire pit mat before using it on the lawn. 🛒 Fire pit grass protection mats on Amazon UK
What is the best shape for a DIY fire pit?
A circular fire pit is almost always the best choice for a DIY build. Circles are the most sociable shape because they encourage everyone seated around them to face inward and connect, rather than sitting in rows or facing at angles as you tend to with square or rectangular designs. From a practical standpoint, a circle is also easier to dig, easier to arrange loose stone around, and easier to light and manage because the air circulates evenly from all sides. Square or rectangular fire pits look striking in very formal or contemporary gardens, but they’re harder to build to a satisfying level of finish when using reclaimed materials.
Can I burn garden waste in a fire pit?
Dry, seasoned woody material from the garden such as hardwood prunings, apple or pear branches, and dry twiggy material can all be burned in a fire pit. However, green or freshly cut material will be very smoky and burns poorly. Leaves, grass clippings, and general garden debris should go on the compost heap rather than in the fire pit. Burning large quantities of garden waste can attract local authority complaints, so I’d always recommend the fire pit for well-seasoned hardwood fuel rather than as a general garden waste disposal solution.
How do I stop my fire pit from going rusty?
Steel fire bowls will develop surface rust over time, especially in the UK where the bowls are often exposed to rain. The best approach is to cover the bowl with a waterproof fire pit cover when not in use, which dramatically slows rust development. 🛒 Fire pit covers on Amazon UK Once a year, treat the outside of the bowl with a heat-resistant metal paint in a satin or matt black finish. Cast iron bowls benefit from an occasional wipe with vegetable or linseed oil while still slightly warm after use, which creates a protective layer and is the same technique used to season a cast iron frying pan.
Summary
A DIY fire pit is one of the most rewarding and cost-effective garden projects you can take on in a weekend. Using reclaimed stone, a steel or cast iron bowl, and a gravel base, you can create a genuinely beautiful garden focal point for as little as £30. The circular design encourages conversation and connection around the fire, making it one of the most sociable additions any garden can have.
Always use well-seasoned hardwood for the cleanest, most pleasant burn. Position your fire pit at least three metres from structures, check wind direction before lighting, and never leave the fire unattended. A spark guard, a long-reach lighter, and a set of fire pit tools make the experience safer and more enjoyable.
Whether you’re using up apple tree prunings, salvaging stone from a reclamation yard, or investing in a quality cast iron bowl, a DIY fire pit is an expression of everything I believe garden design should be: practical, personal, sustainable, and deeply enjoyable.
Have built a DIY fire pit? Why not share it with me on Social media. You can Tweet, Facebook or Instagram me with your designs. If you need gardening advice why not check out my Youtube Gardening guides and subscribe if you haven’t already!
Happy Gardening!


Lee Burkhill
Lee Burkhill, known as the Garden Ninja, is an award-winning garden designer and horticulturist with over 30 years of gardening experience and 15 years as a professional garden designer. A qualified RHS (Royal Horticultural Society) professional, Lee specialises in sustainable garden design and practical horticultural advice. He designs and presents on BBC1’s Garden Rescue and in leading gardening publications. Lee combines three decades of hands-on gardening knowledge with professional design qualifications to help gardeners create beautiful, functional outdoor spaces.
View all posts by Lee Burkhill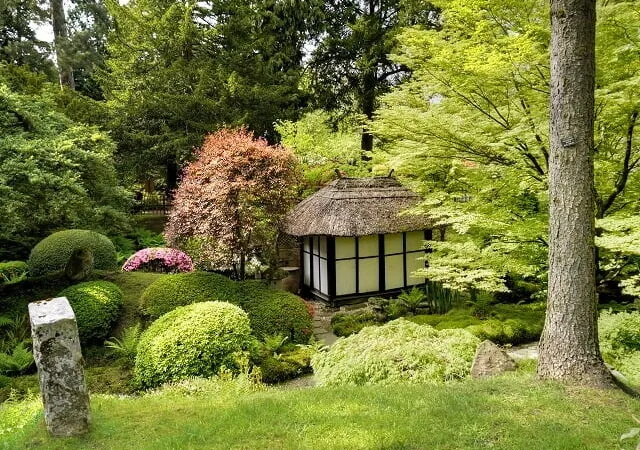


Categories
2 thoughts on “How to build a fire pit: easy garden DIY Guide”
Leave a Reply
You must be logged in to post a comment.
Other posts
-

Start here: to begin your gardening journey! Read more
-
How & when to prune gooseberries: Beginners guide for improved fruiting Read more
-
Exploding Atom Garden Part 4 Planting Shrubs & Edging Read more
-
Best Lawn Spreaders for Fertiliser and Grass Seed: UK Buying Guide Read more
-

Best Trees to Plant Near a Fence: 12 Safe Choices for UK Gardens Read more
-
How to Prune Photinia Red Robin: UK Timing & Technique Guide Read more


I love this so much! Reusing an old piece of metal and rocks from your own yard is such a smart idea!
Great website, thanks so much for showing us