Pleached Trees UK: A Garden Designer’s Complete Guide to Planting, Pruning and Privacy Screening
Lee Burkhill: Award Winning Designer & BBC 1's Garden Rescue Presenters Official Blog
Intermediate level
Pleached trees are a great way of adding privacy to a small or overlooked garden. They have a modern clean shape which blends well with newer contemporary houses and also heritage properties. Available in a variety of beautiful specimens there's a type for most tastes. However, gardeners can be put off as to how to plant them as they do require unusual staking. Don't let that put you off, here's your one-stop guide!
As a garden designer who specialises in awkward and overlooked gardens, I use pleached trees a lot in my designs. Not because I’m lazy with my tree choice, but because they really do offer a host of benefits to a small garden. Whether it’s politely blocking out nosey neighbours, adding some contemporary drama or making the most of the space underneath them, pleached trees can bring the wow factor to any garden.
Pleached trees offer privacy and year-round interest in a garden, leaving space underneath for planting. They are brilliant for small gardens where every square metre counts.
They are a bit of a diva when it comes to planting and staking, and this is where most people fall short with pleached trees and topiary. If you don’t take the time to prepare them correctly, your design concept will fall short. Poorly supported or incorrectly planted trees will lean, migrate, or fail to achieve the crisp, uniform lines that make pleached trees so special. A small amount of time spent on preparation will ensure years of beautiful, symmetrical planting.
Quick Answer
A pleached tree is a tree trained to create a formal screen of branches on a single clear stem, often described as a hedge on stilts. Plant them 1.5m apart, at least 40cm from fences and 1m from buildings. Support each tree with a stake and horizontal timber brace, secured with rubber tree ties. Prune twice a year in early spring and autumn. Hornbeam and lime are the most reliable UK varieties for deciduous screening; cherry laurel and photinia for evergreen coverage.
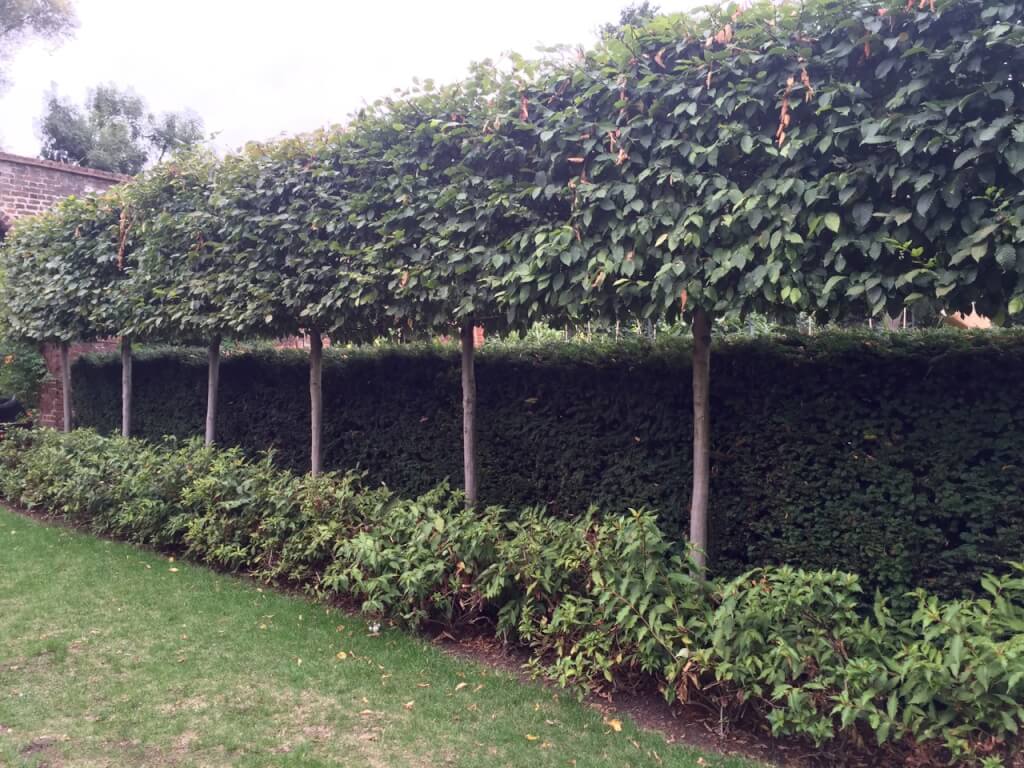
A pleached tree is a tree that has been specially trained to create a formal screen of branches and foliage on a single, clear stem. Think of them as a “hedge on stilts” where the trunk rises between 1.8m and 2.2m before the branches form a continuous, narrow screen above. The branches are carefully trained horizontally onto a supporting framework, creating a flat plane rather than the natural, rounded canopy you would expect from a standard tree.
When several pleached trees are planted in rows (typically 1.5m apart), their young shoots are interwoven to create a living wall effect. This makes them brilliant for privacy screening above existing fences, defining garden rooms, or adding architectural structure without consuming valuable ground space.
Unlike espalier trees, which have horizontal branches spaced at regular intervals along the trunk, pleached trees have a clear stem below, with the horizontal branches concentrated at the top, creating that distinctive elevated hedge appearance.
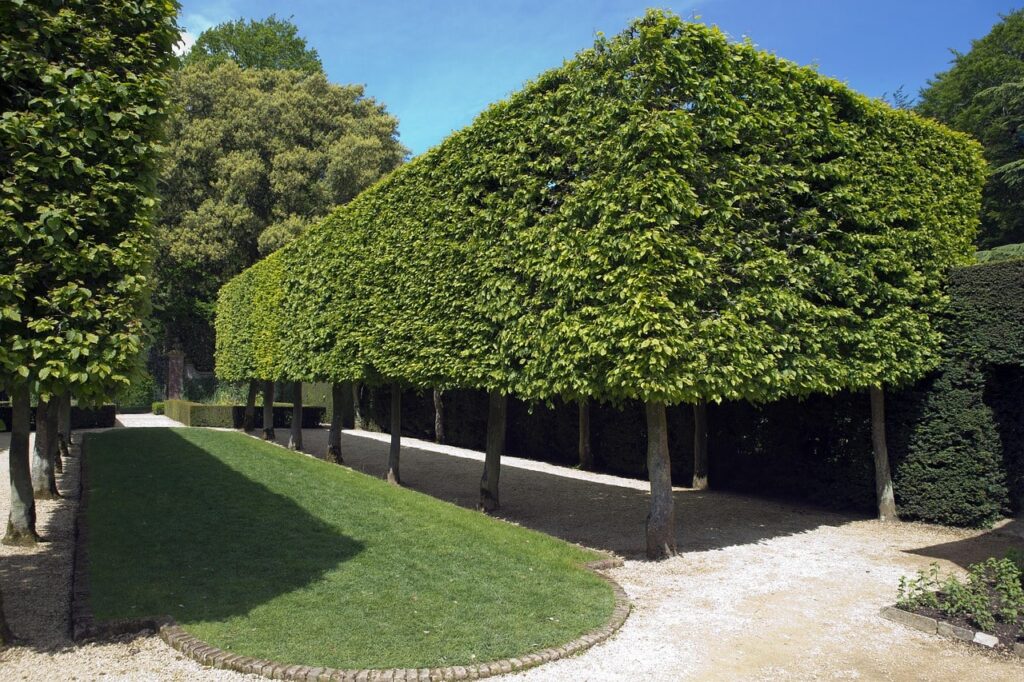
The practice dates back to medieval times when pleached walkways, known as “pleached allées”, were created to provide shaded paths in grand European gardens. The technique became particularly popular in 17th and 18th-century French formal gardens, and it is enjoying a massive revival today thanks to contemporary garden designers at shows like RHS Chelsea, who appreciate how pleached trees work brilliantly in both traditional and modern garden settings.
🌿 Pleached Trees at a Glance
Also known as
Plashed trees, hedge on stilts, pleached hedging
Clear stem height
1.4m to 2.2m depending on variety and intended use
Typical frame sizes
120 x 150cm up to 180 x 180cm (width x height)
Planting spacing
1.5m to 1.8m apart; at least 40cm from fences, 1m from buildings
Best planting time
October to November (rootball); pot-grown available year-round
1 to 2 seasons from pre-pleached; 4 to 5 years from scratch
Cost range
£150 to £1,500+ per tree depending on maturity and species
2. Why choose pleached trees? The benefits
Pleached trees pack a serious punch in garden design, particularly if you are working with a smaller urban plot or an overlooked garden. Here is why they have become such a go-to solution in my designs:
Space efficiency is their superpower
Unlike traditional trees that spread outwards, creating shade and taking up precious planting space, pleached trees grow vertically with a narrow footprint. You get all the height and screening benefits without sacrificing the area beneath them, which remains perfect for underplanting with shade-loving perennials or creating seating areas. In fifteen years of professional design, I have never found a more effective way to add height and privacy to a plot without eating into the usable garden.
Privacy screening above fence height
This solves one of the biggest challenges in modern gardens. Most fencing stops at around 1.8m, but overlooking windows or raised neighbouring properties often sit higher. Pleached trees bridge this gap beautifully, extending your privacy screen by another 1.2m to 1.5m without the need for unsightly trellis extensions or planning permission nightmares.
Year-round structure and interest
This varies depending on your species choice. Deciduous varieties like hornbeam retain their russet leaves through winter, providing structure even when dormant. Evergreen options like photinia or cherry laurel maintain their screening year-round, though they can look a bit heavy in winter if not pruned properly.
Architectural drama that is immediate
There is something undeniably contemporary about the clean lines and formal structure of pleached trees. They add instant sophistication to a garden design, creating defined spaces and drawing the eye upward, which makes small gardens feel more spacious rather than cramped. Unlike other screening solutions that look functional at best, pleached trees look genuinely beautiful from the moment they go in.
Wildlife value should not be overlooked
Despite their manicured appearance, pleached trees still provide nesting sites for birds, particularly in the denser evergreen varieties. The flowers of species like crab apple also support pollinators, whilst maintaining that formal aesthetic. The structured canopy also creates useful shelter and habitat even in winter, particularly for smaller garden birds.
The trade-off? They require regular maintenance (at least twice-yearly pruning) and proper support structures. But if you are after maximum impact with minimum ground space, pleached trees are absolutely worth the effort.
3. Species of pleached tree
Pleached trees come in a range of species, and there is plenty of variety to choose from. The choice between evergreen and deciduous will largely depend on whether you need year-round privacy or are happy with a seasonal screen. Here are the most commonly used varieties in UK gardens, with my professional assessment of each:
If you need year-round privacy, go evergreen. If you want the most reliable, low-maintenance pleached tree for most UK gardens, hornbeam is hard to beat. It holds its golden-brown leaves through winter, providing structure and partial screening even when dormant, and it is extremely tolerant of most UK soil types and exposures.
4. Pleached tree sizes, costs and what to expect
Let me be straight with you about pleached trees: they are not cheap. But understanding what you are paying for and what sizes are available helps you make informed decisions for your garden budget.
Standard frame sizes typically start at 120cm wide by 150cm high for the trained canopy, which sits atop a clear stem of around 1.8m. Larger frames measuring 150cm by 180cm or even 180cm by 180cm are available and command premium prices. Stem height can vary from 1.4m for lower screening right up to 2.2m for dramatic height above tall fencing.
Typical costs range dramatically based on maturity and species. A young, freshly-pleached tree with a 120 x 150cm frame might start around £150 to £250, whilst a mature specimen with a 180 x 180cm frame and several years of training can easily reach £800 to £1,500 per tree. Evergreens like photinia and cherry laurel tend to be pricier than deciduous hornbeam, whilst fruit trees like crab apple sit somewhere in the middle.
Delivery considerations are crucial. These trees are not popping through your letterbox. Most suppliers require specialist lorry delivery with tail-lift equipment, and you will need access for the vehicle, plus the manpower to move it. Some companies charge per tree for orders under a certain quantity (often 4 trees), whilst larger orders may include subsidised or free delivery.
Rootball versus potted availability affects timing. Most pleached trees are grown as root balls and are available from October through April during the dormant season. Pot-grown specimens are available year-round but cost more. If you are ordering in autumn, expect rootball delivery unless you specifically request potted trees.
Establishment timeline is the bit everyone forgets to ask about. If you buy pre-pleached trees from a reputable nursery, you are looking at one to two growing seasons for the canopies to merge into a continuous screen. Training from young trees yourself? That is a four to five-year project requiring patience and skill. For most gardeners, buying pre-pleached makes far more sense.
5. How to plant pleached trees
Pleached trees are planted in much the same way as any container-grown tree, but the staking is where the real skill lies. The best time to plant pleached trees is October or November, when autumn rain has arrived, but the ground is still warm enough for the roots to begin establishing before winter. Pot-grown trees can go in at any point of the year, provided the soil is not frozen, but they will need significantly more watering support during establishment in summer.
Before you dig, check the ground for underground services, including drains, pipes and cables. Tree roots and drainage systems are not friends, and the cost of a damaged drain will dwarf the cost of the trees themselves.
Step 1: Soak the roots before planting
Before you do anything else, soak each tree’s root ball in a bucket of water for at least 10 minutes. This ensures the roots are fully hydrated at the point of planting and significantly reduces transplant stress. Dry roots at planting is one of the most common reasons pleached trees fail to establish in their first season.
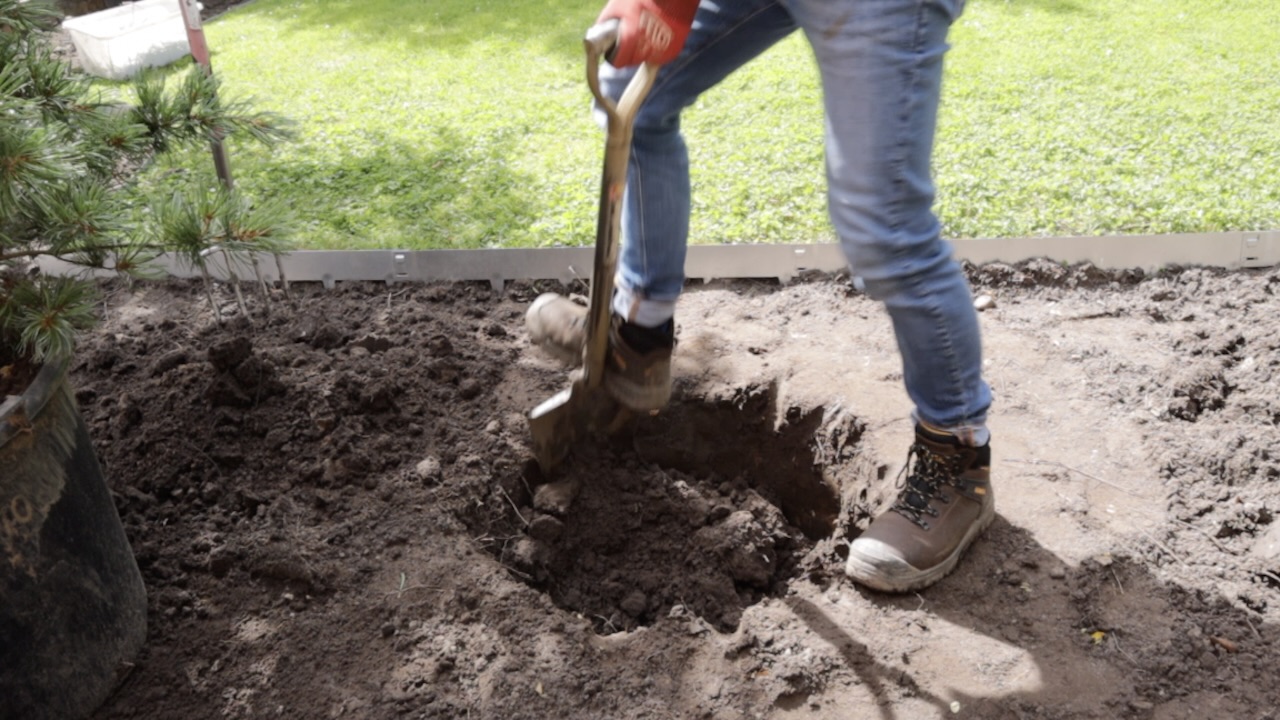
Step 2: Dig a hole 1.5 times the size of the original pot
Loosen the soil in the base and around the sides of the dug hole, and remove any debris. Work the ground so it is broken up and will allow water to drain freely. Crucially, do not dig too deep. The top of the root ball should sit level with the surrounding soil surface, not buried beneath it. On heavy clay soil, especially, planting too deep risks waterlogging the roots through winter.
Avoid adding compost or plant feed at this stage, as it will slow the tree’s rooting. If you need a natural root booster, you can add mycorrhizal fungi to the planting hole to help root development.
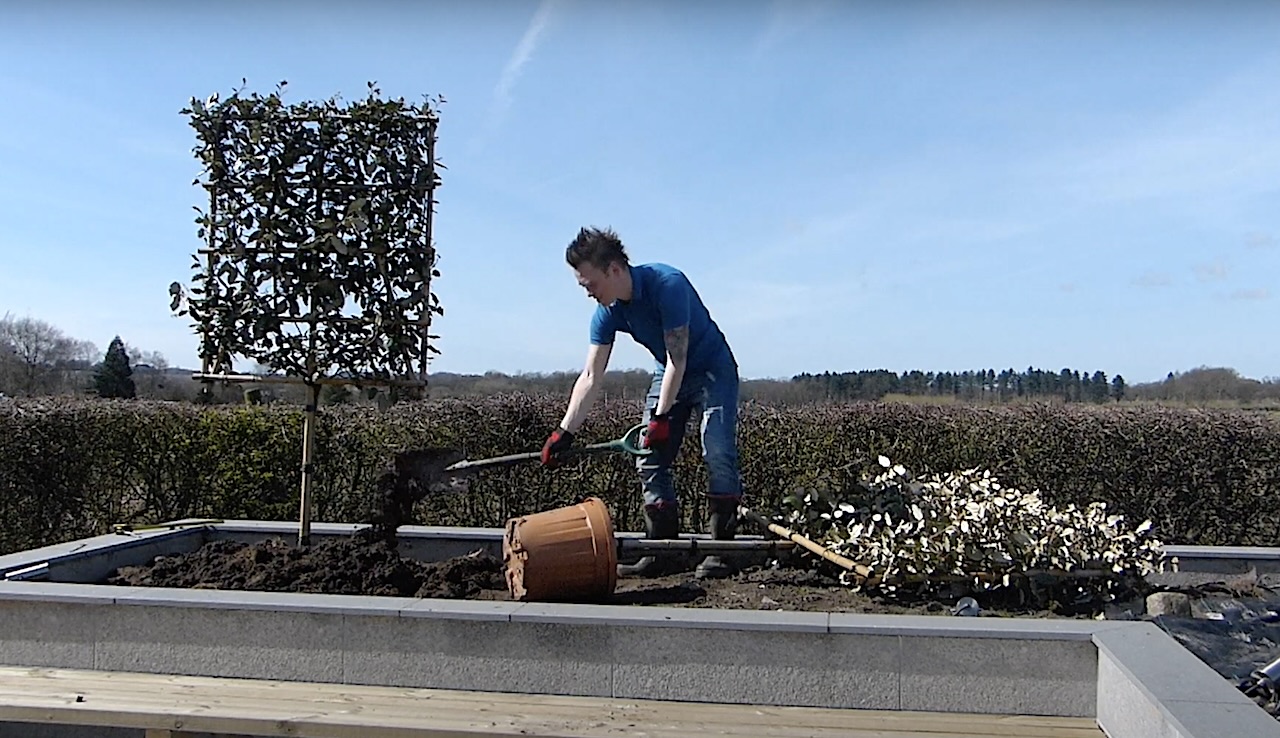
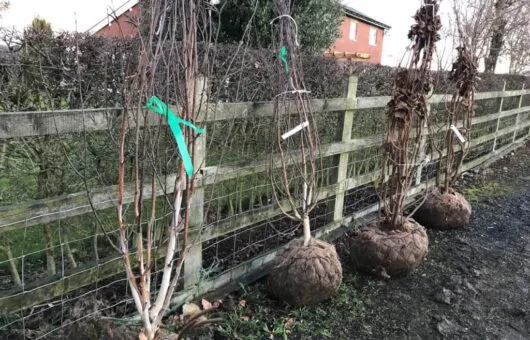
Step 3: Carefully remove the pleached tree from the pot
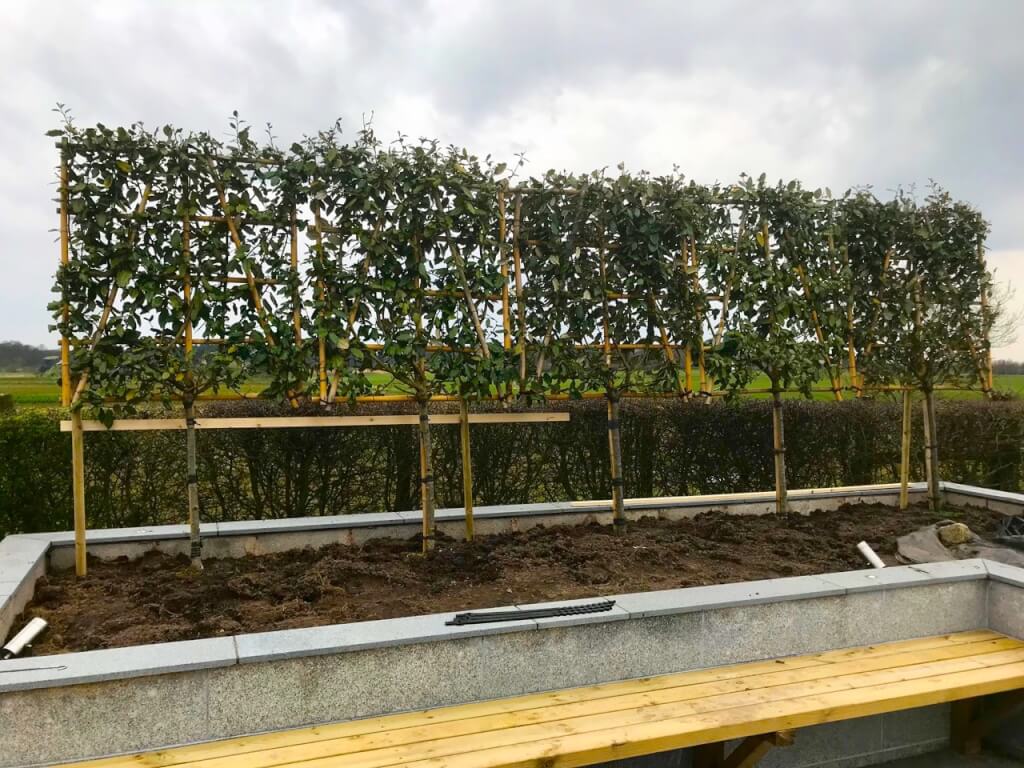
Carefully lean the pleached tree against the inside of the hole, ensuring the frame is not damaged and that the weight rests on the ground rather than on the canopy. If necessary, have a partner hold the canopy while you loosen the pot. Sometimes, pleached trees are braced and stapled into the pot, and the bracing needs to be removed first. The bamboo frame on the tree should be positioned on the outside of the stem, facing away from your supporting stakes.
Step 4: Position the tree in the hole, then stand back
Make adjustments by adding or removing soil until the tree is level and true. Keep standing back to make sure the top and sides of the frame are level with adjacent trees. It is much easier to correct any lean or tilt at this stage than after backfilling. Use a cane placed along the row as a sighting guide to check alignment before you commit.
Step 5: Backfill the planting hole
Backfill with the same soil you dug out. There is no need to add fertiliser or compost, as this will stunt initial root growth. The tree needs to send roots outward in search of nutrients, which is what anchors it over the next few years. Give the stem a gentle shake as you backfill to settle the soil around the roots and remove any air pockets. Air pockets left in the rootzone cause dry spots that kill roots.
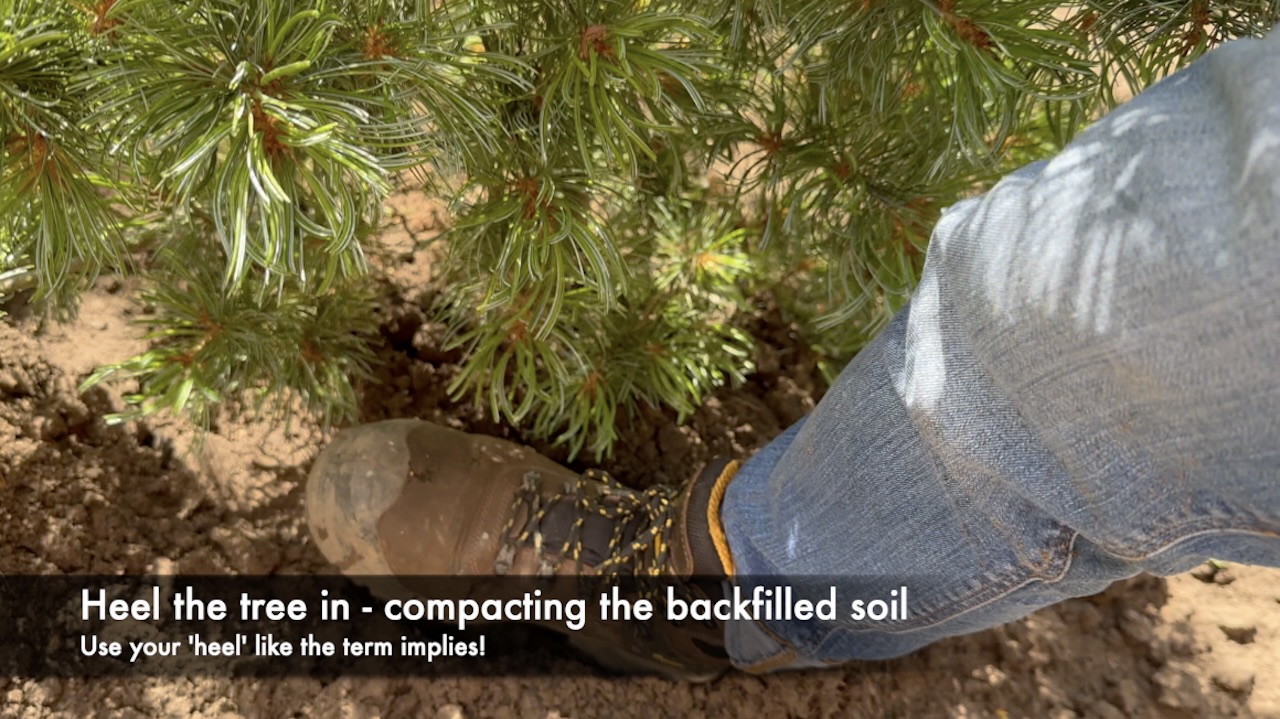
Step 6: Heel in the tree
Press down firmly around the base of the tree and the surrounding soil using your heel. This is known as heeling in. Heel towards the trunk, pushing inward from the surrounding soil. If you fail to backfill and compress properly, the tree will suffer from settlement, wind rock, or failure to establish its root system.
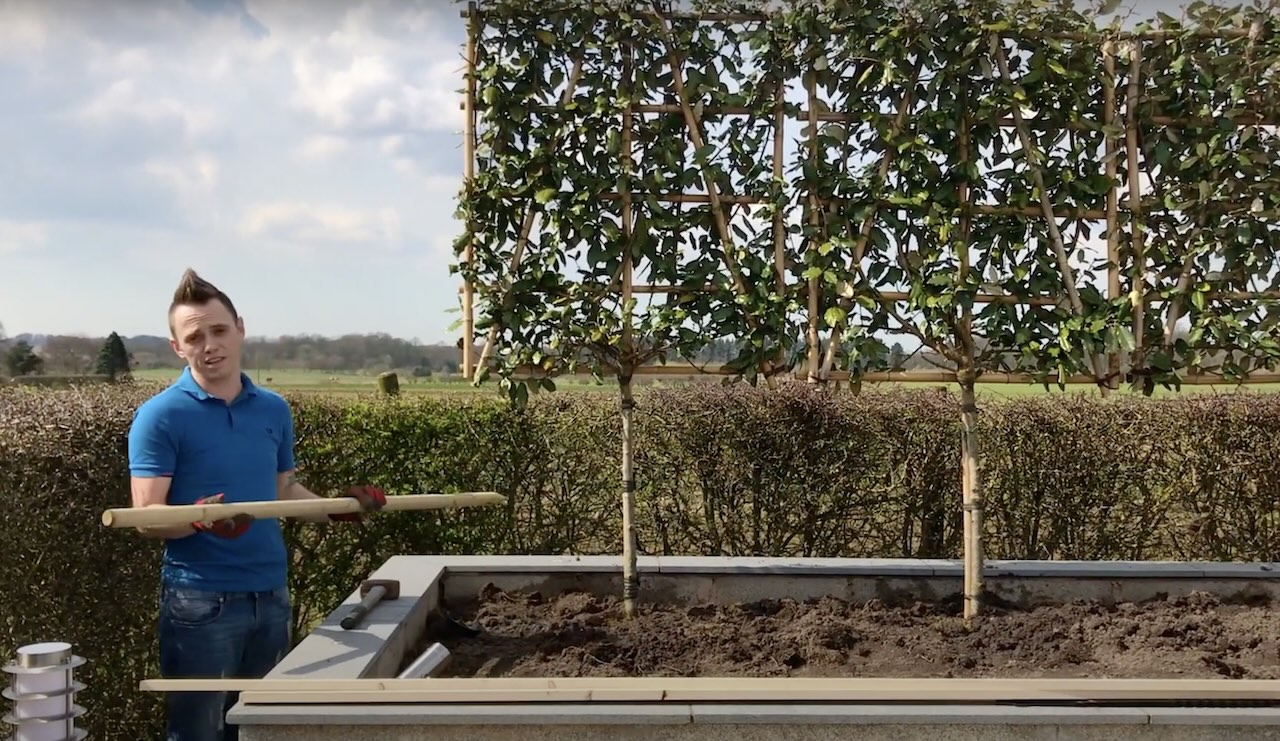
Step 7: Build a frame of supports for your pleached tree
See the section below for detailed instructions on how to brace and support your pleached trees.
6. How to support pleached trees
Creating a support framework for pleached trees is not optional. The large flat surface area of the trained canopy acts like a sail in the wind, meaning that without proper support, even a well-planted pleached tree can rock, lean, or uproot entirely in exposed conditions. Unlike standard trees, where stakes are removed after two or three years, pleached tree supports should be considered a permanent part of the installation.
By creating a solid frame, you ensure that the trees maintain their clean lines and remain stable as they establish themselves. The support framework also helps keep the frames of adjacent trees level with each other, which is what creates that crisp, professional appearance.
The best method I have found over the years is to use a combination of fence post stakes and pressure-treated timber batons. I try to design my frame with minimal visual impact and mirror the positions of the tree trunks so it does not distract from the beauty of the trees. The key is to ensure the support is solid and can hold the trees in their desired positions without flex.
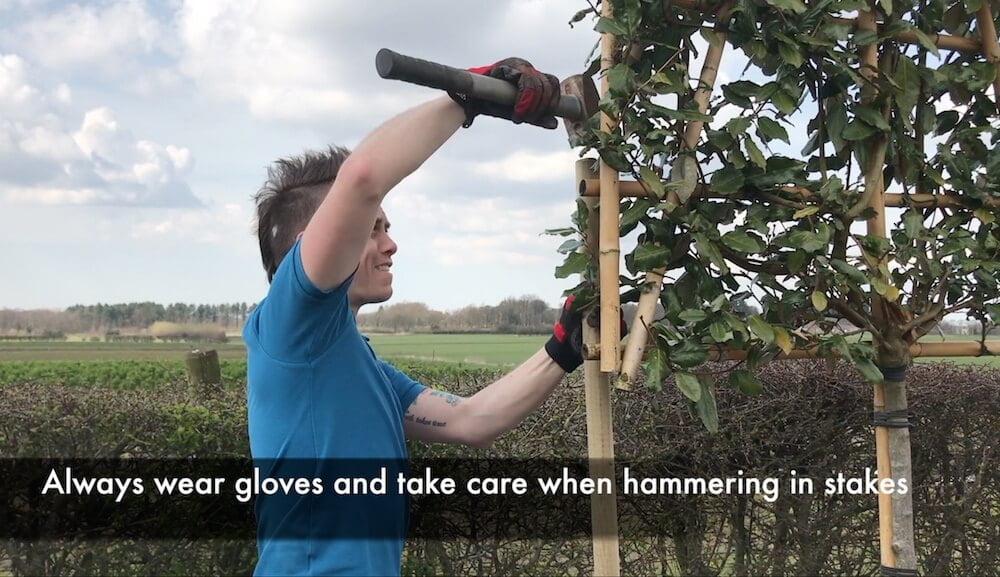
Step 1: Hammer in suitable tree stakes behind each pleached tree
Use 2.4m stakes, driven deep enough so they do not wobble or move easily. A lump hammer is sufficient for most soils; there is no need to concrete them in. Position one stake directly behind each tree, placed so it aligns with the trunk. Drive each stake in firmly before moving to the next, checking after each one that it is upright and in line.
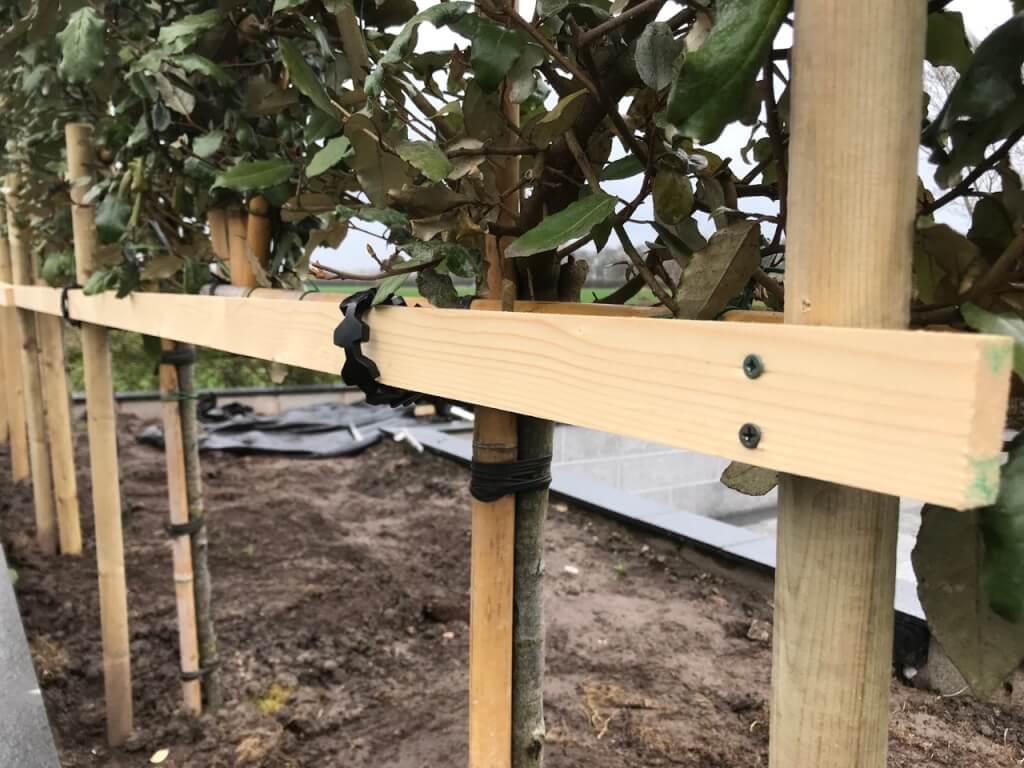
Step 2: Brace the stakes with pressure-treated outdoor timber
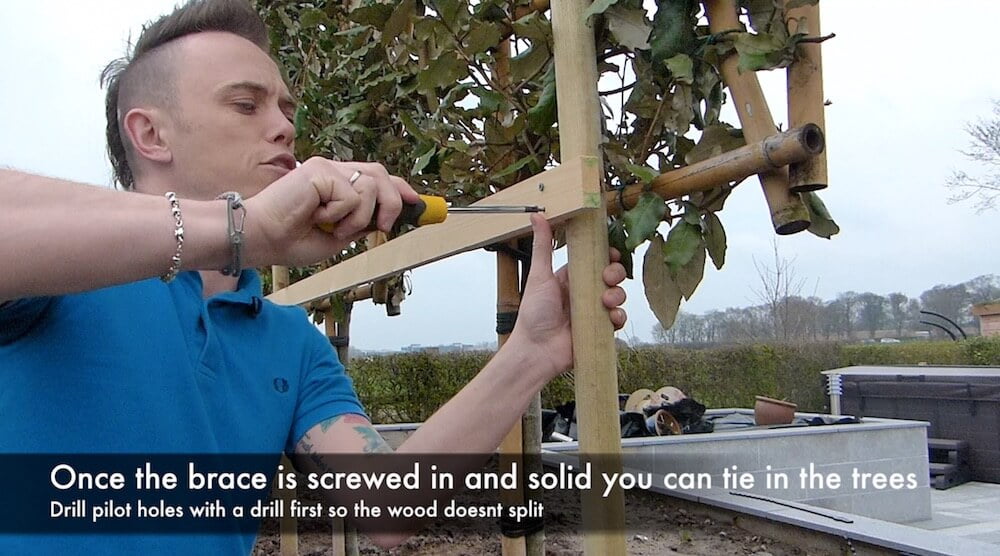
Brace the stakes horizontally using a piece of pressure-treated timber running behind all the trees. You will need a spirit level, a pencil, a drill, and suitable screws, such as decking screws. Position the horizontal brace just below the bottom of the tree frames to keep it as unobtrusive as possible. This brace holds all the stakes together as a single, unified structure, giving you a stable, level framework across the entire row.
Drill two pilot holes for the screws and attach the first end of the brace. Then use the spirit level to mark the correct height on the remaining posts, drilling pilot holes and screwing in each one in turn. By the end, you will have a perfectly horizontal brace running across the back of all your pleached trees.
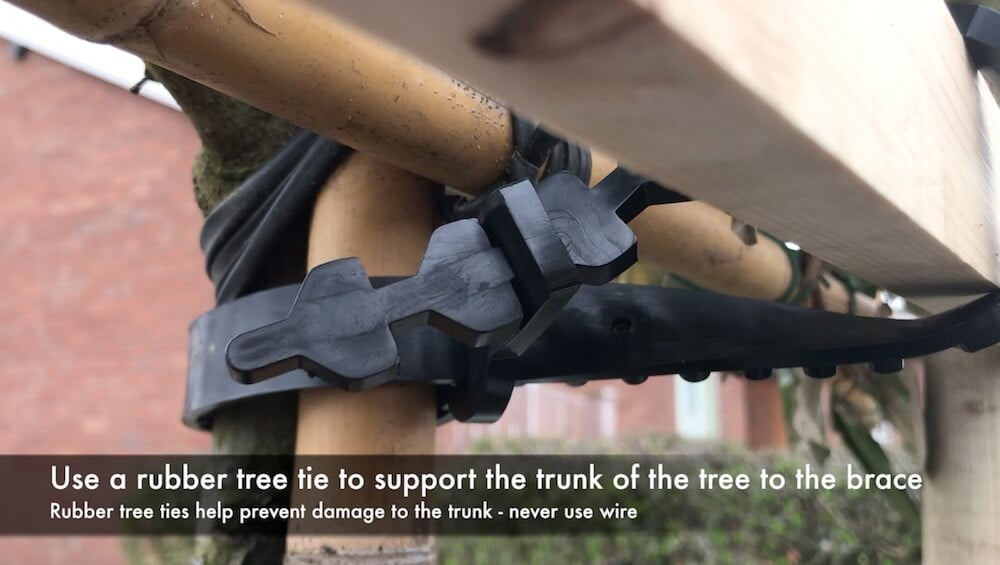
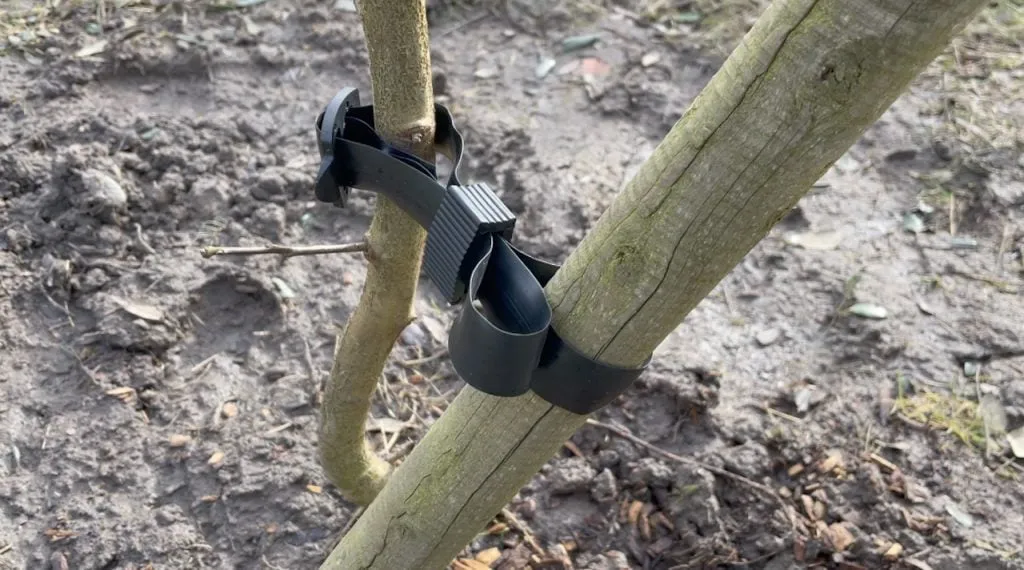
Now, here is the most important tip for any tree support work. You must use a rubber or flexible tree tie. If you use string, wire, or cable ties, you will damage the tree over time. Potentially killing it.
When you look closely at quality pleached trees, you will notice that the branches and supports are tied with rubber strips. This allows movement, flexibility, and growth without cutting into the tree. If a rigid tie cuts into the tree’s bark, it can irreparably damage the vascular system that transports water and nutrients, causing the tree to die from the point of the cut upward.
Why rubber tree ties are essential
Rubber tree ties allow the tree to move slightly in the wind, which is actually beneficial. A completely rigid tree cannot develop the necessary trunk strength through natural movement. Rubber ties also allow you to adjust them over time, loosening them as the tree grows and the trunk expands. You never want a tie that constricts the bark.
A standard rubber tree tie has two parts: a solid loop that goes around the stake or support, and a slotted length that wraps around the tree trunk, with an arrowhead fitting back through the slots. Tie it firmly enough to hold the tree in position, but not so tight that it is strangling the stem. Think of it like tying a formal tie around a shirt collar: snug enough to be neat, loose enough to breathe.
Getting the spacing and positioning sorted before you dig is absolutely critical. Get this wrong and you will either have gaps that never fill, trees competing for resources, or a row that looks misaligned when viewed from inside the house.
Tree to tree spacing should be 1.5m to 1.8m apart for most varieties with standard 120 to 150cm wide frames. If you have opted for larger 180 x 180cm frames, increase this to 1.8m to 2m spacing. The goal is for the canopies to just touch and interweave as they mature, creating a continuous screen without overcrowding. As a rule of thumb, match your tree spacing to the frame width.
Distance from boundaries matters more than you would think. Plant at least 40cm to 50cm away from fences or walls. This gives you access to trim the back of the trees and allows air circulation to prevent fungal issues. If you are planting against a building rather than a fence, increase this to a full metre minimum to protect foundations and allow maintenance access.
Underground considerations often get forgotten until you hit something expensive with your spade. Check for drains, service pipes and underground cables before digging. Ring before you dig if you are at all unsure about what is in the ground beneath you.
Sight lines and shadows deserve thought beyond simply wanting privacy. Walk around your garden at different times of day and consider where shadows will fall. Pleached trees create dappled shade beneath, which is lovely for seating areas, but a row of them along your south-facing boundary could significantly reduce light to a terrace or vegetable garden. Also consider sight lines from inside your house, as you want to screen what needs screening without blocking views you actually want to keep.
Flat or gently sloping ground is ideal for pleached trees in a row. On a pronounced slope, the frames and stems will no longer form a continuous visual line when viewed from the front. On gradual slopes this effect is manageable, but on anything steeper than about 10 to 12 degrees, you may need to step the planting positions to compensate.
9. Aftercare of pleached trees
Once you have tied and supported the pleached trees, give them a really thorough watering. For the first two growing seasons, water generously at least twice a week, more frequently if the weather is warm and dry. This is not the time to be cautious with the watering can. Establishment failure in pleached trees is almost always down to insufficient water in the first summer after planting.
Keep checking the trees for any initial movement and tweak the ties if necessary. A gentle tug on each tree every few weeks during the first autumn will tell you quickly whether the root system is establishing. Newly planted trees should feel increasingly firm over the first season.
In spring, apply a mulch of well-rotted compost or bark around the base of each tree, keeping it clear of the trunk itself. This retains soil moisture, suppresses weeds, and gradually improves the soil structure as it breaks down. Avoid piling mulch up against the stem, as this can cause bark to rot.
With most pleached trees, you will need to prune them twice a year, usually in early spring and then late autumn when they are dormant. As a rule of thumb, trim off any shoots that grow past the frame, and tie in new growth to cover any gaps. Any shoots that emerge lower down the clear stem should be removed promptly with secateurs to maintain the clean trunk line.
10. How and when to prune pleached trees
Pruning pleached trees is essential to maintain their shape and encourage healthy, dense growth. Think of it just like pruning a formal hedge. Prune at least twice a year, in early spring before birds start nesting and again in autumn. If the season is particularly vigorous, a third lighter trim in summer can help keep things tidy.
i) Timing for pleached tree clipping
Prune pleached trees during early spring before the birds nest (typically February to March for most of the UK), and then again in autumn once the main growing season has ended. This keeps them neat throughout the year. Avoid pruning during periods of active growth in hot, dry weather, as this can increase stress and disease risk in the canopy.
ii) Tools for pruning
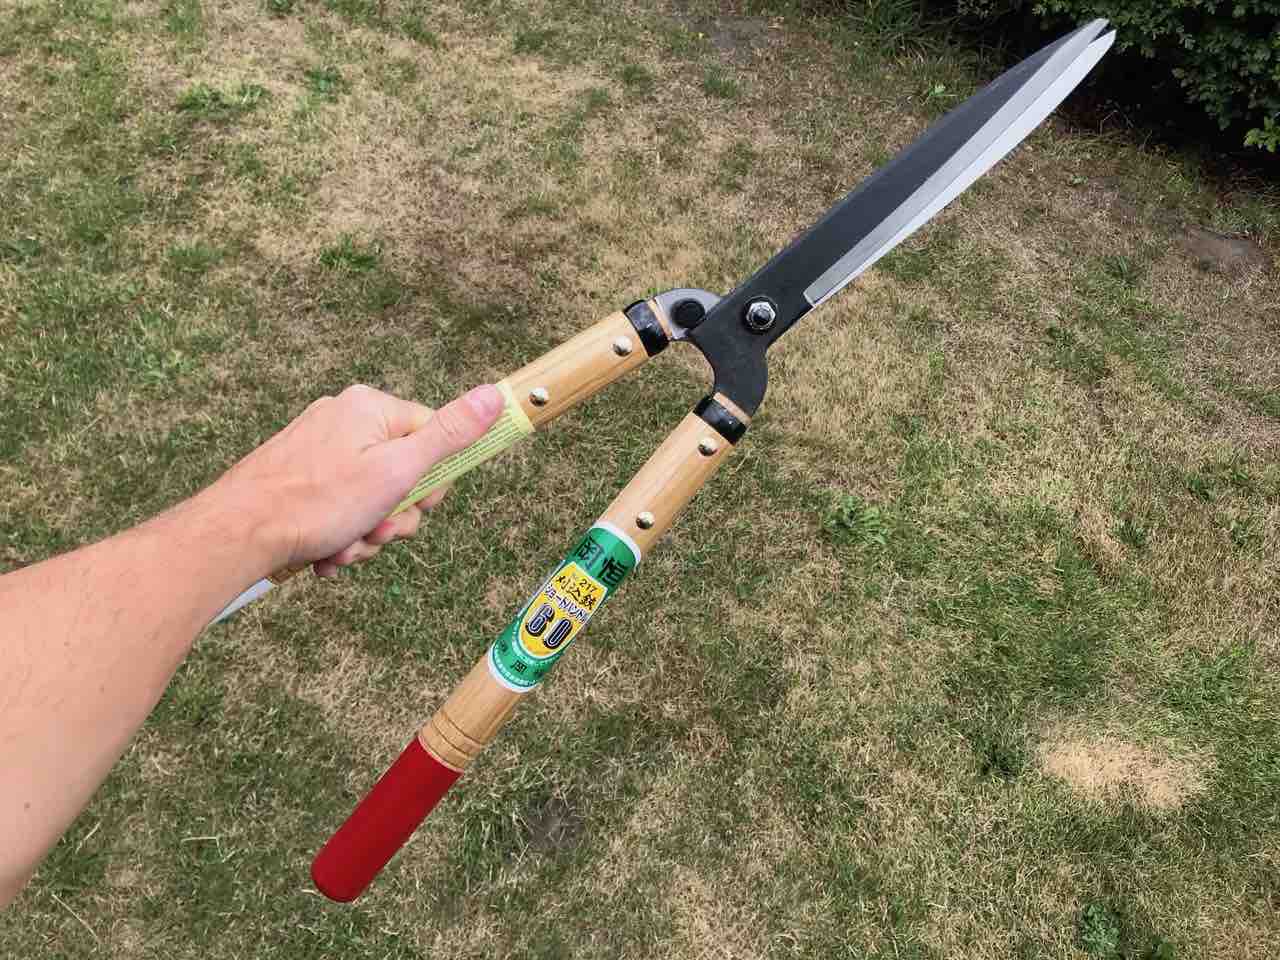
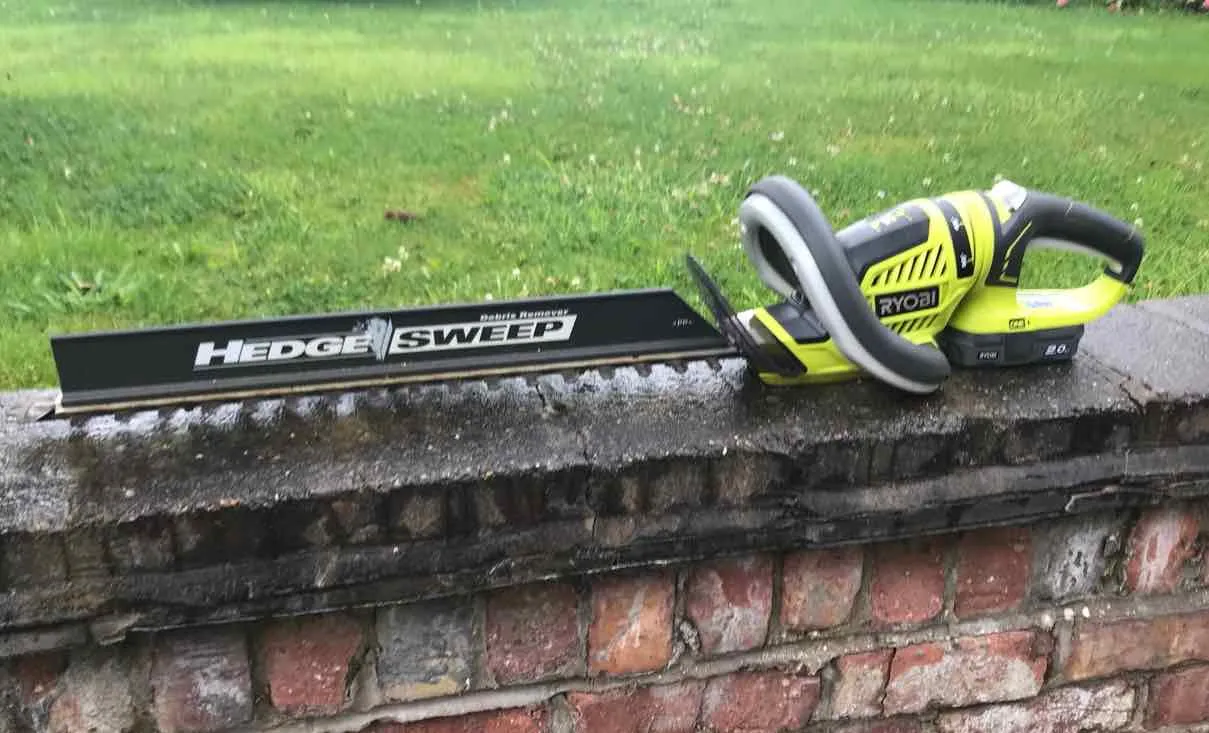
Use sharp, clean pruning tools such as secateurs for individual shoots and stems, hedge shears or a hedge trimmer for the flat faces of the canopy. Always sterilise tools between cuts when pruning multiple trees, to prevent the spread of diseases. A simple wipe with a garden disinfectant spray is sufficient and takes seconds.
Start by removing any dead, damaged, or diseased branches, cutting back to healthy tissue or the nearest lateral branch. Thin out overcrowded or crossing branches to improve air circulation and light penetration throughout the canopy. This helps prevent disease and encourages even, bushy growth across the frame.
Trim back all new growth to maintain the shape and size of the pleached frame, focusing particularly on removing any vertical shoots that disrupt the horizontal structure. These upright water shoots are vigorous and, if left unchecked, will quickly destroy the flat, formal plane that makes pleached trees so distinctive. Lightly trim the sides and top to keep the frame square and encourage lateral branching into any thin or gappy areas.
Regularly inspect pleached trees throughout the growing season for any signs of damage, disease, or unwanted growth. Use your secateurs to remove any stems that emerge from the clear trunk below the frame, as these will divert energy from the canopy and break the clean lines of the trunk if left to develop.
11. Advantages of pleached trees
Space saving: Pleached trees are ideal for small gardens or urban landscapes where space is limited. Their narrow, vertical growth habit allows them to provide height and structure without encroaching on valuable ground space.
Privacy and screening: When planted in rows along property boundaries or around outdoor living areas, pleached trees form a dense, leafy barrier that offers privacy from neighbouring properties or unsightly views above existing fence lines.
Architectural interest: The carefully trained form of pleached trees creates a striking visual impact, adding a sense of formality and sophistication to garden designs. The precise lines and geometric shapes complement both modern and traditional architectural styles.
Seasonal interest: Pleached trees can offer year-round interest depending on the species selected. Some varieties feature attractive foliage that changes colour with the seasons, while others produce showy flowers or ornamental fruit. Additionally, the sculptural silhouette of bare branches in winter adds structure to the garden during the colder months.
Versatility: Pleached trees can be used in various ways: formal hedges, allées, focal points, or to define outdoor spaces and frame views within the landscape.
12. Drawbacks of pleached trees
Maintenance: Pleached trees require regular pruning to achieve and maintain their desired form. Without proper upkeep, they quickly lose their architectural shape and become overgrown and untidy.
Cost: The initial cost of purchasing pleached trees, especially larger specimens, can be significant. Professional pruning services add ongoing expense if you lack the time or skills to maintain them.
Limited species selection: Not all tree species are suitable for pleaching, and the selection may be somewhat limited depending on your climate, soil type, and desired aesthetic.
Establishment period: Newly planted pleached trees may appear sparse during the first season or two. Proper bracing as detailed above is essential during this period.
Limited horizontal shade: While pleached trees excel at providing vertical interest and screening, they do not offer as much canopy coverage or shade as untrained trees with a natural growth habit.
13. Common problems with pleached trees
Sometimes, no matter how diligent you are, your pleached trees may suffer from pests, diseases, or environmental stress. Most problems, if caught quickly, can be rectified.
A) Pleached tree pests
Aphids: These small insects feed on sap, causing leaves to curl and distort. Treat with insecticidal soap or horticultural oil. Natural predators like ladybirds are your best long-term ally.
Scale insects: Scale insects infest branches and leaves, sucking sap and causing yellowing or wilting. Apply insecticidal oil or systemic insecticides in spring.
Caterpillars: Caterpillars may chew on leaves, leading to defoliation. Handpick when feasible or use Bacillus thuringiensis (Bt) insecticide as a targeted biological control.
B) Pleached tree diseases
Powdery mildew: Appears as a white, powdery coating on leaves and stems, particularly in congested, poorly ventilated canopies. Improve air circulation by thinning the canopy, and apply fungicidal sprays containing sulphur or potassium bicarbonate.
Leaf spot: Dark spots or lesions on leaves indicate a fungal leaf spot disease. Prune and dispose of infected foliage and apply fungicidal sprays if necessary. Never compost diseased material, as this risks spreading the problem through your garden.
Anthracnose: Anthracnose can cause dieback and leaf blight, particularly in wet springs. Prune affected branches and improve air circulation to reduce humidity within the canopy.
C) Planting or environmental stress
Drought stress: Water trees adequately during dry periods to prevent drought stress, particularly in the first two years after planting. Apply mulch around the base of the trees to retain soil moisture.
Frost damage: Protect pleached trees from late frost damage by covering with horticultural fleece during cold snaps. French lavender and photinia are more vulnerable to severe frost than hornbeam or beech.
Root compaction: Avoid compacting the soil around pleached trees as this restricts root growth and can lead to nutrient deficiencies. Use mulch and avoid heavy foot traffic around the root zone.
Wind rock or root lift: Usually occurs when a tree has not been heeled in or braced correctly. Reheel and provide additional support if the tree becomes unrooted. Act promptly, as a rocking tree cannot establish new roots effectively.
D) Nutrient deficiencies
Nitrogen deficiency: Symptoms include yellowing leaves and stunted growth. Apply a balanced fertiliser containing nitrogen in spring to correct deficiencies. The best organic option is comfrey tea, which provides a balanced feed without the risk of over-fertilising that can come with synthetic products. See my guide to making comfrey tea for a free, effective feed.
Iron deficiency (chlorosis): Leaves may turn yellow or pale due to iron deficiency, often on very alkaline soils. Treat with iron chelate or iron sulphate, applied as a foliar spray or soil drench.
14. Frequently asked questions about pleached trees
How long does it take for pleached trees to form a screen?
If you purchase pre-pleached trees from a nursery, the canopies will merge into a continuous screen within one to two growing seasons with proper care. If you are training young trees yourself from scratch, expect four to five years before achieving the full pleached hedge effect. Fast-growing species like lime can establish quicker, whilst slower growers like hornbeam take longer but create denser, longer-lasting screens.
Can I keep pleached trees in large pots permanently?
Whilst possible, keeping pleached trees in containers long-term requires significant commitment. You will need substantial pots (minimum 80 to 100 litres), excellent drainage, regular feeding during the growing season, and diligent watering in summer. The trees will also need repotting every three to four years and will not achieve the same vigour or size as ground-planted specimens. For temporary situations such as rental properties, pots work well, but for permanent screening, plant them in the ground.
Do pleached trees need support stakes forever?
The support posts and horizontal bracing rails should remain in place permanently, unlike standard tree stakes that are removed after a few years. Pleached trees have restricted root systems due to their controlled growth, and the elevated canopy creates significant wind resistance. The support framework prevents wind rock, keeps the trees aligned, and maintains their uniform appearance. Think of the supports as part of the structure, not temporary props.
What happens if I want to remove the bamboo frame?
Most commercial pleached trees come with bamboo cane frames that guide the initial shape. These can theoretically be removed once the branches have become woody and self-supporting, typically after three to five years in the ground. However, many gardeners choose to leave them in place indefinitely as they provide continued support and make pruning to shape easier. Over time, the frames become barely noticeable behind the foliage.
How much maintenance time do pleached trees actually require?
Realistically, plan for two pruning sessions per year: one in late winter when the structure is clearly visible (for deciduous varieties) and one in late summer to control vigorous growth. For a row of ten trees, each session takes roughly half a day to a full day, depending on your experience and the trees’ vigour. Add watering time during establishment and occasional feeding, and you are looking at three to four full days of work per year. It is not negligible, but it is manageable for most keen gardeners.
Can I pleach existing trees in my garden?
Technically, yes, but results vary wildly. You need young, pliable trees (ideally under five years old) with straight trunks and flexible branches. Older established trees have woody branches that resist training and can snap. If you are determined to try, start with species known for flexibility like hornbeam, beech, or lime. Set up a proper framework, train gradually over several years, and accept that results will not match commercially-pleached specimens. For most gardeners, buying pre-pleached trees delivers far better results with far less frustration.
Your subscription could not be saved. Please try again.
Your subscription has been successful.
Design the Garden You’ve Always Wanted
Ready to stop guessing and start designing with confidence? My Garden Design for Beginners online course takes you from blank canvas to brilliant layout, step by step.
I’m Lee Burkhill, award-winning garden designer and BBC1’s Garden Rescue presenter, and I’ve built this course around the same principles I use for every client garden — practical, honest, and designed to actually work in the real world.
In 20 hours of flexible online study you’ll cover:
Design principles that make any garden work
How to select and arrange plants like a professional
Styles and layouts to suit every size and shape of space
Video lessons, real-world case studies, quizzes, and a certificate on completion — all for just £199.
Enrol today and start designing your dream garden.
29
Garden Design Examples for Small Gardens: 30 Design Templates & Planting Plans
Garden Design Examples for Small Gardens: 30 Design Templates & Planting Plans: In this online gardening course, I’ll walk you through 30 fantastic garden designs, explaining the logic behind the layout, the plant choices, and take-home tips for applying them in your own garden.
Weekend Garden Makeover: A Crash Course in Design for Beginners
Learn how to transform and design your own garden with Lee Burkhills crash course in garden design. Over 5 hours Lee will teach you how to design your own dream garden. Featuring practical design examples, planting ideas and video guides. Learn how to design your garden in one weekend!
Garden Design for Beginners: Create Your Dream Garden in Just 4 Weeks
Garden Design for Beginners Online Course: If you want to make the career jump to becoming a garden designer or to learn how to design your own garden, this is the beginner course for you. Join me, Lee Burkhill, an award-winning garden designer, as I train you in the art of beautiful garden design.
Pleached trees are one of the most effective tools in the garden designer’s toolkit for small or urban gardens where ground space is precious. Their vertical, narrow footprint delivers maximum screening above fence height without sacrificing what lies beneath. Get the planting, spacing, and support framework right from the start, use proper rubber tree ties, water generously in the first two years, and prune twice yearly to keep that crisp, formal structure intact. Do those things consistently and pleached trees will reward you with one of the most sophisticated, architecturally striking screens you can achieve in a UK garden.
Your subscription could not be saved. Please try again.
Your subscription has been successful.
Lee Burkhill
Lee Burkhill, known as the Garden Ninja, is an award-winning garden designer and horticulturist with over 30 years of gardening experience and 15 years as a professional garden designer. A qualified RHS (Royal Horticultural Society) professional, Lee specialises in sustainable garden design and practical horticultural advice. He designs and presents on BBC1’s Garden Rescue and in leading gardening publications. Lee combines three decades of hands-on gardening knowledge with professional design qualifications to help gardeners create beautiful, functional outdoor spaces.
We are buying 6 pleached beach trees for screening cover in our garden. We have our house on the market at present to sell. So we will be putting them for now into large pots. What will be the best way of securing /staking them until we move?
Hi Robert, Great to hear from you. I would still stake them with a brace of some description or they will blow over. If you can fix this brace to a fence or wall that would be best if you’re then going to move them again. Failing that I’ve used elasticated strapping (the ones with hooks on the end) to keep them tied to a fence before I’ve moved them. Hope that helps! Happy Gardening.
Hi there, we are thinking of getting some pleached trees for our back garden as it is very overlooked by our neighbors. I think we will need about 12.
Please can you advise how far out from a fence pleached trees should be planted? Thank you
Hi Christine. Great to hear from you. I’d always advise that a foot or 50cm is about right. This means you can trim the back and there’s some airflow. Too close and you can’t clip and you may end up with issues as airflow helps keep plants healthy. If they’re too crammed things like fungus or pests can take over for example. Hope that helps!
My pleache’d trees have been in the ground three years now and have good growth but at what point ,if any, do I loosen or remove the trunk ties for the supporting canes?
Hi
We are looking at 6 pleached evergreen for privacy at the side where we border neighbours but the wind can be quite strong as it whips between the houses. 1.8m stem and 1m frame can you please advise which would be most suitable.
Thank you
Hello,
We have removed 2 large llalandii from our back garden and now need to replant with something to hide the overlook from neighbours. I love the look of pleached trees but with the previous stumps we can’t plant new trees closer than 2m, preventing the pleached frame from meeting and leaving a gap. Will the pleached trees ever grow across the gap or is it better to plant a traditional tree instead and just wait for it grow tall enough?
Thanks
Hi – I’m considering using pleached trees in my front garden to screen people looking into our house. I have a 4.4m fence that the trees would screen above, so don’t know if I’d need 3 or 4 trees. What would you advise? The trees I’ve seen have 1.2m screens, so how close do you plant them to each other? Is it OK to overlap them? And how far do the grow sideways? Or is the idea to always keep them the same width as the screen? Great advice about framing them too – I will definitely do this!
Hi Michelle, The best way you can help plants and trees grow strong is by using a decent compost mulch placed directly on the soil. I have an article on that here. Hope that helps. Lee https://www.gardenninja.co.uk/mulching-your-garden/
Hi
We’ve moved into a new house and the developer planted red robin pleached trees but some have died is there any way I can encourage some branches to go across further to the next wooden support. As I think then I’d only need to replace two
Hi Alison, Great to hear from you. To encourage bushy lateral growth you pruning back to the next stet of buds this will encourage more bushy growth. There’s no easy way to make a stem or branch grow longer without some skill and patience. Cutting back to the next set of buds is the easiest way to encourage further growth. Checkout my pruning guide series on Youtube here.Happy Gardening. Lee https://www.youtube.com/playlist?list=PL7HK5RsLCR9crgatYb4LcwE34Om3cKsIO
Hi Katy, Thanks for your comment on pleached trees. If you’re planting root balls you need to make sure that your planting hornbeam standards and not hedging plants. A standard has one main stem. It’s then a case of over years training each shoot at the top into a frame that you would need to build. In all honesty, it would be quicker to buy the pleached trees already established as it is a real skill to achieve. All the best. Lee
Hi Lee
I’d like a pleached hedge but the plants are very expensive. I’ve found some nice pleached apple tress which are about 5 foot high. Will they grow taller over time, or stay the same height.
Thanks for advice. Iris
Hi Iris, It depends on the rootstock. In my experience they won’t grow too vigorously, obviously, it depends on the rootstock they are grafted onto. They are probably pleached more for produce than height or vigour. Happy Gardening. Lee
I’d love to plant some pleached hornbeam or crabapple trees along my back fence. Sadly I don’t have the budget to buy mature pleached trees. Can I buy young trees and train them once they’re in position or do they need to be grafted on smaller rooting stock?
Hi Phillipa, Most pleached trees are grafts to speed up the framing of the pleached tree. Training can take considerable time but if you pick a fast growing tree like beech it can be made simpler! Hope that helps. Happy pleaching. Lee
Hi, we have built a raised bed (2.3m long, 50cm deep and 60cm high) infront of an oil tank which faces lengthways towards our patio. Behind the oil tank there is our side path and then a fence separating us from our neighbours. Unfortunately our neighbours have a bedroom window which looks directly down onto our patio (over the top pf the tank). Given that there is an entrance door into our house by the oil tank, I thought adding pleached trees into the raised bed would be neat and effective for screening. However I am wondering if it is too small an area? The height we need to achieve is 2.7m max. Any larger than that and we will be coming into our bedroom! I have thought of a tree but don’t want one that will cover the path into our door (infront of the raised bed), or interfere with the porch over the door.
If you think pleached would work in that space, can you make any suggestions on which type of pleached trees would suit that size please?
Many thanks 🙂
I have planted some new cherry laurel pleached trees this month (November) and apart from mulching, is there anything I should do to protect the branches from hard frosts or snow?
Hi Lee, This is such a fantastic guide, it’s so useful to have both the video and the step-by-step instructions. Thank you so much for sharing! It’s really great. xx


We are buying 6 pleached beach trees for screening cover in our garden. We have our house on the market at present to sell. So we will be putting them for now into large pots. What will be the best way of securing /staking them until we move?
Hi Robert, Great to hear from you. I would still stake them with a brace of some description or they will blow over. If you can fix this brace to a fence or wall that would be best if you’re then going to move them again. Failing that I’ve used elasticated strapping (the ones with hooks on the end) to keep them tied to a fence before I’ve moved them. Hope that helps! Happy Gardening.
Hi there, we are thinking of getting some pleached trees for our back garden as it is very overlooked by our neighbors. I think we will need about 12.
Please can you advise how far out from a fence pleached trees should be planted? Thank you
Hi Christine. Great to hear from you. I’d always advise that a foot or 50cm is about right. This means you can trim the back and there’s some airflow. Too close and you can’t clip and you may end up with issues as airflow helps keep plants healthy. If they’re too crammed things like fungus or pests can take over for example. Hope that helps!
Hi,
My pleache’d trees have been in the ground three years now and have good growth but at what point ,if any, do I loosen or remove the trunk ties for the supporting canes?
Hi
We are looking at 6 pleached evergreen for privacy at the side where we border neighbours but the wind can be quite strong as it whips between the houses. 1.8m stem and 1m frame can you please advise which would be most suitable.
Thank you
Hello,
We have removed 2 large llalandii from our back garden and now need to replant with something to hide the overlook from neighbours. I love the look of pleached trees but with the previous stumps we can’t plant new trees closer than 2m, preventing the pleached frame from meeting and leaving a gap. Will the pleached trees ever grow across the gap or is it better to plant a traditional tree instead and just wait for it grow tall enough?
Thanks
Hi – I’m considering using pleached trees in my front garden to screen people looking into our house. I have a 4.4m fence that the trees would screen above, so don’t know if I’d need 3 or 4 trees. What would you advise? The trees I’ve seen have 1.2m screens, so how close do you plant them to each other? Is it OK to overlap them? And how far do the grow sideways? Or is the idea to always keep them the same width as the screen? Great advice about framing them too – I will definitely do this!
Hi
Would you use an electric or battery operated hedge trimmer to prune pleached trees or prune by hand using shears?
Is there plant food I can buy to help growth?
Hi Michelle, The best way you can help plants and trees grow strong is by using a decent compost mulch placed directly on the soil. I have an article on that here. Hope that helps. Lee https://www.gardenninja.co.uk/mulching-your-garden/
Hi
We’ve moved into a new house and the developer planted red robin pleached trees but some have died is there any way I can encourage some branches to go across further to the next wooden support. As I think then I’d only need to replace two
Hi Alison, Great to hear from you. To encourage bushy lateral growth you pruning back to the next stet of buds this will encourage more bushy growth. There’s no easy way to make a stem or branch grow longer without some skill and patience. Cutting back to the next set of buds is the easiest way to encourage further growth. Checkout my pruning guide series on Youtube here.Happy Gardening. Lee https://www.youtube.com/playlist?list=PL7HK5RsLCR9crgatYb4LcwE34Om3cKsIO
I am planting hornbeam footballs and want them to grow into a pleached hedge. Any tips.
Hi Katy, Thanks for your comment on pleached trees. If you’re planting root balls you need to make sure that your planting hornbeam standards and not hedging plants. A standard has one main stem. It’s then a case of over years training each shoot at the top into a frame that you would need to build. In all honesty, it would be quicker to buy the pleached trees already established as it is a real skill to achieve. All the best. Lee
Hi Lee
I’d like a pleached hedge but the plants are very expensive. I’ve found some nice pleached apple tress which are about 5 foot high. Will they grow taller over time, or stay the same height.
Thanks for advice. Iris
Hi Iris, It depends on the rootstock. In my experience they won’t grow too vigorously, obviously, it depends on the rootstock they are grafted onto. They are probably pleached more for produce than height or vigour. Happy Gardening. Lee
I’d love to plant some pleached hornbeam or crabapple trees along my back fence. Sadly I don’t have the budget to buy mature pleached trees. Can I buy young trees and train them once they’re in position or do they need to be grafted on smaller rooting stock?
Hi Phillipa, Most pleached trees are grafts to speed up the framing of the pleached tree. Training can take considerable time but if you pick a fast growing tree like beech it can be made simpler! Hope that helps. Happy pleaching. Lee
Hi, we have built a raised bed (2.3m long, 50cm deep and 60cm high) infront of an oil tank which faces lengthways towards our patio. Behind the oil tank there is our side path and then a fence separating us from our neighbours. Unfortunately our neighbours have a bedroom window which looks directly down onto our patio (over the top pf the tank). Given that there is an entrance door into our house by the oil tank, I thought adding pleached trees into the raised bed would be neat and effective for screening. However I am wondering if it is too small an area? The height we need to achieve is 2.7m max. Any larger than that and we will be coming into our bedroom! I have thought of a tree but don’t want one that will cover the path into our door (infront of the raised bed), or interfere with the porch over the door.
If you think pleached would work in that space, can you make any suggestions on which type of pleached trees would suit that size please?
Many thanks 🙂
I have planted some new cherry laurel pleached trees this month (November) and apart from mulching, is there anything I should do to protect the branches from hard frosts or snow?
Hi Lee, This is such a fantastic guide, it’s so useful to have both the video and the step-by-step instructions. Thank you so much for sharing! It’s really great. xx
Thanks Rachel I’m glad my tree guides are so useful! Happy Gardening. Lee