Lee Burkhill: Award Winning Designer & BBC 1's Garden Rescue Presenters Official Blog
Intermediate level
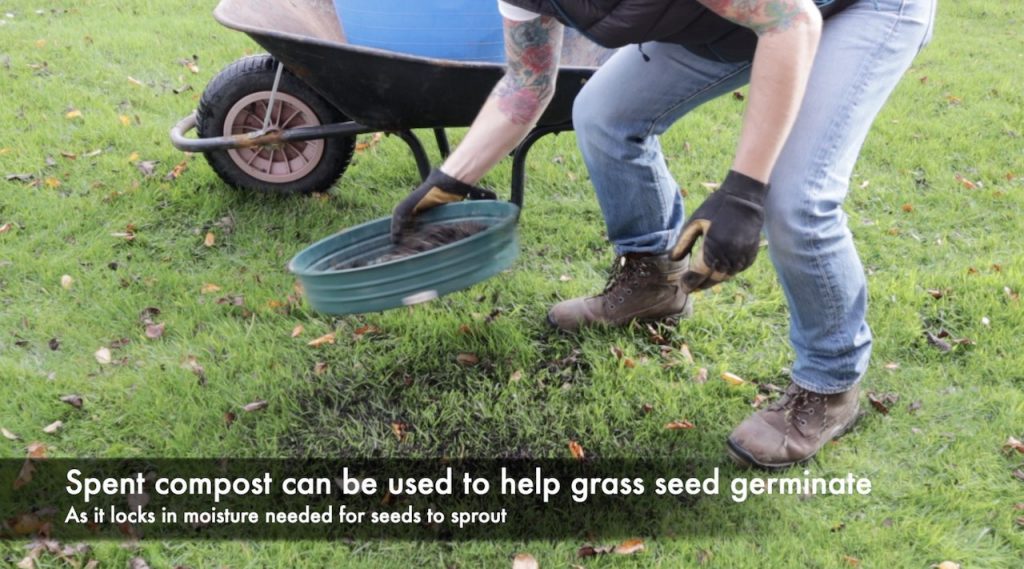
Scarifying your lawn can help bring back a lawn from the brink of death and used as a yearly lawn maintenance tool can keep your lawn looking immaculate. Whilst many people know you need to mow a lawn only a select few seem to know that you also need to scarify lawns too. This guide is going to show you how you can keep your lawn looking amazing all year round or fix a poor lawn with scarification.
Quick Answer
Scarify your lawn in early autumn (September to October) once the grass is growing well but weed pressure is falling. Mow short first, set blades 2 to 3mm into the soil, make two passes at 45 degrees to each other, then overseed immediately at 15 to 35 grams per square metre and water in. Your lawn will look alarming for two weeks and recover fully in four to six weeks.
Scarification of a lawn is often used to revitalise and keep it in check. Scarification involves using a machine, a bit like a lawnmower but much sharper, with a rotating set of blades that slice down into the topsoil. This helps cut the grass rhizomes, drag out debris, and furrow the soil.
Think of scarification as a yearly or biannual step in lawn maintenance to reduce the buildup of thatch and dead grass and keep your lawn in top form. Watch my popular guide on how to easily scarify your lawn, and read on for more details about each step in the lawn scarification process.
This page contains affiliate links for products I use and love. If you take action (i.e., subscribe or make a purchase) after clicking a link, I may earn a gardening commission, which helps me keep the Garden Ninja Blog free for all.
What is lawn scarification?
Lawn scarification is the process of removing old moss, thatch and debris from a lawn. Scarification cuts through the rhizomes of your grass/turf to encourage rich, fresh new growth. Scarification can renovate even the most threadbare and patchy of lawns.
Encouraging vigorous grass growth as it severs rhizomes, causing the grass to send out new shoots
Reduce compaction and encourage drainage
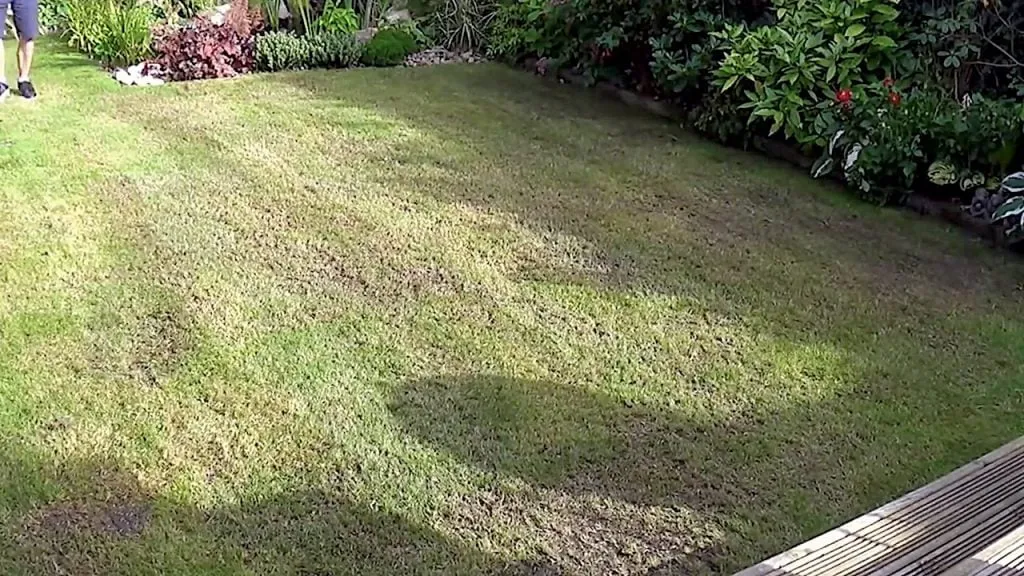
A freshly scarified lawn above can be seen, a mix of short green grass, bare patches, overseeded patches, and a general tapestry of nice and not-so-nice, but trust me, it will all bounce back better than before!
How do I know if my lawn needs scarifying?
Before you commit to scarifying, it is worth checking whether your lawn actually needs it. Not every lawn does, and scarifying a lawn that does not have a significant thatch problem is unnecessary effort. The simplest test is to push a pencil or your finger into the turf at soil level. If you hit spongy resistance before you reach firm soil, you have a thatch layer worth addressing. If you can push straight through to firm ground without that springy cushion, your thatch is at a manageable level.
For a more precise check, use a trowel or bulb planter to extract a small cross-section of turf going at least 5cm deep. The thatch layer is the brown, matted zone between the soil surface and the base of the living green grass blades. A thatch layer of about 6mm or less is beneficial and should be left alone. Once thatch exceeds 13mm, it can cause drainage problems, disease, and moss invasion. At that point, scarifying is genuinely worthwhile.
🌿 Does My Lawn Need Scarifying? At A Glance
Symptom
What it means
Spongy, bouncy feel underfoot
Thatch layer has built up. Scarify this season.
Moss spreading year on year
Poor drainage and thatch favour moss. Scarify and aerate.
Water pooling after rain
Thatch and compaction blocking drainage. Scarify then hollow-tine aerate.
Lawn looks dull despite feeding
Thatch is blocking fertiliser from reaching the roots. Scarify before next feed.
Brown matted layer visible at base of grass
Thatch over 13mm. Scarify in autumn for best recovery.
Lawn not recovered well after summer
Annual autumn scarification and overseeding will restore it.
When to scarify a lawn?
The very best time to scarify a lawn is Autumn time, i.e., September to late Oct in the UK.
Although you can scarify in spring, you’re in a race against weed growth, whereas in Autumn time, the weeds are slowing down. You can also be more vigorous in your scarification in Autumn than in spring.
You want to avoid scarifying in the following circumstances:
During the middle of summer, when the grass is growing quickly, it makes mowing very difficult for a few weeks post scarification
Over time, your lawn will build up what is called thatch. This is a layer of dead grass, not the result of mowing; as the grass dies back, newer shoots take their place. If you think of turf as a large mat of interconnected dead rhizomes and roots, you can start to understand why it may become congested after a period.
In a perfect world, the new grass and the breakdown of this thatch can be in perfect harmony. It’s usually fungi that break down thatch, but if your grass outgrows this process, usually after a feed, then thatch can build up, causing a detrimental effect on your lawn.
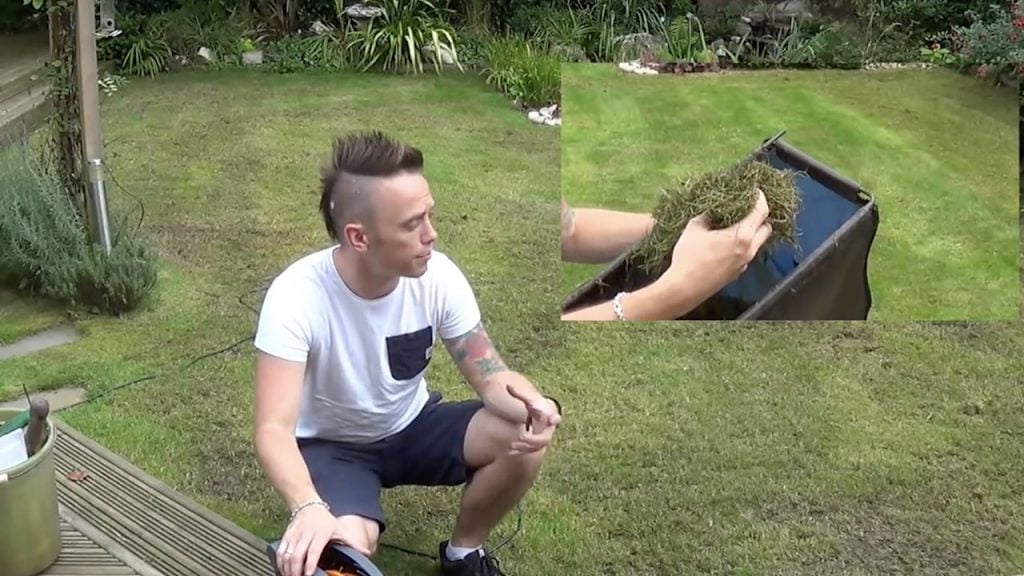
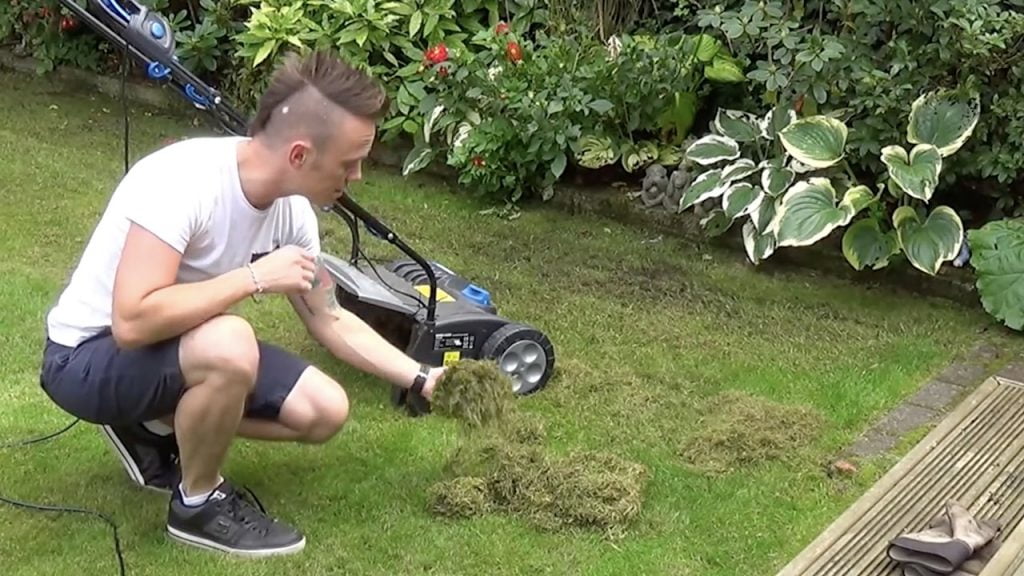
You can see the thatch coming off an unloved old lawn above. You can tell too much thatch if you get down close; you’ll see a brown, webbed layer between the grass and feel the grass turn spongy when you walk on it.
Does scarifying remove moss?
A buildup of moss can also occur on your lawn, making it feel spongy underfoot. Scarification is the best way, other than synthetic chemicals, to remove this and help keep your lawn in tip-top condition. Think of scarification as giving a muddy doormat a good shake, brush, and wash to remove rubbish and matted strands, and lift the pile.
Some gardeners may apply a moss killer, such as iron sulphate, before scarifying. It depends on just how mossy or bouncy your lawn is! I tend not to use it and save such treatments only for the worst mossy lawn offenders.
Scarification is a great way to remove moss. Scarification easily lifts moss from a lawn, allowing it to be disposed of or composted, helping the lawn breathe, and preventing moss from outcompeting your beloved lawn seed!
Which scarifier do you need? A buying guide
The right scarifier depends almost entirely on your lawn’s size. Buying too small a machine means endless emptying of a collection bag and a job that takes three times longer than it should. Buying more machines than you need means spending money on capacity and power you will never use. Here is how I think about the decision.
For lawns up to about 100 square metres, a hand scarifier is entirely adequate and far less hassle than a powered machine for occasional use. A quality hand scarifier with hardened steel tines will effectively remove light to moderate thatch and is the right tool for annual maintenance scarifying in a small garden. It requires no cables, no storage headaches, and on a compact lawn, it is genuinely quicker to set up and use than a powered machine.
For lawns from 100 to 300 square metres, an electric corded scarifier is the sweet spot. You get enough power to cut properly through established thatch and a collection box capacity to handle a medium lawn without constant emptying. A 2-in-1 scarifier and aerator model delivers both treatments in a single session, making it the most efficient approach for the annual Autumn renovation programme.
For lawns over 300 square metres, or for lawns with particularly heavy thatch accumulation, a petrol scarifier gives you the depth and power that electric machines cannot match. The engine weight naturally pushes blades deeper into the turf on very compacted or heavily thatched lawns. Hiring a petrol scarifier for £40-£60 per day from a local hire centre is a reasonable alternative if your lawn only needs a thorough renovation every few years.
Many machines marketed as “scarifiers” are actually lawn rakers with wire tines, not true blade scarifiers. Wire tines remove surface debris and light thatch but cannot cut through established thatch at soil level. True scarifiers use hardened steel blades that slice 2 to 3mm into the soil surface. Always check the blade type before buying.
Lawn rake vs scarifier vs dethatcher: what is the difference?
These three terms are used interchangeably in garden centres and online, which causes real confusion. They are not the same thing, and they do not produce the same result. Understanding the difference will save you from doing the wrong job with the wrong tool.
A spring tine lawn rake uses flexible wire or steel tines to pull surface debris, dead leaves, and loose moss from the lawn without penetrating the soil. It is a surface cleaning tool, best used in early spring to tidy the lawn before the growing season begins. It does not remove embedded thatch, nor does it cut into the soil.
A dethatcher uses slightly more aggressive metal tines to pull out shallow thatch and surface debris more thoroughly than a spring rake, without cutting into the soil. It suits lawns with a light thatch problem where you want to tidy things up without the full disruption of scarification. Many electric lawn rakers are effectively dethatchers by another name.
A scarifier uses rotating hardened steel blades that cut 2 to 3mm into the soil surface, severing grass rhizomes, slicing through established thatch, and opening channels in the turf surface. It is an aggressive renovation tool that produces dramatic short-term results and long-term improvement. For lawns with genuine thatch problems, there is no substitute.
🌿 Rake vs Dethatcher vs Scarifier
Tool
How it works
Best for
Intensity
Spring tine rake
Flexible tines pull surface debris
Spring tidy-up, light moss
Gentle
Dethatcher / lawn raker
Metal tines remove shallow thatch
Light thatch, regular maintenance
Moderate
Scarifier
Steel blades cut 2 to 3mm into soil, slice rhizomes
Scarifying a lawn is no more complicated than using a lawnmower. What puts many people off is the fact that it feels and looks brutal. Not many people are open to slicing up their lawn, no matter how lumpy, bumpy, or ugly it is. However, this is the process that your lawn needs to remove intruders such as moss and thatch and trust me, I’ve scarified even the worst lawns, and the immediate impact is a horror show, but they always come back to lush green growth!
Although your lawn may look awful immediately after scarification, in about 3-4 weeks, it should start to look much better than before as new shoots emerge. It’s well worth the leap of faith. (If you’re looking for the best scarifier, I would recommend this one.)
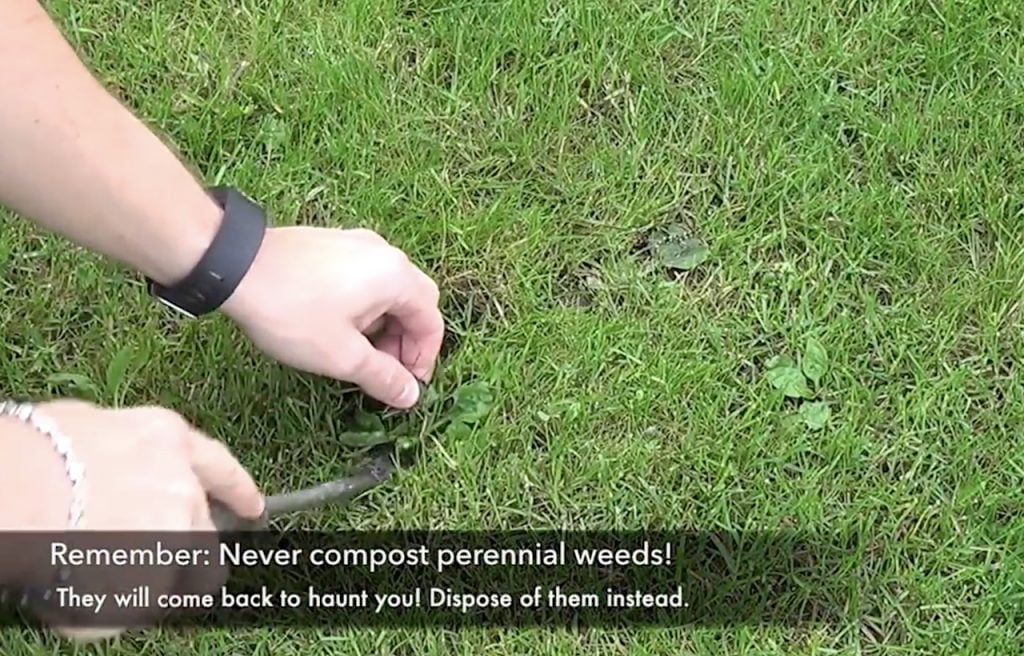
Step 1: Remove all weeds from the lawn
Yes, this may be a time-consuming approach, but it’s really necessary. If you don’t remove them, then using the scarifier will only help propagate perennial weeds, meaning they come back twofold. I prefer to hand-weed smaller lawns, not because I’m a sadist, but because I’m not a fan of chemical weedkillers.
However, you may need to consider a selective weedkiller for larger lawns. (Always follow the instructions and use them with care).
Step 2. Mow your lawn short
The next step is to mow the lawn as short as possible without scalping it. Scarifiers slice vertically through the soil profile, whereas mower scalping slices horizontally, tearing grass at the surface level and causing damage rather than renovation. Start on a high mower setting and gradually reduce it over two or three passes until the grass is sitting at around 2 to 3cm. This is shorter than your normal mowing height, and that is intentional.
Mowing short before scarifying serves two purposes. It exposes the thatch layer so the scarifier blades can reach it without first working through a thick canopy of grass, and it lets you see the lawn surface clearly so you can identify where the worst thatch and hollows are before you begin. Wait for the grass clippings to dry, then remove them before scarifying; wet clippings will clog the collection box and reduce the efficiency of each pass.
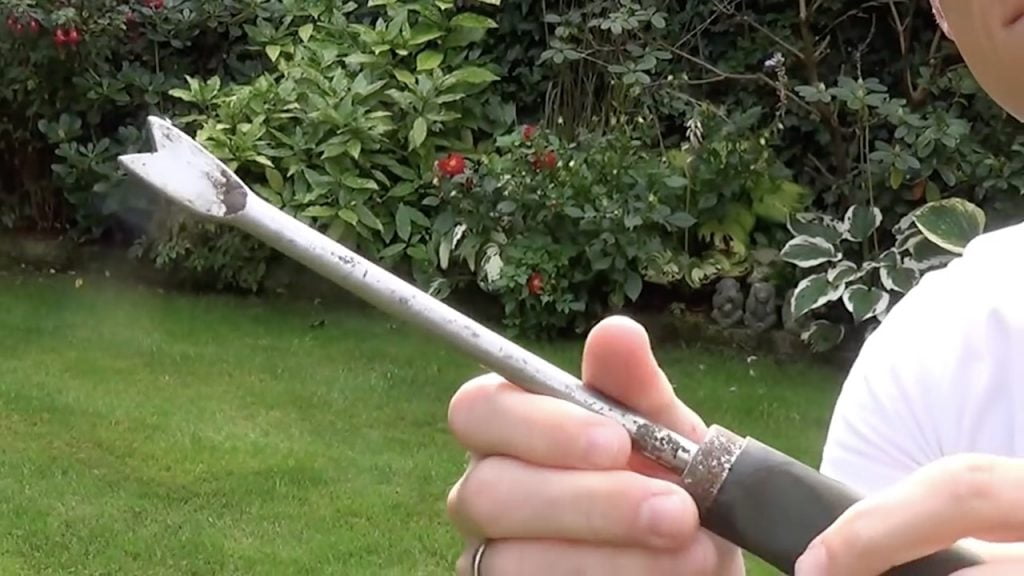
Step 3. Set the scarifier depth
A scarifier should have a depth setting or adjuster. A bit like a lawnmower, you can choose how deeply you scarify. For a seasonal light scarify, then a higher setting is preferable.
For a really poor lawn, then, a deeper setting is required. Use your judgement. You can always start higher and work lower based on how much debris comes out.
Above are the blades of a scarifier that slice through the lawn, removing debris.
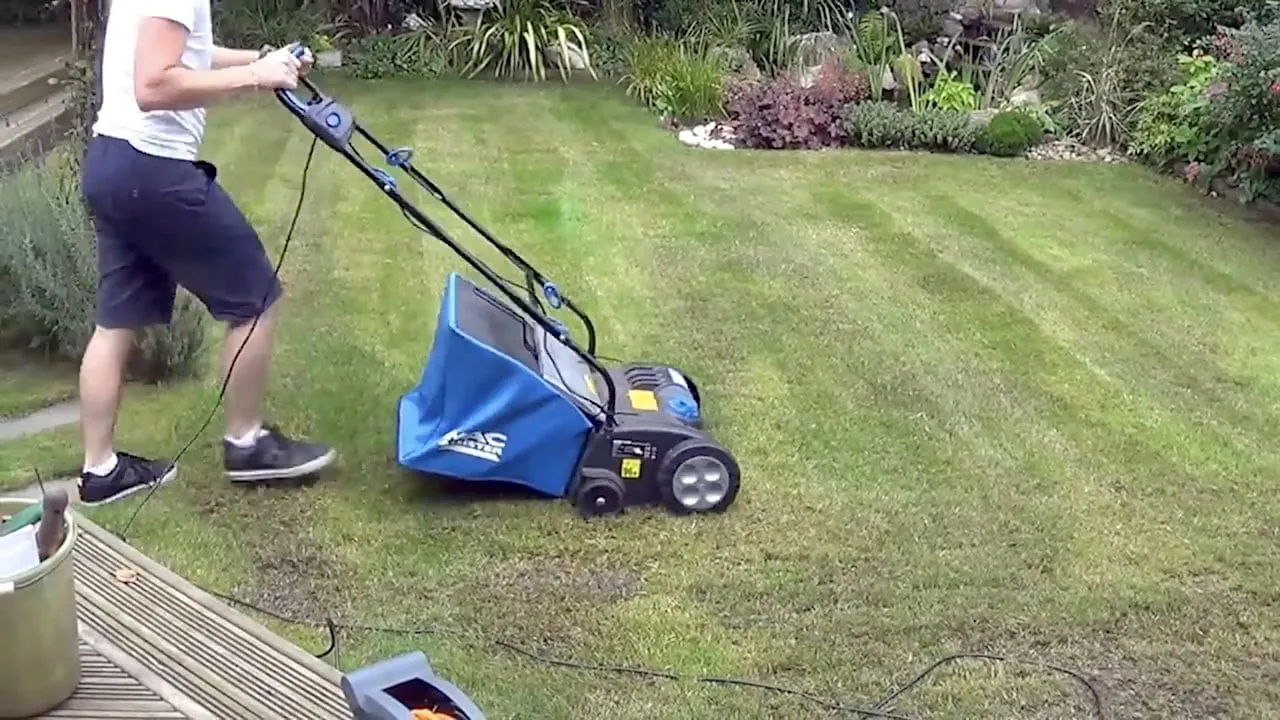
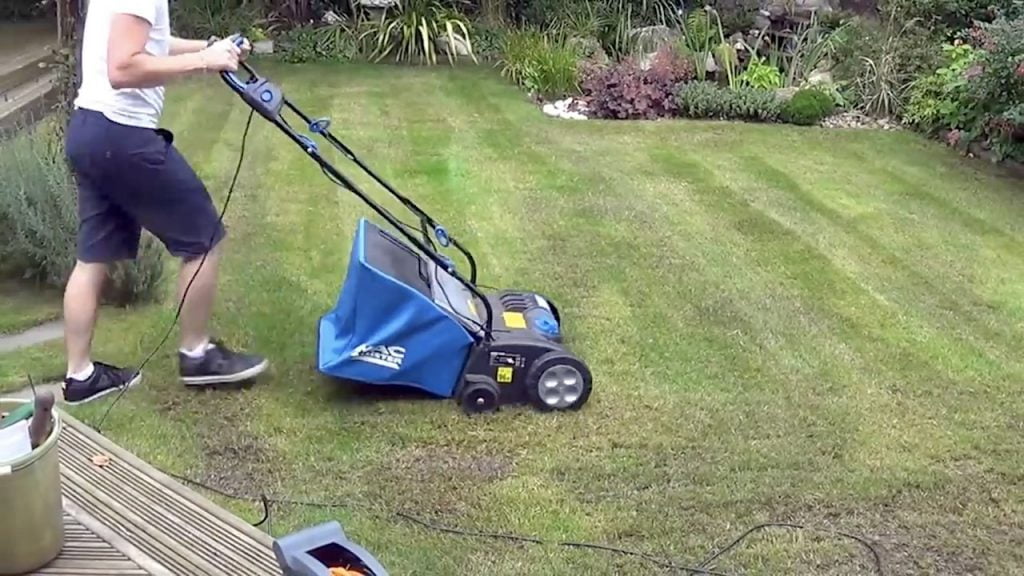
Step 4. Scarify either vertically or horizontally on the first pass
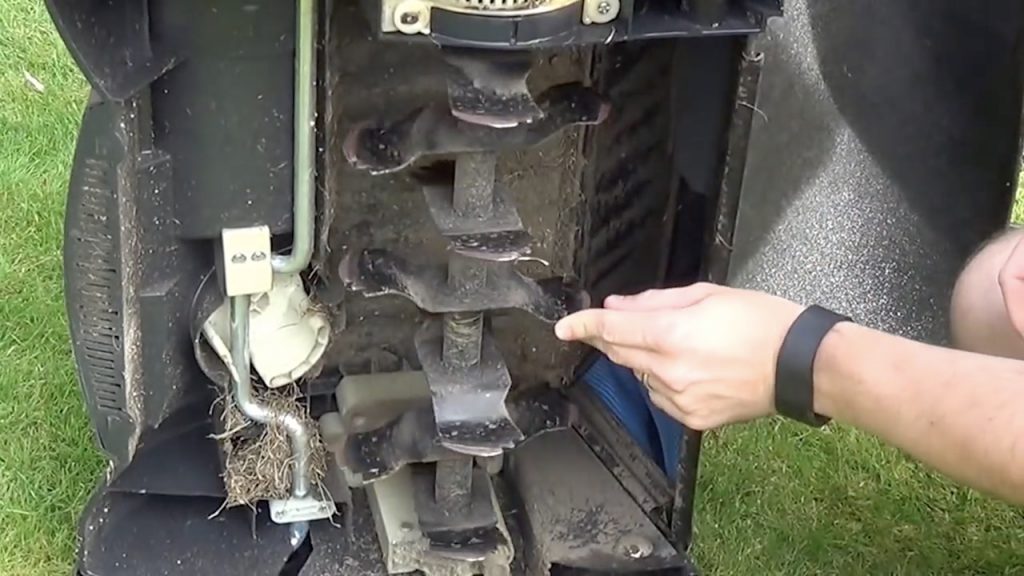
Start at one edge of the lawn and work in straight lines from one end to the other, just as you would when mowing. Keep a slow, steady walking pace: rushing the machine reduces the depth and quality of each cut. The scarifier blades need time to work properly through the thatch layer, so resist any temptation to push the pace. Empty the collection box as soon as it is full rather than waiting until material starts spilling back onto the lawn. You may be genuinely surprised by how much comes out, especially on a lawn that has not been scarified in a few years.
Keep an eye on the blade depth as you go. If the collection box is filling up quickly and the material coming out is mostly brown thatch and moss, the depth is right. If very little is coming out, lower the blade setting slightly on the next pass. If you are pulling up green turf in large chunks, the blades are too deep and need to be raised. The goal is to cut cleanly through the thatch without tearing living grass out of the soil in significant quantities.
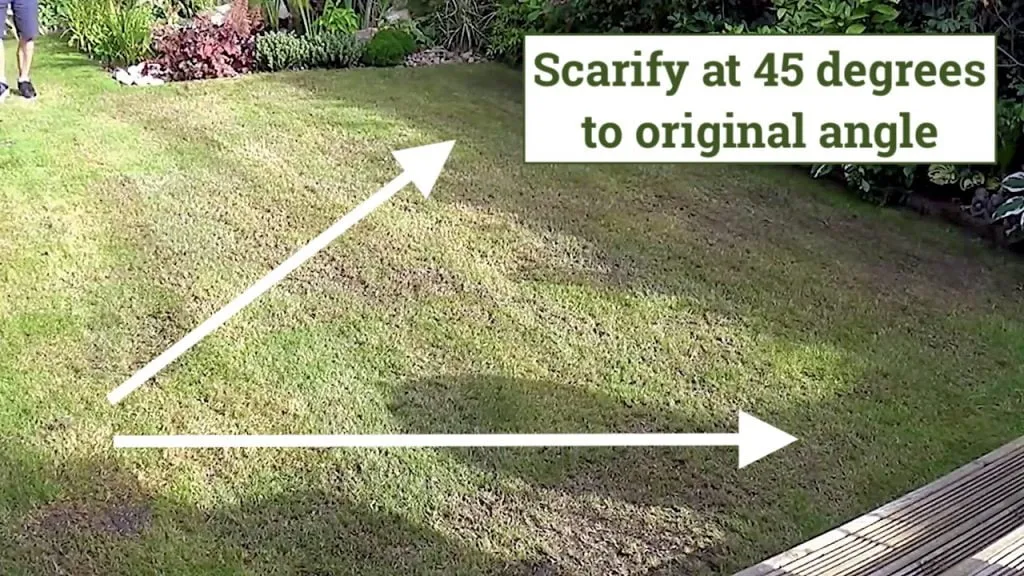
Scarify in one direction, then at 45 degrees to that original line.
5. Scarify again at 45 degrees to the first pass
Once the first pass is complete, turn the scarifier 45 degrees to the original direction and work back across the lawn in the new direction. Thisdiagonal pass lifts thatch that the first direction missed and creates the characteristic criss-cross matrix in the turf surface, allowing maximum air, water, and nutrients to reach the root zone. It ensures even, thick regrowth across the whole lawn rather than leaving parallel strips of denser and thinner coverage.
Some gardeners skip the second pass to save time. I would strongly advise against it. The improvement from a single pass to two passes at 45 degrees is not marginal. The second diagonal pass typically lifts as much material again as the first and produces a noticeably more even recovery. If the lawn is in very poor condition, a third pass at 90 degrees to the original is also worthwhile, but for most domestic lawns, two passes produce the right balance of disruption and recovery speed.
6. Once fully scarified, it is time to reseed
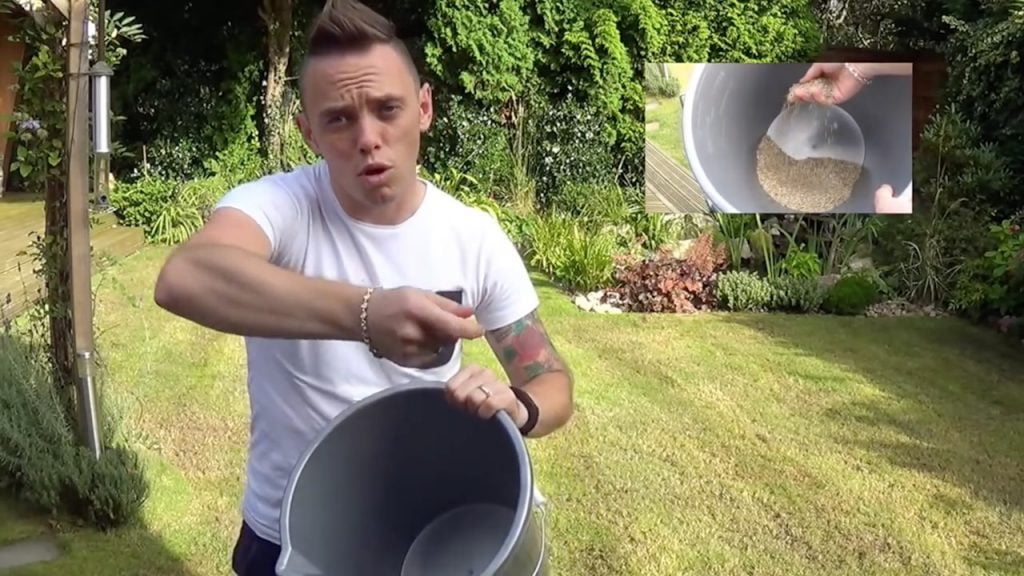
If your lawn is in a bad way or you have an ornamental lawn, it is time to overseed after scarifying. The timing is important: seed sown immediately after scarifying drops directly into the open channels and bare areas the scarifier has created, giving it far better soil contact and germination rates than seed scattered onto an untouched lawn surface. With a poor lawn, I would always overseed to help it along.
Scatter a fresh grass seed mix at 15 to 20 grams per square metre for a maintenance overseed on a reasonable lawn, or up to 35 grams per square metre on a lawn with significant bare patches. Use a spreader rather than broadcasting by hand, which inevitably produces uneven coverage. A ryegrass and fescue blend is suitable for most UK domestic lawns.
Ryegrass establishes quickly and handles wear well; fescue produces a finer, denser sward and tolerates drier conditions. For shaded areas, choose a shade-tolerant seed mix specifically formulated for low-light conditions.
Step 7. Water your lawn
Water the lawn thoroughly after scarifying and overseeding. The soil needs to be moist for the grass seed to germinate, and the existing grass needs water to begin the recovery process now that its rhizomes have been disturbed. Apply water gently using a sprinkler or a hose with a fine-rose head rather than a jet, which can wash the seed out of the channels and into piles.
For the first two weeks after scarifying, aim to water lightly every day if there is no significant rain. The goal is to keep the surface moist consistently rather than soaking the lawn heavily every few days. Dry periods between waterings at this stage can kill germinating seed before it establishes.
Once you can see new grass emerging and the existing grass is visibly recovering, switch to deeper, less frequent watering: a thorough soak every three to four days is better for encouraging roots to grow downward than daily light sprinkles. In a typical UK Autumn, natural rainfall will usually do much of this work for you.
8. Consider top-dressing the lawn
Top dressing is an optional but genuinely worthwhile step on lawns that are in poor condition, have significant bare areas, or are on free-draining soil that dries out quickly. The purpose is to create a fine layer of material around the base of the seed and existing grass plants that retains moisture, feeds soil biology, and helps level any minor hollows the scarification has exposed.
Sieve a layer of light compost or proprietary lawn top dressing over the lawn surface. The keyword is “lightly”: you want a thin covering that settles around the bases of the grass plants without smothering them. If you cannot see the grass tips through the dressing, you have applied too much.
Work the material in with the back of a rake or a stiff broom, pushing it into the aeration channels and any hollows. Grass tips must remain visible throughout, and the lawn should look dressed rather than buried. For a detailed guide to materials, quantities, and application techniques, see my complete top-dressing guide.
A poor neglected lawn is shown above after scarification, overseeding and top dressing. This example was more weeds than lawn, so drastic measures were required. Leaf mould is a great lawn top dressing, and the best part is that if you have large deciduous trees on your property, you can make it for free each Autumn.
What to do after scarifying: the full aftercare plan
Scarifying is only half the job. What you do in the two to three weeks immediately after determines whether your lawn bounces back stronger than ever or limps through Autumn looking worse than before. This is the aftercare sequence I follow every time.
Overseed any bare or thin patches immediately after scarifying while the soil surface is open and receptive. Apply a quality ryegrass and fescue blend at 15 to 35 grams per square metre, depending on how thin the lawn is. Use a spreader rather than scattering by hand for even distribution. Rye grass germinates in 5 to 10 days; fescue takes 7 to 14 days. Full guidance is in my complete overseeding guide.
Top-dress the lawn; it is in poor condition. A light application of sieved compost or a proprietary lawn top dressing worked into the surface helps retain moisture around the new seed and feeds soil biology. Apply at no more than 2-3kg per square metre and brush in thoroughly so the grass tips remain visible. My full top dressing guide covers the materials and methods in detail.
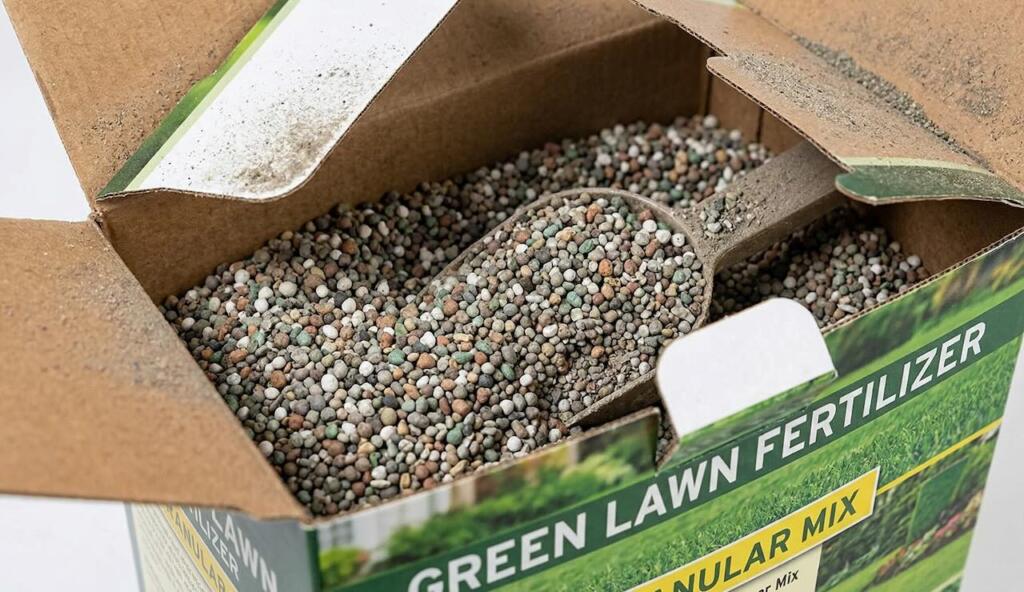
Feed with an Autumn lawn fertiliser two to three days after overseeding. A potassium-rich Autumn feed helps harden grass against the coming winter, strengthens roots, and supports recovery from the scarification. Do not use a spring or summer high-nitrogen feed at this point, and do not apply fertiliser directly onto fresh seed. Use a spreader to avoid burning. For full guidance, see my complete lawn feeding guide.
Water consistently for 10 to 14 days. Light daily watering is better than heavy watering every few days at this stage. Once the new grass is established and the existing grass is visibly recovering, switch to deeper, less frequent watering. In a typical UK Autumn, natural rainfall will often do the work for you.
💡 Top Tip
The thatch and moss you have removed can go straight onto the compost heap. Thatch breaks down readily as a carbon-rich material. Moss is slower to rot and best mixed in with other green material rather than added in large quantities on its own. Any that will not compost easily can be used to line hanging baskets or create small wildlife habitat piles.
Scarifying different lawn types: what you need to know
Not all lawns respond to scarification in the same way, and adjusting your approach to suit your grass type and situation makes a significant difference to the outcome.
Fine ornamental lawns composed mainly of fescue and bent grasses are the heaviest thatch producers of any UK lawn type. Their spreading rhizomes create dense mats quickly, and regular scarification, potentially twice a year on a very fine lawn, is entirely normal and beneficial. These lawns need a genuinely sharp scarifier with the blade set to the correct depth, as tearing rather than cutting the fine grass causes more setback than on a robust utility lawn.
Ryegrass-dominant lawns are the opposite. Ryegrass is a low thatch producer and a vigorous regrower after mechanical treatment. Most family lawns in the UK are ryegrass-based, and an annual light scarification plus overseeding programme is a straightforward approach that delivers consistent year-on-year improvements.
Shaded lawns under mature trees are a special case. I recommend scarifying these in spring rather than Autumn, where possible. Shade causes significant thinning over winter, and if you scarify in Autumn. Then the canopy closes over winter, preventing recovery, and you can end up with very thin grass by spring. A late March or April scarification, when the trees are relatively bare and light levels are good, gives shaded grass the best window for recovery.
Clay soil lawns are prone to waterlogging and moss. Scarification helps, but should ideally be combined with hollow-tine aeration, which addresses the compaction and drainage problems that allow moss to take hold in the first place. See my complete aeration guide for how to sequence these two operations effectively.
Newly laid lawns should be left alone for at least a full growing season before scarifying. I would personally wait two years on a seeded lawn and at least one year on a turfed lawn before introducing any mechanical renovation. The root system needs to establish properly before you put it under the stress of scarification.
Common lawn scarification mistakes and how to avoid them
Having answered sacrifice questions in the Garden Ninja forum for years, I see the same mistakes recurring. These are the ones worth knowing about before you start.
Scarifying when the lawn is wet or waterlogged is probably the most common mistake. Saturated soil tears and compacts under the machine’s weight. Wet thatch clogs the blade mechanism. Always wait for a dry spell of at least two to three days before scarifying.
Setting the blades too deep on the first pass. Start at a moderate setting and assess what is coming out. You can always make a second pass at a deeper setting if the first pass doesn’t lift enough material. Going too deep from the start on a poorly established or thin lawn can strip out more living grass than thatch.
Scarifying without removing weeds first. As I explain in the step-by-step section, perennial weeds such as dandelions and plantains will be spread and multiplied by a scarifier passing over them. Remove them first or treat with a selective weedkiller several weeks before scarifying.
Skipping the aftercare. Scarifying without overseeding, feeding, and watering is like digging over a vegetable bed and then leaving it bare. You have opened the lawn up beautifully and then given weeds and moss the ideal conditions to colonise the gaps. The aftercare is where the investment pays off.
Panicking and mowing too soon. The lawn will look terrible. This is normal, expected, and temporary. Mowing within the first two weeks, particularly at a low setting, removes the new seedlings you have just sown and sets recovery back by weeks. Hold your nerve.
⚠️ Safety Warning
Before starting any powered scarifier, remove stones, toys, and debris from the lawn surface. The rotating blades can project stones at significant speed. Wear long trousers and sturdy shoes. Always check and adjust blade depth with the machine switched off and unplugged. Keep children and pets off the lawn while working and until it is fully recovered.
Why does my scarified lawn look terrible?
There is no way around this: your lawn will look genuinely dreadful for the first two to three weeks after scarifying. Bare soil, flattened grass, brown patches, and what looks like general devastation are completely normal results of a thorough scarification. You have removed years of accumulated dead moss, thatch, and debris. You have sliced through grass rhizomes across the entire surface. The immediate visual result won’t be pretty.
The temptation to intervene is strong at this point, especially if your neighbours are peering over the fence. Resist it. Your lawn will start recovering visibly within two to three weeks and will reach its best new growth at the four to six week mark. What you will see is new grass shoots emerging from the scarified channels, bare patches filling in from the overseeded seed, and the overall colour shifting from the post-scarification brown back toward a rich, healthy green. The lawn that comes back after a thorough Autumn scarification and overseeding is always denser, greener, and more resilient than the one you started with.
When can I mow my lawn after scarification?
This is a question I get asked constantly, and the answer is more reassuring than most people expect. You do not need to wait months. Your freshly scarified lawn will take four to six weeks to show thick new growth, but you can bring the mower out earlier than that without causing harm.
The earliest I would consider mowing is two to three weeks after scarifying, once the new seedlings are clearly established and the existing grass has recovered enough to stand upright. When you do mow for the first time, set the mower to its highest cutting height.
Cutting too low, too soon stresses the recovering grass and clips off seedlings that have not yet developed a proper root system. Keep mowing on a high setting for the first month after scarifying, then gradually lower it back to your normal height over the following weeks as the new growth thickens and hardens.
Avoid heavy foot traffic on the scarified lawn for the first four weeks wherever possible. The soil is disturbed, and the new roots are shallow. Compression at this stage can set back recovery and create compaction in exactly the areas you have just opened up. If you have children or dogs using the garden, try to redirect them away from the scarified area until the new growth is well established.
Here’s the main example lawn 6 weeks later. It is still developing, but far richer and greener than before. Still some patches that need more time, but a vast improvement!
Frequently asked questions about lawn scarification.
How often should I scarify my lawn?
For most UK domestic lawns, once a year in Autumn is the right frequency. Fine ornamental lawns with heavy thatch can benefit from twice-yearly treatment, in spring and Autumn. Ryegrass-dominant utility lawns in reasonable condition can sometimes go every other year with a spring rake in between. The thatch test described above is the most reliable guide: if the brown layer is under 6mm, leave it; if it is over 13mm, scarify this season.
Should I apply moss killer before scarifying?
If your lawn has a significant moss problem, applying iron sulphate two to three weeks before scarifying produces better results. Treating moss first means it is dead and dry by the time you scarify, so the machine lifts it cleanly rather than spreading live spores across the lawn. Wait until the moss turns black or brown before proceeding. If moss is only a minor issue, you can scarify directly. For my full guidance on tackling moss,s see my complete moss removal guide.
Can I scarify in spring instead Autumn?
Yes, and for some lawns, spring is the better option, particularly for shaded lawns or when the lawn needs the long summer growing season to recover. The main disadvantage of spring scarifying is that weed pressure increases as the season warms, allowing weeds to colonise the disturbed surface before your grass recovers. Recovery timelines are also slightly longer in spring: 6 to 8 weeks versus 4 to 6 weeks in Autumn.
Will scarifying damage my lawn?
It will look damaged for two to three weeks. That is unavoidable and entirely normal. The only situations where scarifying causes genuine lasting damage are: scarifying a waterlogged lawn, setting the blades too deep on a thin or poorly established lawn, scarifying in a heatwave when recovery cannot happen, or scarifying a newly laid lawn before it has established. Follow the guidance in this article, and the lawn will always recover.
Should I aerate before or after scarifying?
Aerate after scarifying, not before. Scarifying first removes the thatch that would otherwise block the aeration channels from receiving top dressing and air. Once scarified, hollow-tine aeration can be performed in the same session by pulling out soil cores, dramatically improving drainage and root-zone oxygen levels. The sequence that yields the best Autumn renovation results is: scarify, aerate, top dress, overseed, then water. For full guidance, see my lawn aeration guide.
Is it worth hiring a professional to scarify?
Professional lawn scarification services typically cost around £150 for a 100-square-metre lawn, ranging from about £80 for a small garden to £350 or more for a larger property, with aeration and overseeding included. For a one-off renovation of a seriously neglected lawn, a professional service with petrol machinery can be worthwhile. For ongoing annual maintenance, buying a quality electric scarifier at £100 to £150 pays for itself after one to two uses compared to the professional rate.
Ready to stop guessing and start designing with confidence? My Garden Design for Beginners online course takes you from blank canvas to brilliant layout, step by step.
I’m Lee Burkhill, award-winning garden designer and BBC1’s Garden Rescue presenter, and I’ve built this course around the same principles I use for every client garden — practical, honest, and designed to actually work in the real world.
In 20 hours of flexible online study, you’ll cover:
Design principles that make any garden work
How to select and arrange plants like a professional
Styles and layouts to suit every size and shape of space
Video lessons, real-world case studies, quizzes, and a certificate on completion — all for just £199.
Enrol today and start designing your dream garden.
29
Garden Design Examples for Small Gardens: 30 Design Templates & Planting Plans
Garden Design Examples for Small Gardens: 30 Design Templates & Planting Plans: In this online gardening course, I’ll walk you through 30 fantastic garden designs, explaining the logic behind the layout, the plant choices, and take-home tips for applying them in your own garden.
Weekend Garden Makeover: A Crash Course in Design for Beginners
Learn how to transform and design your own garden with Lee Burkhills crash course in garden design. Over 5 hours Lee will teach you how to design your own dream garden. Featuring practical design examples, planting ideas and video guides. Learn how to design your garden in one weekend!
Garden Design for Beginners: Create Your Dream Garden in Just 4 Weeks
Garden Design for Beginners Online Course: If you want to make the career jump to becoming a garden designer or to learn how to design your own garden, this is the beginner course for you. Join me, Lee Burkhill, an award-winning garden designer, as I train you in the art of beautiful garden design.
Scarification is a brilliant way to reinvigorate lacklustre or compacted turf. Even the worst offending lawns can be revived with a little effort. Scarification removes moss, debris, and thatch, helping open up your lawn. It’s worth lawn maintenance activity once you get over the awkward and brutal aftermath. Within 4-6 weeks, your lawn will bounce back fuller than ever.
Have you scarified your lawn recently? I’d love to hear your thoughts and success stories about renovating old, tired lawns.
🌿 Lawn Scarification: The Quick Version
Best time? September to October in the UK. Autumn gives the best recovery window with lower weed pressure and warm soil.
Right tool. Hand scarifier for lawns under 100m². Electric corded for 100 to 300m². Petrol or hire for anything larger.
Check your thatch. Under 6mm: leave it. Over 13mm: scarify this season. A trowel cross-section is the most reliable test.
Two passes. First pass in one direction, second at 45 degrees. Blades set 2 to 3mm into soil. Empty the collection box often.
Don’t skip aftercare. Overseed immediately at 15 to 35g/m², top dress lightly if needed, apply autumn feed, water daily for two weeks.
It will look terrible. For 2 to 3 weeks. That is completely normal. Recovery is full in 4 to 6 weeks.
Don’t mow for 2 to 3 weeks. When you do, keep the setting high. You will be rewarded with the best looking lawn you have had in years.
For the complete Autumn lawn renovation programme that scarification sits within, these guides cover everything else you need:
You can Tweet, Facebook or Instagram me with your lawn images. If you need gardening advice, why not check out my YouTube gardening guides and subscribe if you haven’t already?
Your subscription could not be saved. Please try again.
Your subscription has been successful.
Lee Burkhill
Lee Burkhill, known as the Garden Ninja, is an award-winning garden designer and horticulturist with over 30 years of gardening experience and 15 years as a professional garden designer. A qualified RHS (Royal Horticultural Society) professional, Lee specialises in sustainable garden design and practical horticultural advice. He designs and presents on BBC1’s Garden Rescue and in leading gardening publications. Lee combines three decades of hands-on gardening knowledge with professional design qualifications to help gardeners create beautiful, functional outdoor spaces.