How to Plant a Tree: The Complete UK Guide for Gardeners
Lee Burkhill: Award Winning Designer & BBC 1's Garden Rescue Presenters Official Blog
Beginner level
Planting trees is one of the best things we can do in the garden to help reduce carbon, combat extreme temperatures and also reduce our flood risks in urban areas. This beginner guide on how to plant a tree is going to show you how to correctly plant trees, where to position them and also give you 10 suitable trees for small urban gardens.
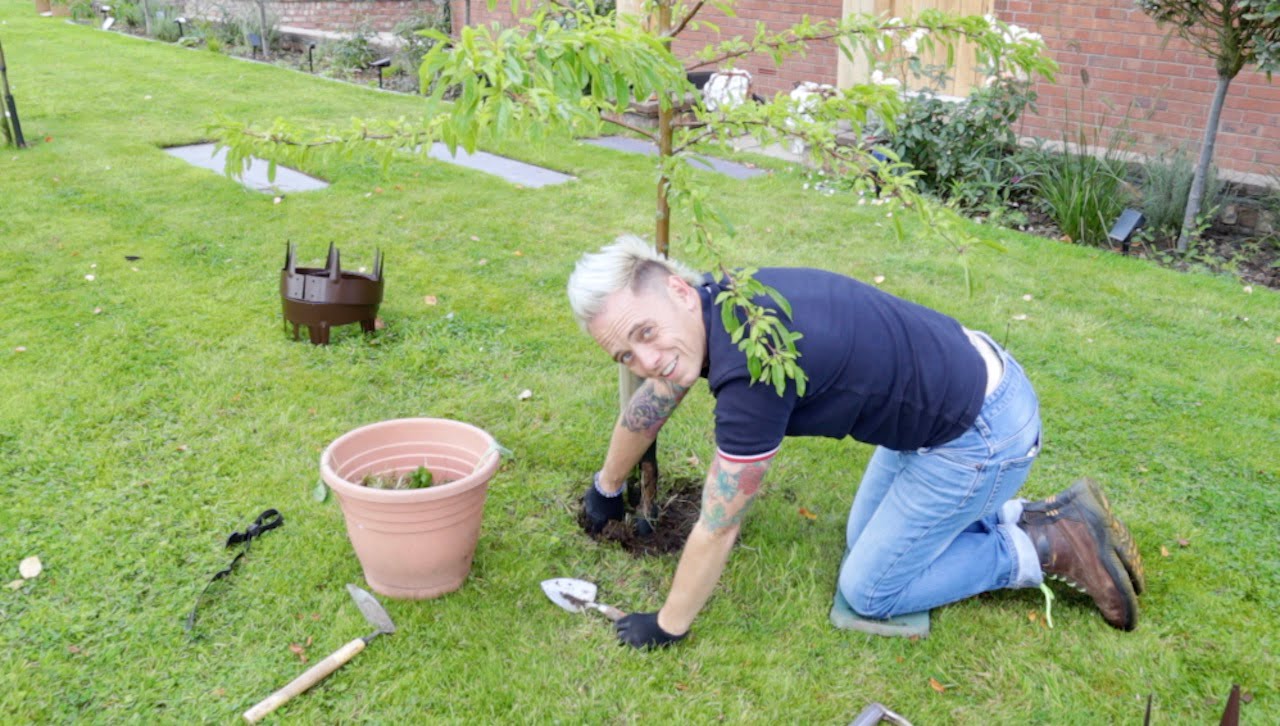
Planting a tree is one of the most rewarding things you can do in a garden. In over 20 years as a professional garden designer and presenter on the BBC’s Garden Rescue, I have planted hundreds of trees across all manner of spaces: tiny urban courtyards, sprawling country gardens, and everything in between. The single most important thing I have learnt is that how you plant a tree matters just as much as which tree you choose.
Get the planting right and your tree will establish quickly, anchor firmly, and reward you for decades. Rush it, and you risk a slow, struggling specimen that never fulfils its potential. This guide takes you through everything you need to know, step by step.
Quick Answer
To plant a tree successfully, dig a hole 1.5 times the width of the root ball and no deeper than the root collar. Loosen the roots, backfill with the same soil, firm in well, stake against wind rock, and water thoroughly. The best time to plant is autumn or early spring when the tree is dormant and rainfall is reliable.
(This guide contains affiliate links. If you choose to buy from these I receive a small commission that helps keep this blog free to use.)
When is the best time to plant a tree in the UK?
Timing makes a real difference with trees. The best planting window in the UK is autumn, from October through to early December, or early spring before the tree breaks into bud. Both periods share the same advantage: the tree is dormant or just waking, the soil is still workable, and rainfall tends to do most of the watering work for you.
Autumn planting is my preferred option for most trees. The soil retains summer warmth, which encourages root establishment before the harder frosts arrive. By the time spring comes, that tree has already sent out new anchoring roots and is ready to push on with its first season of growth.
Spring planting works well too, particularly for more tender species, but you need to be prepared to water consistently through the drier months that follow. Avoid planting in summer wherever possible. The heat and moisture demand on a newly planted tree with a disturbed root system is considerable, and establishment rates drop significantly. The only exception is a container-grown tree with an intact root ball, and you are prepared to water every two to three days during dry spells.
💡 Top Tip
Never plant a tree when the ground is frozen or waterlogged. Both conditions prevent the roots from establishing properly and can cause the root ball to rot before the tree has a chance to anchor. If the ground is rock hard, hold off for a week or two and try again.
Container-grown, bare-root, or root-balled trees: which should you buy?
Before you even pick up a spade, it is worth understanding the three forms in which trees are sold in the UK, because each has different planting requirements and price points.
Best value; wide cultivar choice; must plant promptly
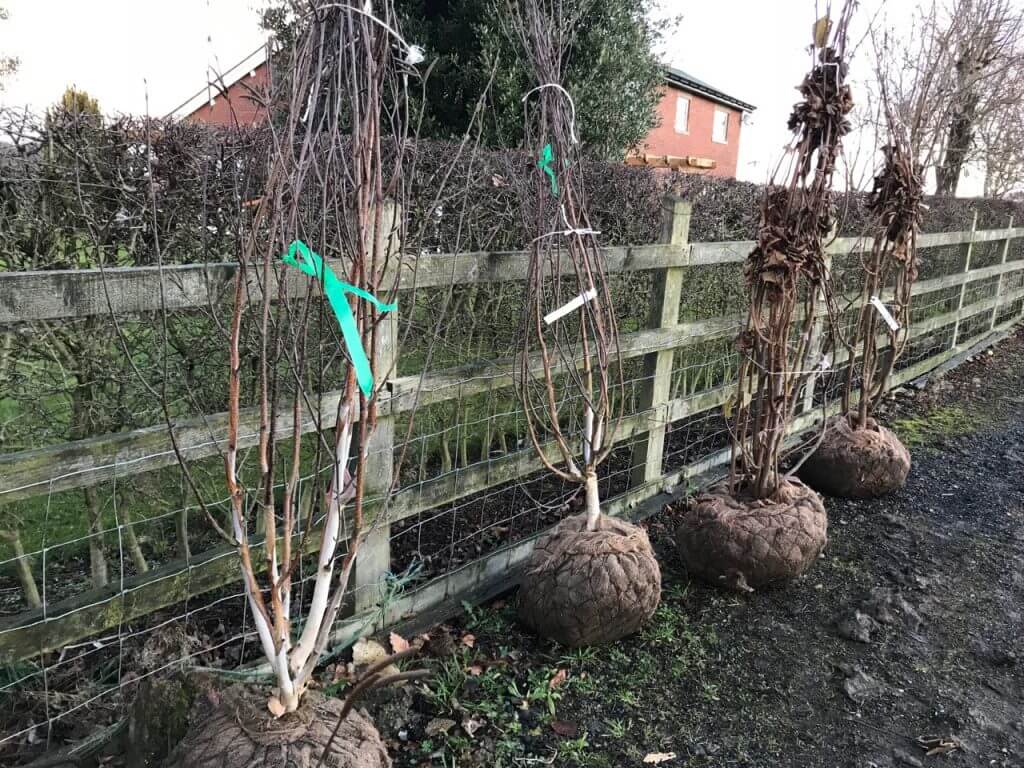
Root-balled
Autumn or early spring
Larger specimens; roots wrapped in hessian; handle carefully
Bare-root trees are outstanding value, and I use them regularly in client gardens when budget is a consideration. They are lifted during dormancy, so the roots are exposed and the tree is sold without any soil or pot. This makes them cheaper to produce and ship, and the savings are passed on to you as the buyer.
The catch is that bare-root season runs only from November to March, and you need to plant them as soon as they arrive. I always soak the roots in a bucket of water for a few hours before planting, and for larger trees, overnight soaking gives them the best possible start.
Root-balled trees are field-grown and lifted with their root system intact, wrapped in biodegradable hessian. You can plant them in hessian and all, though I always loosen the wrapping around the top of the root ball once it is in the hole. Do not try to remove the hessian entirely before planting, as you risk breaking apart the root mass.
Choosing the right tree for your garden
The most common tree-planting mistake I see on Garden Rescue is a mismatch between the chosen tree and the available space. Someone falls for a silver birch in the garden centre, brings it home, plants it by the fence, and then wonders why it has swallowed the garden ten years later. The solution is simple: always research the ultimate height and spread before you buy, not after.
Before settling on a tree, work through these factors:
The ultimate height and spread of the mature tree is the starting point. Check the RHS plant finder or the label on the pot for this information. Factor in that a tree listed as reaching 8m will take many years to get there, but it will get there.
Your soil type matters too, as some trees are fussy about drainage or pH.
The garden aspect determines how much sun the tree will receive at its eventual height, which affects both growth rate and flowering.
Available space, including overhead and underground, is worth considering as some trees have invasive root systems that can affect drains or foundations if planted too close to buildings.
Finally, your budget determines whether you go for a small bare-root whip at a few pounds or an advanced container-grown specimen.
💡 Top Tip
When choosing between cultivars, go for a multistem form where possible for smaller gardens. A multistem tree has multiple thinner trunks rather than one dominant trunk, which keeps the overall height more manageable and gives you beautiful structural interest at eye level rather than way above your head.
Step 1: Preparing the planting site
Preparation is where most gardeners shortchange themselves, and it is the step that makes the greatest difference to long-term success. A tree cannot reach out for moisture and nutrients through compacted, debris-filled ground. If you want your tree to thrive rather than merely survive, give the planting site the attention it deserves before you dig anything.
Clear the area of any turf, weeds, or debris in a circle at least 1m in diameter around where the trunk will sit. Grass is a surprisingly effective competitor for water and nutrients, and leaving it up to the base of a young tree is one of the reasons new trees fail to establish well. Once cleared, use a garden fork to break up the soil around the planting area to a depth of a spade’s blade. This loosening is not about adding anything; it is about removing the compaction that prevents roots from spreading outward.
Avoid adding compost or fertiliser into the planting hole itself. This is counterintuitive for many gardeners, but a rich, soft pocket of compost in the hole can actually discourage the tree from sending its roots outward into the surrounding soil. The tree needs a reason to explore, and a comfortable cushion beneath it removes that incentive. Save any compost for the surface mulch after planting.
If you are working on very poor or compacted clay soil, you can mix a small amount of well-rotted organic matter into the backfill soil, but keep it modest. The goal is to encourage outward root growth, not to create a five-star hotel in the planting hole.
Step 2: Digging the hole
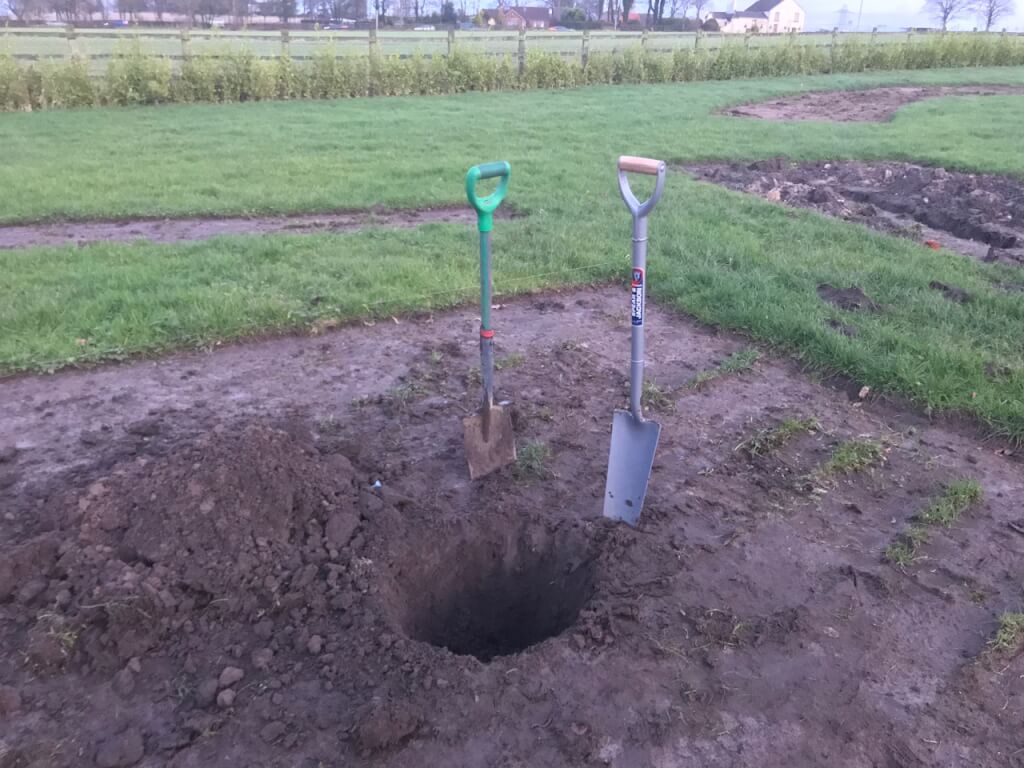
The size of the hole is one of the most critical factors in successful tree establishment. Too small, and the roots are cramped and struggle to anchor. Too deep, and you risk burying the trunk graft or root collar underground, which can cause rot and kill the tree.
The golden rule is to dig wide and shallow rather than narrow and deep. Aim for a hole that is at least 1.5 times the width of the root ball or container, but no deeper than the root ball itself. Tree roots spread outward far more than they grow downward, so width is far more important than depth here.
Before you put the tree in, check the depth by placing the root ball in the hole and laying a cane or long handle across the top of the hole. The root collar of the tree (where the roots flare out from the trunk) should sit level with or very slightly above the surrounding ground. If the tree is sitting too low, remove it and add a small amount of soil back to the base before trying again.
⚠️ Warning
Never bury the tree graft. On grafted trees (most ornamental and fruit trees), you will see a slight kink or union low on the trunk where the cultivar was grafted onto the rootstock. This union must remain above the soil surface. Burying it can cause it to rot and will kill the tree, often within a couple of seasons.
On the question of round versus square holes: there has been debate in arboricultural circles about whether square holes encourage roots to break out into the surrounding soil more effectively than round holes. In my experience of planting trees for over 20 years, a round hole with the soil loosened 1.5 times the width of the root ball consistently gives excellent results. I have yet to see a meaningful benefit from square tree holes in practice.
Step 3: Positioning the tree in the hole
Before you commit to backfilling, take a moment to find the best position for your tree within the hole. Gently lower the tree in and spin it slowly until you find the side that looks the most balanced and rounded when viewed from your main vantage point. Trees always have a better side and a back side: the side that faced the sun during nursery growing tends to be fuller and more even. Put the best side forward.
Check that the root collar sits at the right depth, then stand back and check the trunk is vertical before you backfill. It is much easier to adjust the tree at this stage than after you have firmed all the soil back around it. Use a cane or spirit level alongside the trunk to confirm it is truly upright rather than relying on your eye alone. Slopes in the ground can be deceptive.
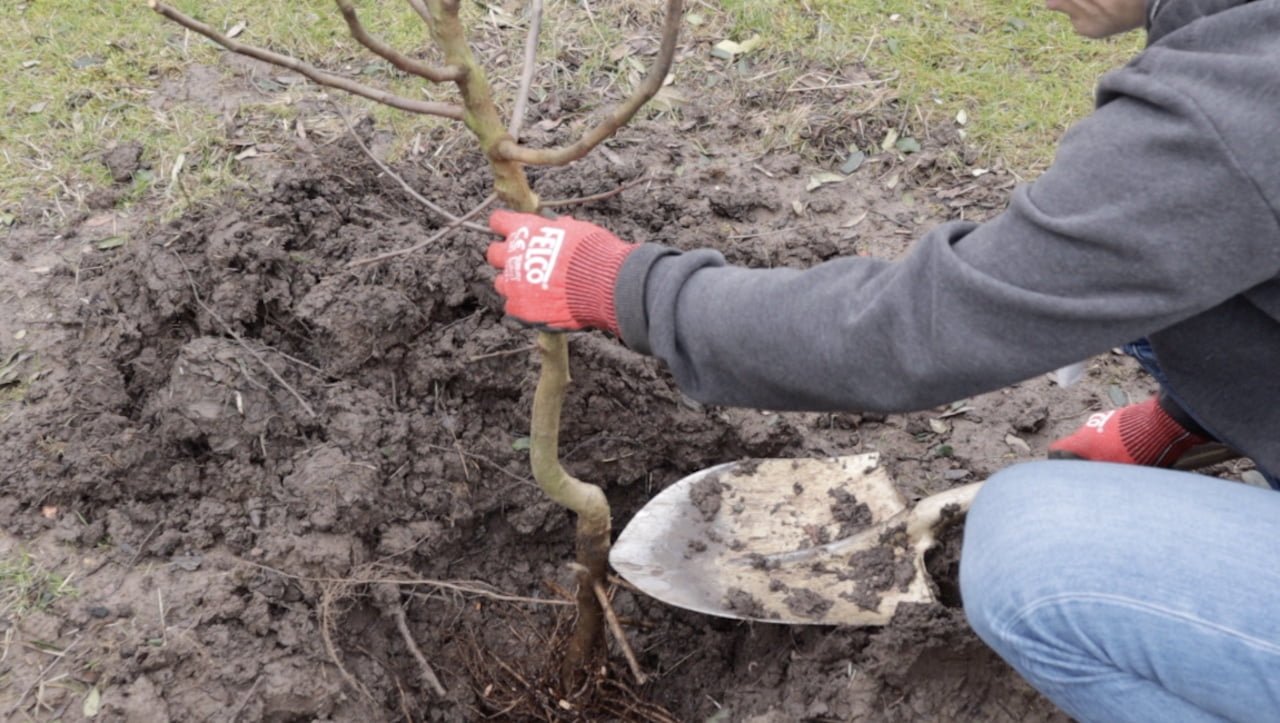
For bare-root trees, take a moment before lowering the tree to tease the roots gently outward and downward with your hands. If the roots have been bundled together in transit, carefully separate them so they hang naturally. Roots that cross over each other or double back on themselves can cause problems as the tree matures. This five-minute job at planting time can prevent structural issues years later.
Step 4: Backfilling and firming in
With the tree positioned and the depth checked, it is time to backfill. Use the soil you removed from the hole rather than imported topsoil or compost. This is the right growing medium for your site and helps the tree’s roots transition naturally from the root ball out into the surrounding garden.
Add the soil back in stages rather than all at once. Fill to roughly a third of the way up, then firm the soil in around the roots using your heel. This process of heeling in removes air pockets that can dry out roots and prevent good soil-to-root contact. Be deliberate and firm about this: a tree that is loosely planted will rock in the wind, which damages new roots and considerably slows establishment.
Continue adding soil and firming in, checking the trunk remains vertical as you go. It is surprisingly easy for a tree to shift slightly during backfilling. Once the hole is filled and level with the surrounding ground, give the trunk a gentle shake. It should feel solid, not wobble freely. If there is movement, firm in around the base once more.
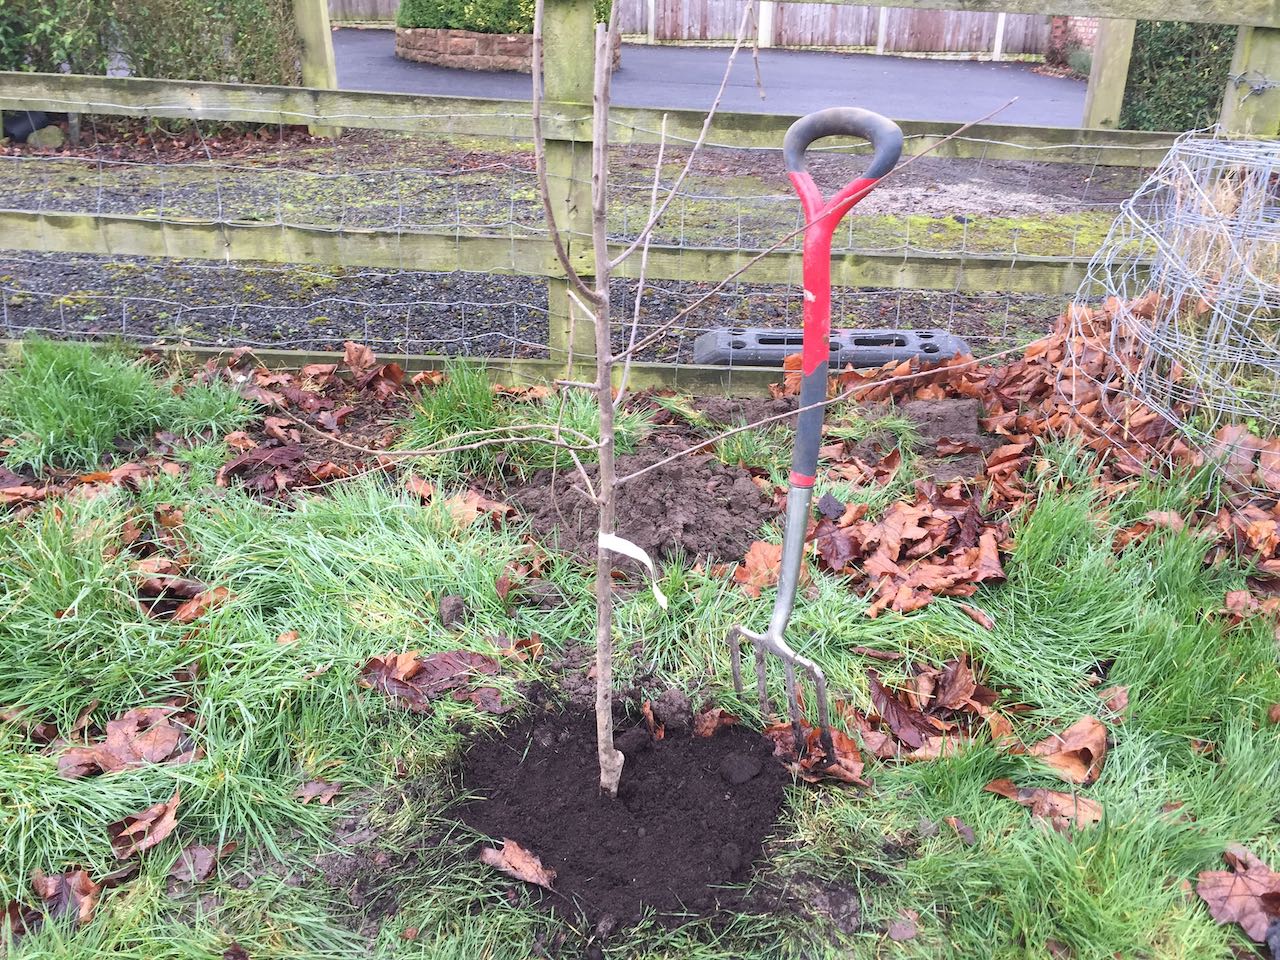
Finish by forming a very slight saucer-shaped depression in the soil around the trunk. This acts as a watering reservoir, directing rainfall and irrigation water down toward the root zone rather than running off the surface. Keep a gap of 5 to 10cm between the soil surface and the base of the trunk to prevent moisture from sitting against the bark.
Step 5: Staking and support
Almost all newly planted trees benefit from staking, at least for the first couple of seasons. The purpose is not to hold the trunk rigid but to anchor the root ball while the tree sends out new roots to stabilise itself naturally. A tree that is allowed a little movement in the wind will actually develop a stronger trunk over time, so the stake should be short enough to allow the top two-thirds of the tree to sway gently.
For most garden trees, an angled stake driven in at 45 degrees away from the prevailing wind direction works very well and avoids damaging the root ball. Drive the stake into undisturbed soil at the edge of the planting hole rather than through the root ball itself. The top of the stake should sit no higher than a third of the way up the trunk.
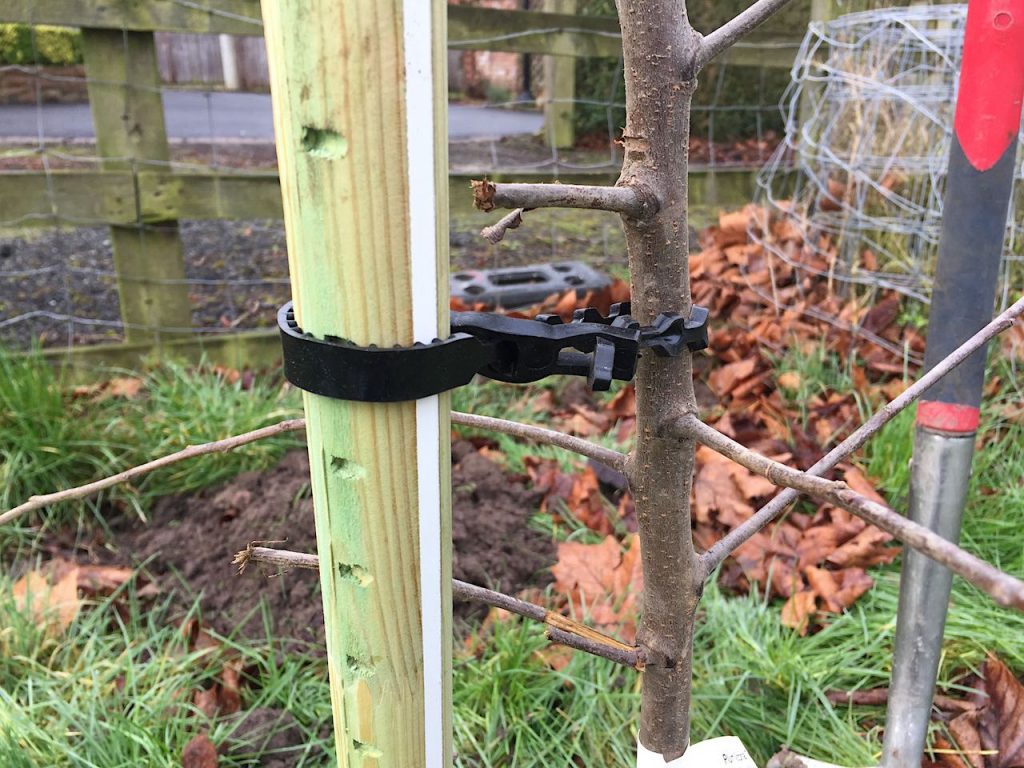
Always use rubber tree ties rather than wire, rope, or string. Wire and rope bite into the bark as the trunk thickens, girdling and eventually killing the tree. Rubber ties are flexible, adjustable, and far kinder to the bark. Check ties every spring and loosen them as the trunk expands. I have seen established trees with old wire ties buried deep into the cambium layer, and it is entirely avoidable.
For larger or root-balled trees, a two-stake system with a crossbar tie is more secure. Drive two vertical stakes on either side of the root ball and connect the trunk to the crossbar with a single rubber tie in a figure-of-eight configuration. Check the tree annually and remove the stakes entirely once the tree is clearly self-supporting, usually after two to three growing seasons.
Step 6: Mulching
Mulching is one of the most effective things you can do for a newly planted tree, and it is one of the most overlooked. A good mulch layer does several jobs simultaneously: it retains soil moisture, suppresses competing weeds, regulates soil temperature, and gradually feeds the soil as it breaks down.
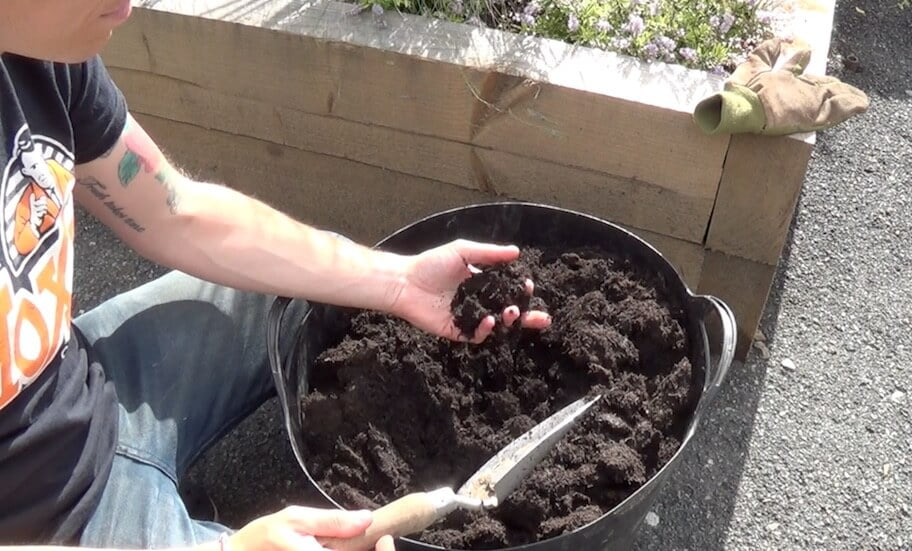
Apply a layer of peat-free organic mulch around the base of the tree, covering the area out to at least the edge of the planting hole. Aim for a depth of 5 to 7cm. Good choices are peat-free compost, chipped bark, or leaf mould.
My personal preference is a good-quality wool-based, peat-free compost because it retains moisture particularly well without becoming waterlogged, which makes it excellent for newly planted trees that need consistent moisture as they establish.
Never pile mulch directly against the trunk of the tree. This is sometimes called “volcano mulching” and it causes the bark to stay permanently damp, which invites rot, disease, and pest damage. Leave a clear gap of at least 5cm between the mulch and the base of the trunk at all times.
Step 7: Aftercare and watering in the first season
The first season after planting is the most critical period for a tree’s long-term survival. During this time, the tree has a disturbed root system and is entirely dependent on you for its water supply until it sends out enough new roots to source its own. This is not the time to be hands-off.
Water a newly planted tree three times a week during its first month, giving the root zone a thorough soak each time. One watering can per tree per session is a reasonable guide for a young specimen. It is far better to water deeply and less frequently than to give a light sprinkle every day. Deep watering encourages roots to grow downward in search of moisture, building a more stable root system than surface watering does.
After the first month, reduce to once or twice a week during dry spells. Autumn-planted trees in the UK will largely be watered by rainfall through winter, but keep an eye on them during any dry spring spells the following year. Spring-planted trees need the most attentive watering regime, particularly during June and July when UK soils can dry out quickly.
By the second year, a well-established tree should be largely self-sufficient in normal UK rainfall conditions, though it is worth giving larger specimens a thorough soak during prolonged dry periods throughout their first three years. Watch for signs of drought stress such as leaf curl, premature leaf drop, or wilting foliage and respond quickly. A tree stressed in its first couple of seasons may survive but often never fully recovers its vigour.
💡 Top Tip
Adding mycorrhizal fungi granules to the roots at planting time can significantly speed up establishment. These beneficial fungi form a symbiotic relationship with tree roots, extending their reach and improving water and nutrient uptake. Dust them directly onto the roots before lowering the tree into the hole. You can buy them in small sachets from most garden centres.
Formative pruning: shaping your young tree
Pruning a newly planted tree may feel counterintuitive when it is already working hard to establish, but a small amount of well-judged formative pruning in the first few years will shape the tree’s entire future structure. The goal is not to aggressively reduce the tree but to remove anything that works against a good long-term framework.
The starting point for any tree is what I call the four Ds: remove any branches that are dead, diseased, damaged, or crossing. Dead wood saps energy and can harbour disease. Crossing branches rub against each other, creating wounds that serve as entry points for pathogens. Address these first, using clean, sharp secateurs for smaller growth or a pruning saw for anything thicker than your thumb.
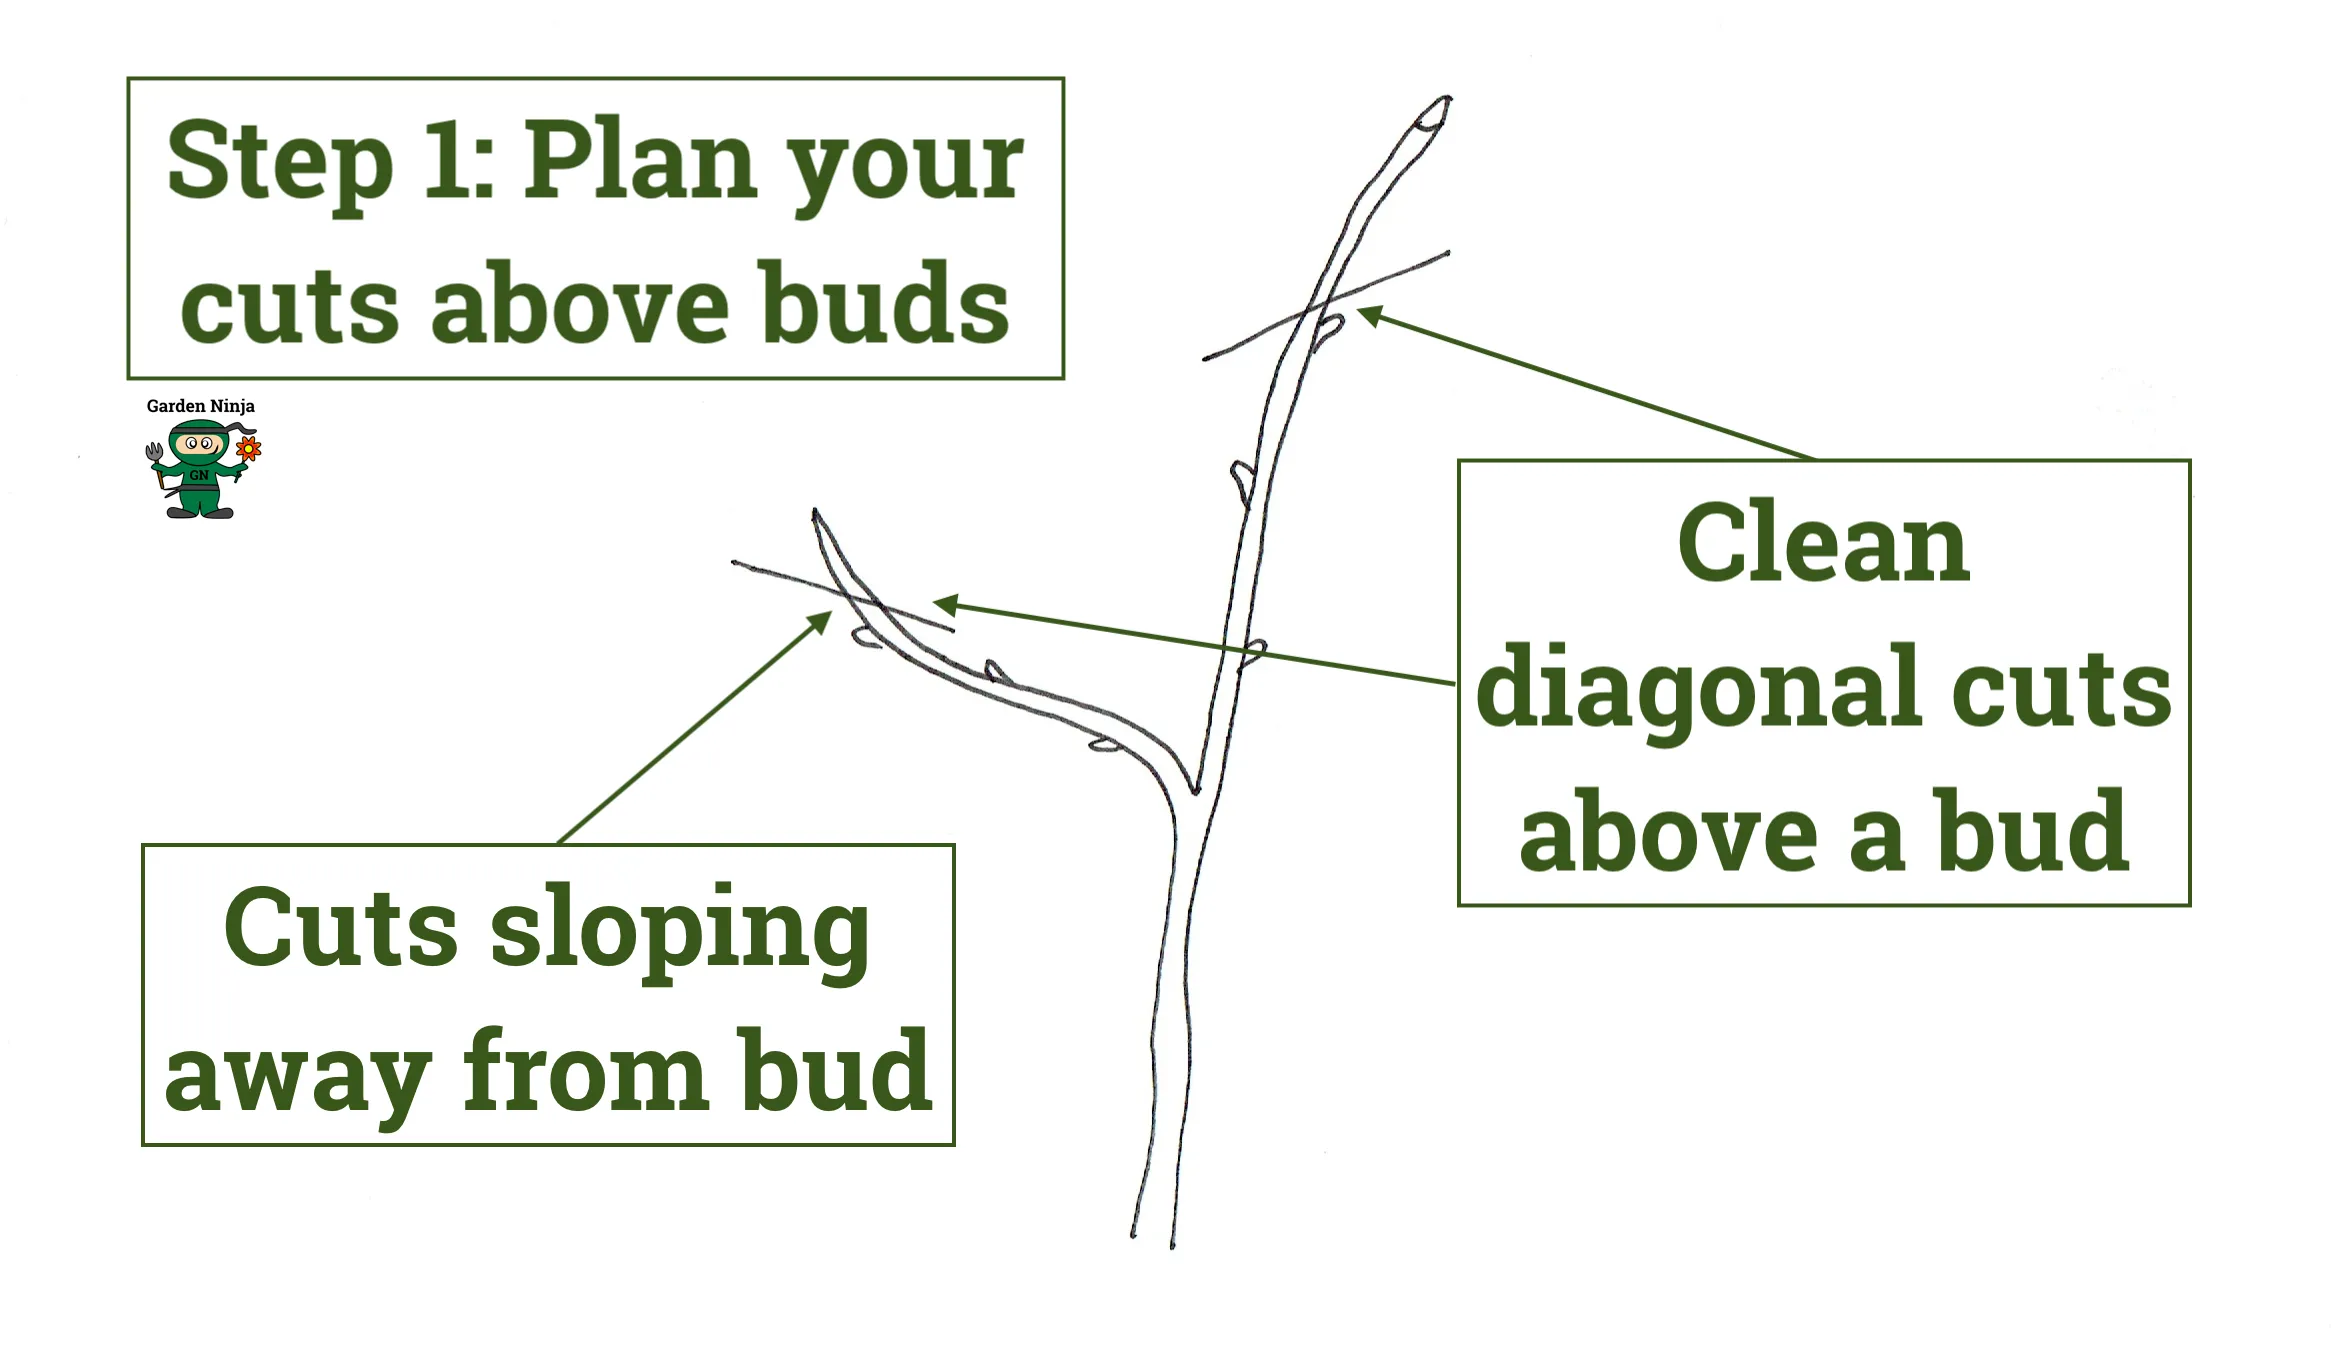
Once the four Ds are addressed, work around the tree looking for any branches that are growing inward toward the centre, at an awkward downward angle, or that are competing directly with the leader (the main upright trunk). Cut these back to the next outward-facing bud or the next branch junction. Always cut to a bud or junction rather than leaving a stub, as stubs die back and can introduce disease.
For most ornamental trees, light formative pruning once a year in late winter while the tree is dormant is sufficient. For fruit trees, the timing and technique become more specific. I have detailed guides on apple tree pruning and pear tree pruning if you need more specific guidance.
If a tree is casting too much shade as it matures, consider crown lifting rather than removal. Crown lifting is the process of removing the lower branches to raise the canopy and let more light underneath. I cover this technique in detail in my guide on how to crown lift a tree, and it can transform an overpowering tree into an elegant specimen without losing all the wildlife value and structure it provides.
Positioning trees in the garden
Where you plant a tree is just as important as how you plant it. One of the most common mistakes I see is trees planted tight to the boundary fence, where they quickly become cramped, grow unevenly toward the light, and cause friction with neighbours as they expand over the boundary. A tree planted in open ground, where you can access it from all sides, not only grows more symmetrically but looks far more purposeful in the garden.
Think about trees as focal points rather than background fillers. A well-placed tree draws the eye through a garden and creates a sense of journey and destination. I often use trees as punctuation marks: one specimen at the end of a path or a group of three on an open lawn creates far more impact than a line of trees planted along the fence.
Always consider the ultimate height and spread of your chosen tree before you finalise the planting position. Trees that may overhang drains, overhead cables, or neighbouring properties will cause expensive, disruptive problems to resolve later. As a general guide, keep trees at least 5m from the house for smaller species and further for anything that will exceed 10m at maturity. For smaller garden trees and multistem specimens, a tree ring in a lawn is a wonderful way to make a specimen tree a true focal point without it competing with border plantings for space.
Frequently asked questions about planting trees
How deep should I plant a tree?
Plant the tree so that the root collar, where the roots begin to flare out from the trunk, sits level with or very slightly above the surrounding soil. The hole should be no deeper than the root ball. Planting too deep is one of the most common causes of tree failure in the first few years, as it can bury the graft and cause the bark at the base to rot.
Should I add compost or fertiliser to the planting hole?
Not in the hole itself. Adding rich compost to the planting hole can discourage the roots from spreading outward into the surrounding soil. Backfill with the soil you removed from the hole, and save your compost for a mulch layer on the surface after planting. If the surrounding soil is very poor, you can add a modest amount of well-rotted organic matter to the backfill, but keep it to a small proportion of the overall mix.
How long does it take for a tree to establish after planting?
Most trees planted during dormancy will begin sending out new roots within the first few weeks and show good active growth in their first spring. As a rough guide, allow one year of establishment for every inch of trunk diameter at planting time. A containerised tree with a trunk of 4cm might take three to four years to be fully self-sufficient. During this period, consistent watering during dry spells is the single most important thing you can do.
Should I stake all newly planted trees?
Most newly planted trees benefit from at least one season of staking, particularly in exposed or windy positions. The exception is very small bare-root whips, which are flexible enough to withstand wind without staking. For all other trees, a short angled stake that allows the top of the tree to move freely is better than a tall rigid stake that holds the whole tree completely firm. Remove stakes once the tree is clearly anchored, usually after two to three growing seasons.
Can I plant a tree in summer?
You can plant a container-grown tree at any time of year, including summer, but it requires significantly more aftercare. You will need to water every two to three days during dry weather and be vigilant for signs of heat stress. Bare-root and root-balled trees should not be planted in summer as they are not in a dormant state and will not establish reliably. If you must plant in summer, choose a cloudy day, water thoroughly before and after planting, and apply a thick mulch to retain as much soil moisture as possible.
What is the best mulch for a newly planted tree?
Chipped bark, peat-free compost, or leaf mould all work well. Apply a layer 5 to 7cm deep over the root zone, keeping a clear gap of at least 5cm from the trunk itself. Avoid using lawn clippings directly around a tree as these can mat together, restrict airflow, and produce excessive heat as they decompose. A good quality peat-free wool compost is my personal recommendation as it retains moisture exceptionally well without becoming waterlogged.
My newly planted tree is dropping its leaves. Is it dying?
Leaf drop after planting is very common and is usually transplant shock rather than a sign the tree is dying. The tree is responding to root disturbance by shedding leaves to reduce the amount of water it needs to transport. Keep watering consistently and avoid fertilising at this stage as it can stress the tree further. If the tree drops all its leaves but the stems remain green and pliable when scratched with a fingernail, the tree is alive and should recover. Give it a full growing season before drawing any conclusions.
🌳 Garden Ninja Summary: How to Plant a Tree
Planting a tree well comes down to a handful of principles done consistently and carefully. Plant at the right time of year (autumn or early spring wherever possible), dig wide rather than deep, keep the root collar at or above soil level, firm in properly, stake with rubber ties, mulch generously, and water regularly through the first season. Get those steps right and you will give your tree the foundation it needs to thrive for decades.
Transform Your Garden Knowledge with Garden Ninja’s Expert Resources
Ready to elevate your gardening beyond basic tasks? My comprehensive online courses provide the expertise to transform you from enthusiastic beginner to confident garden creator.
With courses starting from just £29, you gain access to award-winning design knowledge.
29
Garden Design Examples for Small Gardens: 30 Design Templates & Planting Plans
Garden Design Examples for Small Gardens: 30 Design Templates & Planting Plans: In this online gardening course, I’ll walk you through 30 fantastic garden designs, explaining the logic behind the layout, the plant choices, and take-home tips for applying them in your own garden.
Weekend Garden Makeover: A Crash Course in Design for Beginners
Learn how to transform and design your own garden with Lee Burkhills crash course in garden design. Over 5 hours Lee will teach you how to design your own dream garden. Featuring practical design examples, planting ideas and video guides. Learn how to design your garden in one weekend!
Garden Design for Beginners: Create Your Dream Garden in Just 4 Weeks
Garden Design for Beginners Online Course: If you want to make the career jump to becoming a garden designer or to learn how to design your own garden, this is the beginner course for you. Join me, Lee Burkhill, an award-winning garden designer, as I train you in the art of beautiful garden design.
My Garden Design for Beginners course covers everything from reading your soil and aspect to creating planting plans that work in the real world. Over 2,000 students have already joined the Ninja community.
Lee Burkhill, known as the Garden Ninja, is an award-winning garden designer and horticulturist with over 30 years of gardening experience and 15 years as a professional garden designer. A qualified RHS (Royal Horticultural Society) professional, Lee specialises in sustainable garden design and practical horticultural advice. He designs and presents on BBC1’s Garden Rescue and in leading gardening publications. Lee combines three decades of hands-on gardening knowledge with professional design qualifications to help gardeners create beautiful, functional outdoor spaces.
Such a helpful post , invaluable to me as a newbie tree planter! You mention taking into account height and spread of when choosing trees for the garden. Can you recommend a source that I can use to quickly check height and spread of particular trees? Thanks
Hi Emma. The RHS plant finder has useful information on the ultimate height and spread of the plants they list so give that a go! https://www.rhs.org.uk/plants