How to Graft a Fruit Tree: A Beginner’s Step-by-Step UK Guide
Lee Burkhill: Award Winning Designer & BBC 1's Garden Rescue Presenters Official Blog
Expert level
Tree grafting is one of the most established methods of propagating fruit trees. It has a high success rate and gives you an array of options to control the ultimate height of the tree. But as soon as you mention grafting even to experienced gardeners people look on in horror. It's wrongly considered complex, difficult and only for experts. So I attended a tree grafting course to prove that anyone can do it!
Quick Answer
Tree grafting joins a scion (a cutting from your chosen variety) to a rootstock (which controls eventual tree size) using a clean angled cut, grafting tape, and sealing wax. Late winter to early spring is the best time for whip grafting in the UK, when trees are still dormant but sap is beginning to rise. Success rates improve dramatically with sharp, sterile tools and cuts that are as flat and uniform as possible, so the cambium layers of both parts can make full contact.
Tree grafting is one of those techniques that sounds far more complicated than it actually is. I first tried it at a workshop held at Ordsall Hall in Salford, a beautiful Tudor manor and knot garden here in the North West. Peter Nicols from the Northern Fruit Group led the session, and within a few hours, a room full of complete beginners had produced their first grafted apple trees. I went home with five newly grafted specimens, and by May, all five had broken into bud.
I have been growing fruit trees ever since, and grafting remains one of the most satisfying things you can do in the garden. It connects you directly to a tradition that is thousands of years old. Every supermarket apple you have ever eaten began life as a graft. The Braeburn on your kitchen counter, the Cox in the fruit bowl. All of them are joined to a rootstock by someone, somewhere, making the same basic cut you are about to learn.
This guide covers everything you need to know to attempt your first graft, from choosing compatible rootstocks and scion wood through to the moment, several months later, when the buds finally swell and you realise it has worked. I will also cover the tools that genuinely make a difference and where to source good rootstocks in the UK.
Ordsall Hall in Salford, where the grafting workshop took place
When I explain tree grafting to clients during garden consultations, the first question is nearly always: why not just plant the seed? It is a completely fair question, and the answer gets to the heart of what makes grafting so remarkable.
Apple trees do not come true from seed. If you plant a pip from your favourite Cox apple, the resulting tree might produce something completely different: smaller, sourer, or not at all what you wanted. This is because most apple varieties are not self-pollinating; they cross with other varieties nearby, and the seed carries genetics from both parents. You could grow a tree for seven years before it fruits and discover it bears nothing resembling the apple you started with.
Grafting bypasses this entirely. You take a cutting from a known variety, attach it to a rootstock, and the resulting tree is a genetic clone of the original. Every Bramley apple tree in existence traces back through a chain of grafts to a single tree grown from a pip in Nottinghamshire around 1809. That is the power of the technique.
Beyond variety preservation, grafting gives you control over the eventual size of your tree. The rootstock determines how big the tree grows, completely independently of the variety you graft onto it. A Cox apple on an M27 rootstock stays under 1.5 metres and will fit in a large pot on your patio. The same Cox on an MM111 rootstock will eventually reach five metres. This is enormously useful for garden design, and it is something I use regularly when planning fruit trees for smaller urban gardens.
💡 Top Tip
Grafting is also a brilliant way to rescue heritage apple varieties that might otherwise be lost. Many old orchards contain unnamed varieties with exceptional flavour that have never been commercially propagated. If you find such a tree, taking scion wood and grafting it onto new rootstock is the only way to preserve it.
What is a grafted tree?
A grafted tree is essentially two plants fused into one. The lower portion, the rootstock, provides the root system and controls the tree’s eventual vigour and size. The upper portion, the scion, provides the variety and determines what fruit you get. Where they meet is called the graft union, and once healed it becomes the strongest point on the tree.
You can usually identify the graft union on a fruit tree by looking for a slight swelling or kink in the trunk, typically eight to fifteen centimetres above soil level. This is where the two parts have fused together. When you plant a grafted tree, it is essential to keep this union above the soil surface. If it gets buried, the scion can send out its own roots, bypassing the dwarfing effect of the rootstock entirely, and your compact patio tree will suddenly decide to become a full-sized specimen.
Look for the slight bulge near the base. That is the graft union
The compatibility between rootstock and scion matters a great deal. Apple varieties can be grafted onto any apple rootstock, and pear onto quince rootstock. Stone fruits such as plums, cherries, and apricots can often be grafted within the Prunus genus. Mixing incompatible species will result in a union that either fails outright or breaks down after a few years as the two tissues prove unable to transport water and nutrients across the join.
When to graft fruit trees in the UK
Timing is genuinely critical, and getting it right is probably the single biggest factor in whether your graft succeeds. In the UK, late January through to mid-March is the ideal window for whip and tongue grafting, which is the technique most commonly used for beginners and the one I practise at Ordsall Hall. The tree is dormant, but the sap is beginning to stir, and this combination means the cambium tissue on both rootstock and scion is at its most receptive to forming a union.
Used for top-working older trees with thicker stems
The other crucial point is that your scion wood (the cutting from the desired variety) should be collected while still fully dormant, ideally in January or February, before any signs of growth appear. I store mine wrapped in slightly damp newspaper inside a sealed plastic bag in the fridge. They will keep in this state for several weeks without any deterioration, giving you flexibility about when to do the actual grafting.
Tools you will need for grafting
You do not need a great deal of specialist equipment to graft a tree successfully, but what you do use needs to be absolutely sharp and sterile. A blunt knife is the single most common cause of failed grafts. A ragged cut means poor contact between the cambium layers, and that is where the union forms. Sharp, clean cuts give the two pieces every chance of fusing together.
At Ordsall Hall we used penknives and a good set of secateurs, with everything disinfected before we started. Since then I have tried various dedicated grafting knives and they genuinely do make a difference. The blade profile is designed specifically to produce the long, flat cut that whip grafting requires, in a single smooth pull rather than a sawing motion.
🛠 Essential Grafting Tools
Tool
Purpose
Notes
Grafting knife
Making the scion and rootstock cuts
Must be razor sharp; disinfect between trees
Sharp secateurs
Cutting scion wood to length
Bypass type only; disinfect before use
Grafting tape
Binding the graft union
Specialist stretchy tape; degradable types available
Grafting wax
Sealing the graft to prevent dehydration
Beeswax blend is best; softens with hand heat
Sterilising solution
Disinfecting tools between cuts
Methylated spirits or dilute bleach solution
Labels and marker pen
Identifying each graft
Absolutely essential. Grafts look identical once bound
On secateurs, I would strongly recommend a quality bypass pair for collecting scion wood. The cut needs to be clean and precise rather than crushing the wood fibres, which is exactly what anvil secateurs do. I cover the secateurs I trust in my full guide to the best secateurs in the UK.
Apple tree rootstock types and sizes explained
Choosing the right rootstock is one of the most important decisions you will make. The rootstock determines how vigorous the tree becomes, how quickly it bears fruit, whether it needs permanent staking, and how suitable it is for your soil type. Getting this right for the space you have available will save years of frustration.
All the commonly used UK apple rootstocks are prefixed with M (from East Malling Research Station in Kent, where most were developed) or MM (Malling-Merton, a joint programme). The lower the number generally indicates the more dwarfing effect, though this is not entirely consistent across the range.
🌳 Apple Rootstock Guide for UK Gardens
Rootstock
Eventual Height
Years to Fruit
Best For
M27
1.2–1.5m
2–3 years
Containers and patios; needs permanent staking; small annual yield
M9
1.8–2.5m
2–3 years
Small gardens; very productive; needs permanent staking; well-drained fertile soil
M26
2–3m
3–4 years
Bushes and cordons; can be trained; good medium-sized family tree
MM106
3–4.5m
3–4 years
Larger gardens; more drought tolerant; no permanent staking needed after establishment
MM111 / M25
4.5–5m+
4–5 years
Orchards and large plots; full yield; very drought tolerant; long-lived
For most garden grafting projects, M9 or M26 offer the best balance between manageability and productivity. M27 is genuinely excellent for container growing but the small root system means dehydration is a constant risk, especially in the first year or two. If you are planting into the open ground and want an apple tree that will largely look after itself once established, MM106 is the one I come back to most often in garden designs.
You can source good quality apple rootstocks from specialist UK fruit nurseries. Look for bare root rootstocks available November through March. They are considerably cheaper than buying a finished grafted tree and give you complete control over the variety you grow.
Which apple varieties to graft
One of the genuine joys of grafting is that you are not limited to whatever happens to be in your local garden centre. At Ordsall Hall, Peter introduced us to a range of heritage varieties that most people have never encountered, each with its own distinct character and origin story.
For my first grafting session, I chose these five Malus domestica cultivars, and I have grown all of them since:
🍎 Apple Varieties I Have Grafted
Variety
Origin
Season
Character
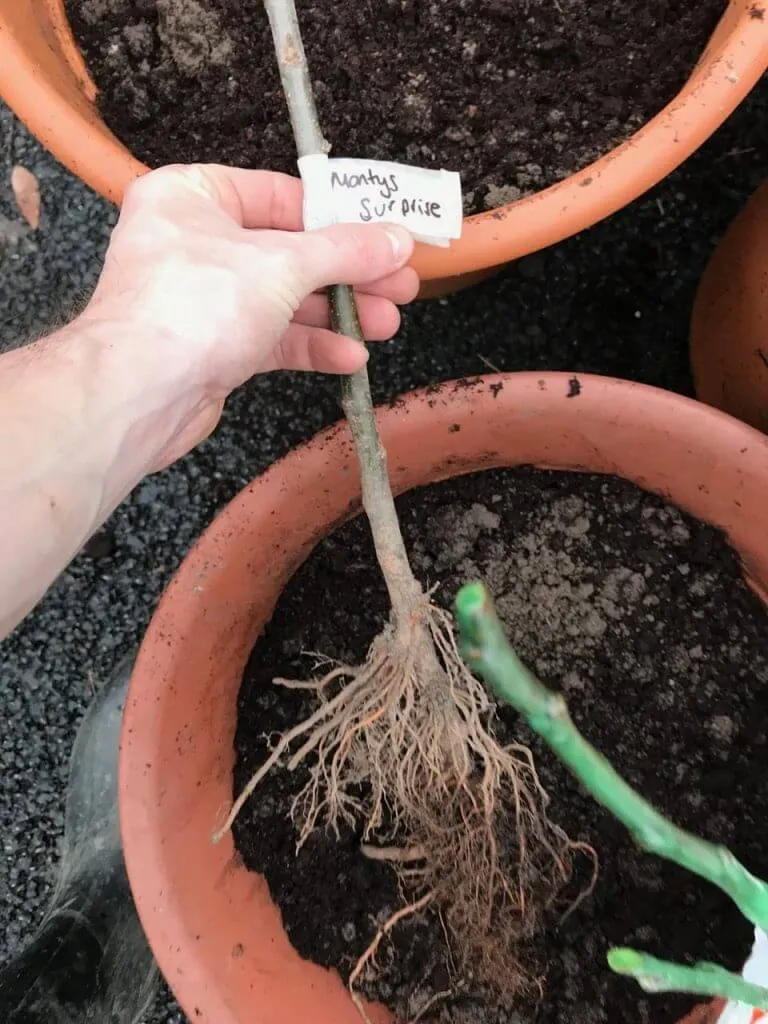
Monty’s Surprise
New Zealand
Late
Shiny red-striped skin; exceptionally large fruit; good disease resistance
Duke of Devonshire
Cumbria, UK
Late
Golden yellow skin; very juicy; self-fertile and useful if growing just one tree
Dual purpose eating and cooking; distinctive nutty flavour; self-sterile so needs a partner
Lord Derby
Cheshire, UK
Mid
Cooking apple; sharp flavour; makes brilliant pies; notably productive
Cox’s Orange Pippin
Berkshire, UK
Mid
The classic British dessert apple; complex aromatic flavour; needs good soil and care
If you are grafting with the aim of having multiple different varieties in a small space, it is worth thinking about pollination groups at this stage. Most apple varieties need a compatible pollination partner flowering at the same time to produce fruit. Choosing two varieties from the same or adjacent pollination group means they will pollinate each other. Self-fertile varieties like Duke of Devonshire or Greensleeves are a useful option if you only have room for a single tree.
One approach I particularly enjoy is creating a family tree, where multiple scion varieties are grafted onto the branches of a single rootstock. This gives you several different apple varieties from one tree, each fruiting at slightly different times through the season. It is genuinely one of the most satisfying things you can grow in a small garden.
Choosing and cutting the scion wood
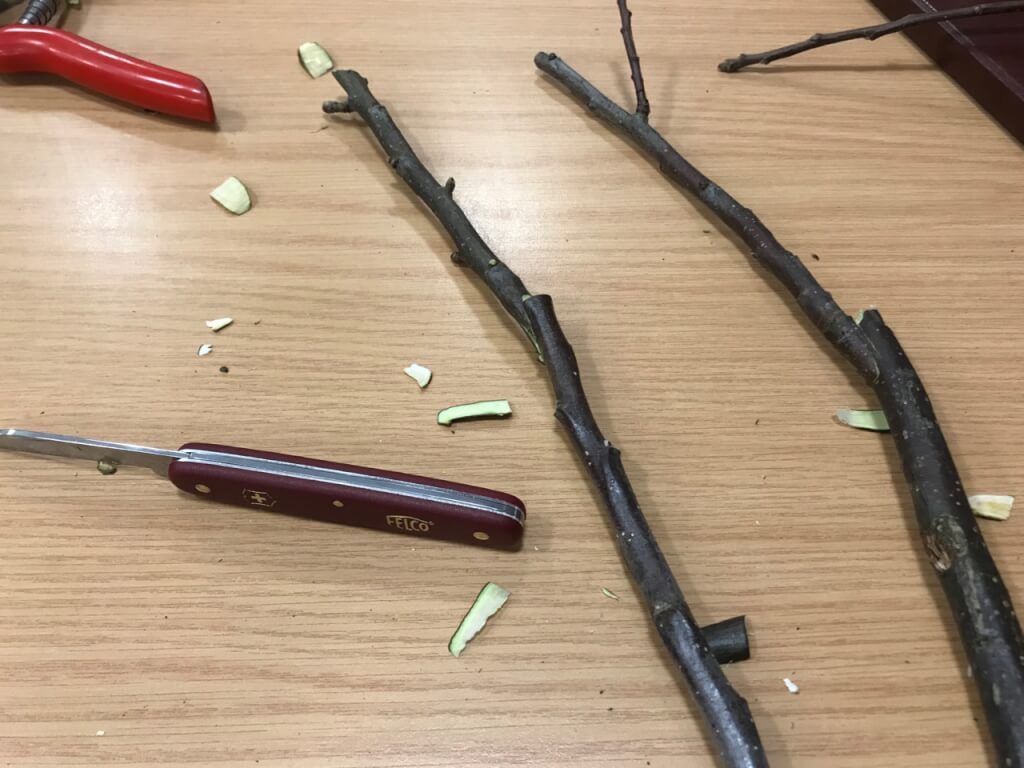
Scion wood selection is where the quality of your graft is largely determined before you even pick up a knife. You are looking for healthy one-year-old growth from the current season. This is wood that has hardened slightly over summer and autumn, turning a deeper brown colour compared to the softer green growth at the shoot tips.
Avoid the very tips of shoots. This newest, softest growth is less likely to take successfully. Instead, work from the middle sections of each stem, where the wood is firmer and the buds are plump and healthy-looking. Any wood showing signs of disease, damage, or dieback should be discarded entirely and your knife disinfected before using it again.
Healthy pencil-thick scion wood cut for practice grafts at Ordsall Hall
Each scion should contain no more than three healthy buds. More than this puts additional demand on the rootstock to supply water and nutrients before the union has formed, which reduces take rates. A length of around ten to fifteen centimetres is ideal. The Orchard Project recommends a 7.5 to 10cm piece as a minimum, and in my experience that range works very well.
💡 Top Tip
If you are collecting scion wood ahead of your grafting date, wrap the cut pieces in lightly damp newspaper, place inside a sealed plastic bag, and store in the bottom of the fridge. They will keep in good condition for four to six weeks. Label each piece clearly with the variety name at the point of collection. Once wrapped they are almost impossible to tell apart.
How to cut a tree graft: the whip and tongue method
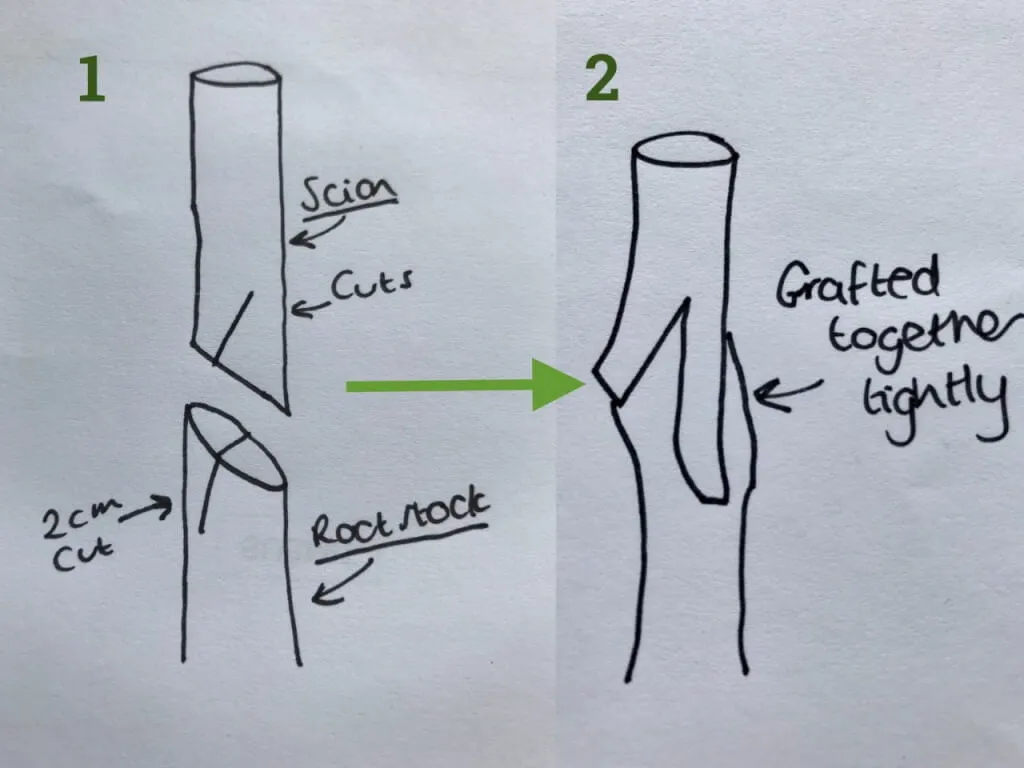
The whip and tongue is the most reliable graft for beginners working with pencil-thick material, which is exactly what your scion and rootstock should be at this stage. The principle is straightforward: you make matching angled cuts on both pieces so they fit together perfectly, then cut a small interlocking tongue into each surface to hold them in alignment while the tape goes on.
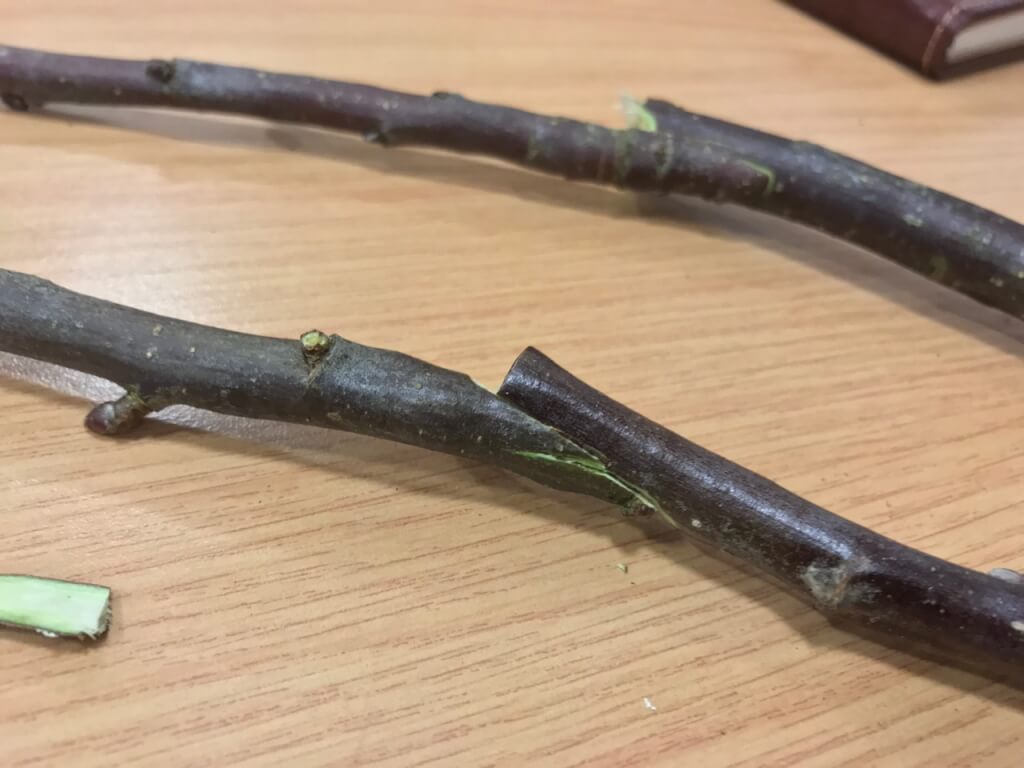
The key is matching cuts. The two pieces need to slot together cleanly
Start by cutting the rootstock to between 15 and 30 centimetres from ground level. This height matters. Too low and you risk splash-back of soil-borne pathogens onto the fresh wound. Then make a long, smooth, downward-sloping cut across the stem at roughly a 45-degree angle. The aim is a flat surface rather than a curved one, and achieving this in a single smooth stroke is much better than multiple sawing passes.
Make the same angled cut on the base of your scion, trying to match the angle and length as closely as possible. The golden rule is that the two cut surfaces must meet flush, with the green cambium layer on both sides lining up. The cambium is the thin growing layer between the bark and the heartwood, visible as a narrow green or pale yellow band just beneath the outer surface. This is where the union forms, and contact between the two cambium layers is what makes the graft work.
Once you have made the two angled cuts, make a small secondary cut into each surface, creating an interlocking tongue. This holds the two pieces in register while you apply the tape, preventing them from sliding out of alignment. It takes a little practice to get both tongues to interlock cleanly, but even an imperfect tongue is better than none.
⚠ Important
Work as quickly as you can once the cuts are made. The exposed cambium tissue begins to dry out and oxidise within minutes, which reduces take rates significantly. Have your tape ready before you make the first cut, so you can move straight to binding without delay.
Joining the rootstock and scion
This is the moment where all the preparation comes together. Slide the two cut surfaces together so the tongues interlock and the cambium layers on at least one side are aligned. Ideally you want alignment on both sides, but with stems of slightly different diameters this is not always possible. Prioritise getting one side perfectly aligned rather than compromising both sides for the sake of symmetry.
The scion is on the left, rootstock on the right. Note how the cut surfaces meet flush
It helps enormously to practise the cutting motion on scrap wood before attempting it on your actual scion material. The technique involves pressing the blade against the wood at the correct angle, then drawing it down in a single, controlled stroke. After a few attempts you will develop a feel for the pressure required, and your cuts will start coming out flat and smooth rather than curved or wavy.
If your two pieces are slightly different thicknesses, which is common when working with material of mixed ages, always err towards placing the scion slightly to one side so the cambium lines up on that side. A graft where only one side is properly aligned will still succeed. A graft where neither side aligns properly will not.
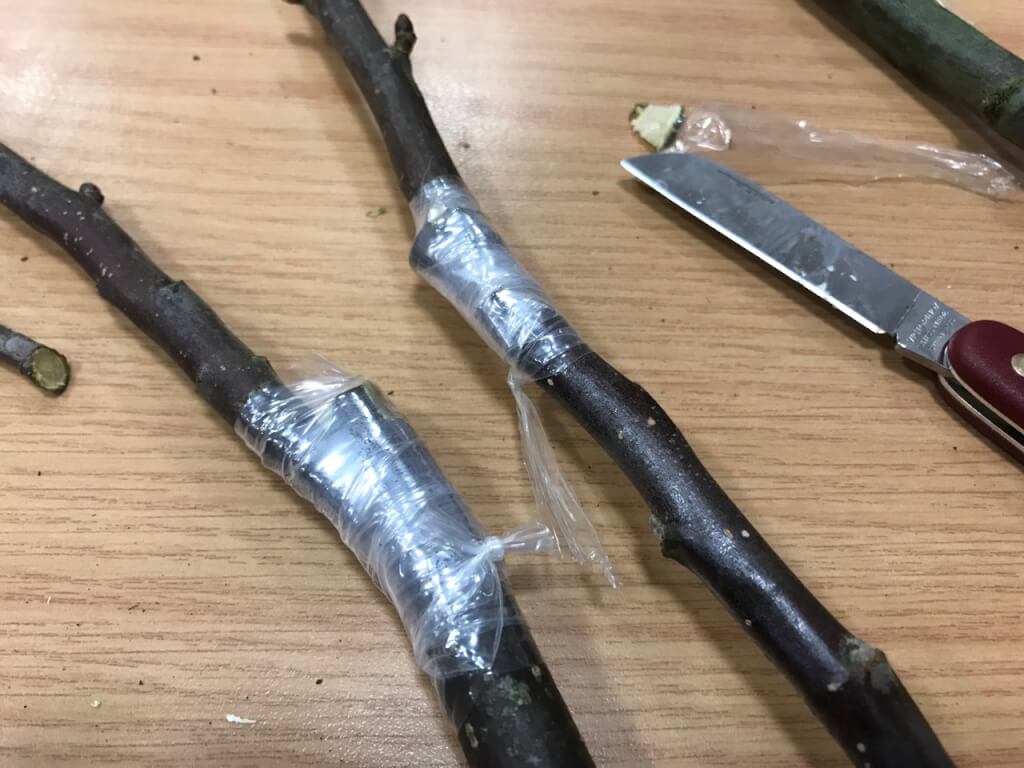
Binding and sealing the graft
Once the two pieces are fitted together, you need to bind and seal the union before anything else. Speed matters here. Every second the exposed cambium is open to the air and exposed to bacteria and fungal spores, the lower your chances of success.
Wrapping the grafting tape firmly around the union, working from below upwards
Use specialist grafting tape rather than ordinary household tape. Grafting tape is stretchy, which allows it to be applied under tension to hold the union firmly together. It also allows the union to expand slightly as it heals, rather than constricting growth as ordinary tape would. Apply it in overlapping spirals, working from below the cut upwards, and finish with a firm double knot at the top.
Then apply grafting wax generously over the entire union and the top cut of the scion. The wax performs two functions: it seals the wound against pathogens, and it prevents the scion from drying out during the critical first weeks before the union forms and water can move across it. At the workshop, Peter used a traditional molten green wax that coated the entire scion, and the buds pushed through it without any trouble once growth began. A beeswax blend grafting wax stick, which softens with the heat of your hands, works equally well for home grafters.
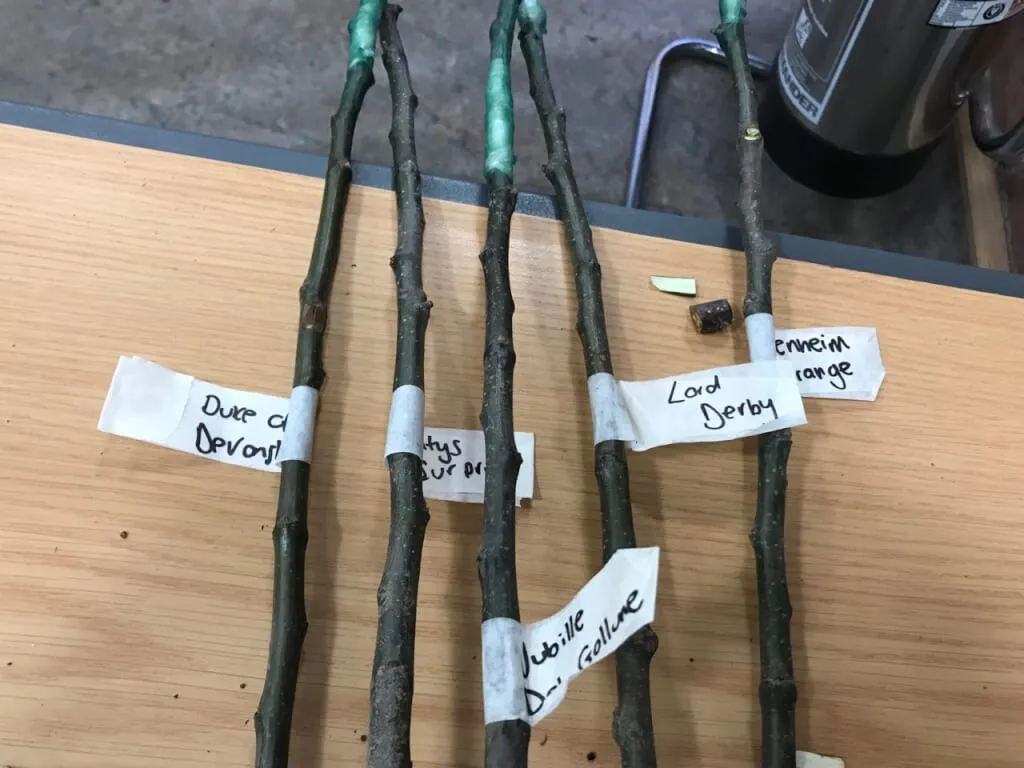
Label every single graft immediately after sealing. This is one of those things that feels unnecessary when you are only making five grafts, but become critically important three months later when they are all sitting in identical pots and you have completely forgotten which is which. I use weatherproof plant labels with a permanent marker, attached to the grafted stem just above the union.
Label every graft at this stage. You will thank yourself in three months
Planting your tree grafts
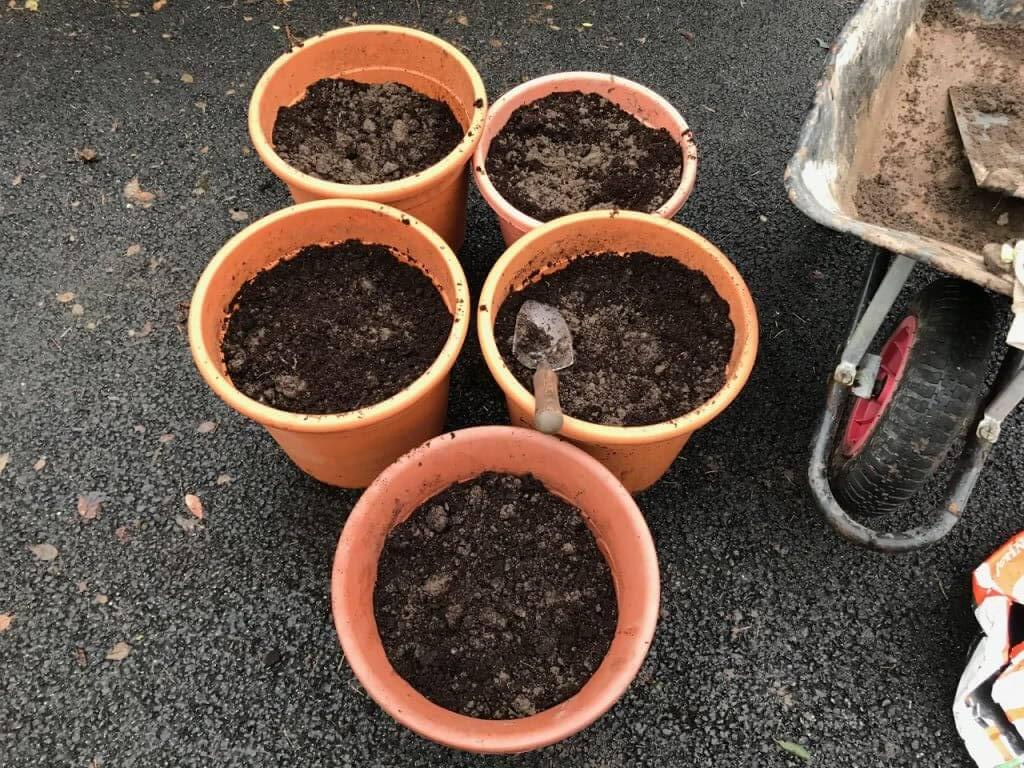
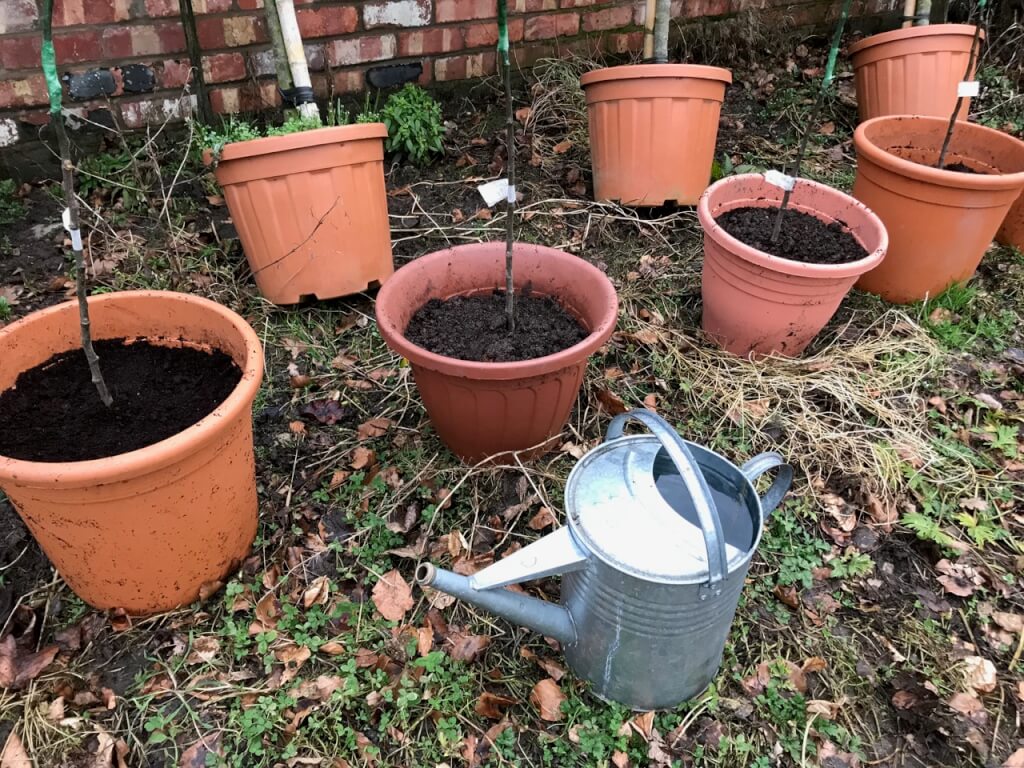
Once bound and sealed, your grafts need to go into growing medium as quickly as possible. The rootstock is bare root at this stage, and bare roots dehydrate rapidly. I prefer to pot grafts into medium-sized containers initially, around 12 to 15 litres, rather than planting straight into the ground. This gives me control over watering, allows me to position them somewhere sheltered, and means I can keep a close eye on which have taken without having to mark the garden.
Getting the rootstock into compost as quickly as possible after binding
I use a mix of roughly half general purpose compost and half good topsoil. The compost is not there primarily for nutrition at this stage, as the tree has no roots actively feeding yet, but for moisture retention. Dehydration is the most common killer of grafted rootstocks in the first few weeks. The compost helps maintain even moisture around the roots while the union is forming and the tree cannot yet draw water efficiently from the soil.
Medium containers with compost and topsoil mix ready for the grafted rootstocks
Plant the rootstock with the graft union clearly above the compost surface. Water in thoroughly after planting, then position the pots somewhere sheltered from wind and strong direct sun. A cold greenhouse or the sheltered side of a fence is ideal. Direct sun on the waxed union in early spring can cause it to crack, letting in the pathogens you have worked to exclude.
Water in thoroughly after potting. Consistent moisture is the key in the first few weeks
The weeks following grafting are the most uncertain, and also the most rewarding when things go right. There is nothing to do during this period except keep the roots moist and resist the temptation to check whether the union is forming by disturbing the tape.
Check the pots every few days and water whenever the top few centimetres of compost begin to dry out. Grafted trees at this stage are not actively growing. They are directing all their energy into forming the union, so they are not drawing water particularly quickly. But letting them dry out even briefly can be fatal, particularly on M9 and M27 rootstocks where the root system is naturally limited.
The first sign that a graft has taken is bud swell on the scion. The buds will begin to plump up, then slowly expand, and eventually push through the grafting wax. This is one of the most satisfying moments in gardening, and the sense of achievement does not diminish with repetition. If a scion remains completely unchanged for eight to ten weeks while others around it are growing, it has probably failed. Remove it cleanly, disinfect the rootstock cut, and the rootstock may still be viable for another attempt.
⚠ Common Grafting Problems and Solutions
Problem
Likely Cause
Solution
Scion shrivels and browns
Union failed; scion dried out
Remove and reattempt if rootstock is still healthy
No growth after 10 weeks
Union has not formed; wrong timing
Likely failed. Try chip budding in late summer instead
Rootstock sends up shoots below union
Rootstock is more vigorous than scion
Rub out rootstock shoots immediately. They will take over if left
Union forms but tree grows slowly
Partial cambium contact; restricted union
Remove tape promptly when growth reaches 46cm; stake carefully
Graft cracks at union in wind
Insufficient staking; union still fragile
Always stake grafted trees; the union is permanently the weakest point
One thing to watch for carefully is growth emerging from the rootstock below the graft union. This happens when the rootstock throws up its own shoots, and these must be removed immediately by rubbing them off with your thumb or cutting them flush. If left, they will outcompete the scion growth and eventually take over the tree entirely, reverting it to the rootstock, which in the case of M9 or MM106 produces small, unpalatable fruit, or none at all.
When to untie tree grafts
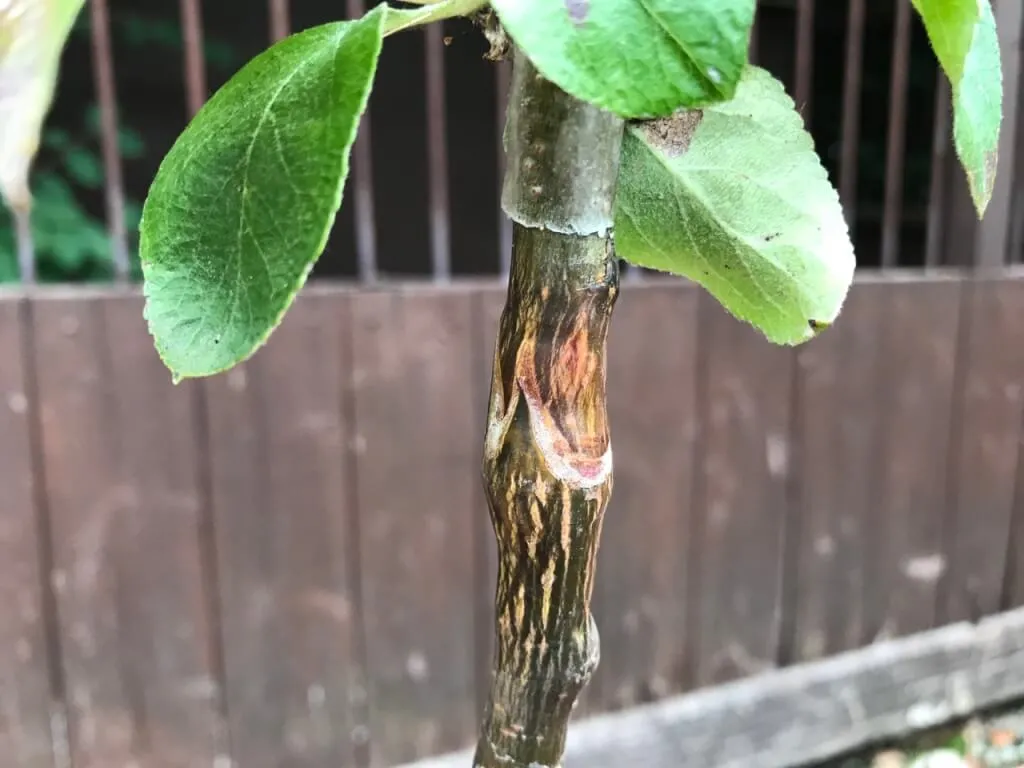
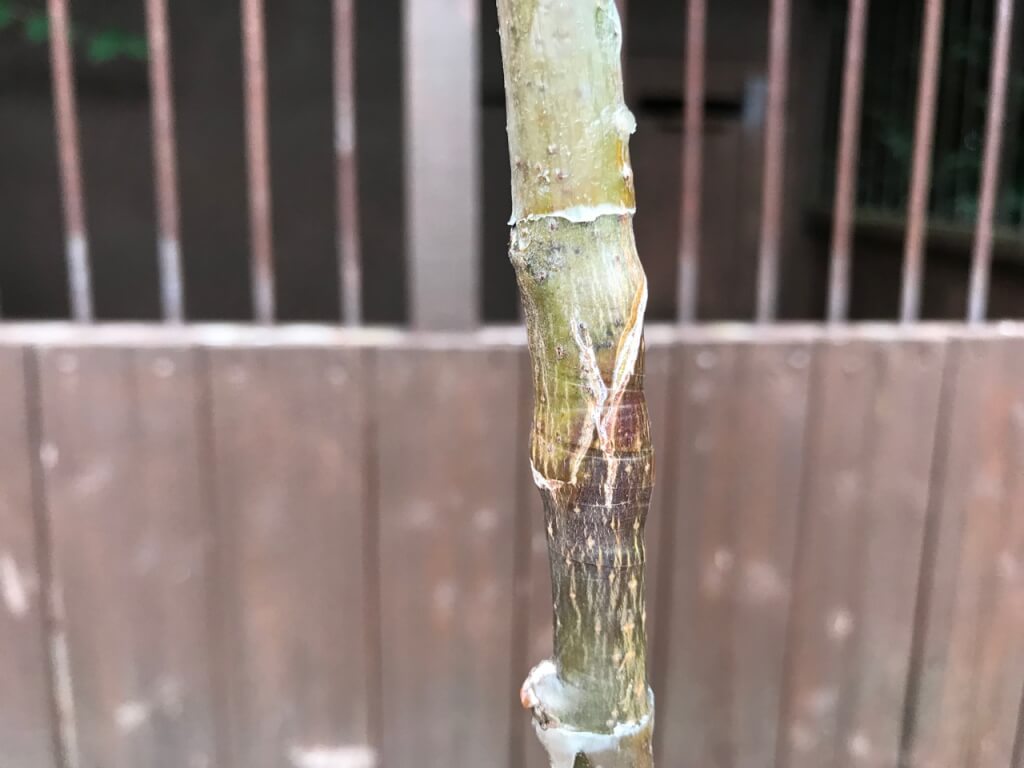
Leave the grafting tape in place until the new scion growth has reached around 46 centimetres in height. At that point the union should be well-healed and the tape can be carefully removed by cutting the knot and unwinding it slowly rather than slitting it with a knife, which risks nicking the bark and creating a wound that invites fungal infection.
A successful scar should be smooth and uniform. This one healed beautifully
Once the tape is removed, stake the tree carefully. The graft union is always the point of least mechanical strength on a grafted tree, and a gust of wind at this stage can snap the scion clean off at the union, undoing months of patient work. I stake mine with a cane that extends above the top growth, and here is a trick I picked up from Peter at Ordsall Hall: birds, particularly pigeons, love to perch on the very tips of young grafted trees. A stake taller than the scion gives them an alternative perch and saves the graft from their weight.
Results: 6 months on
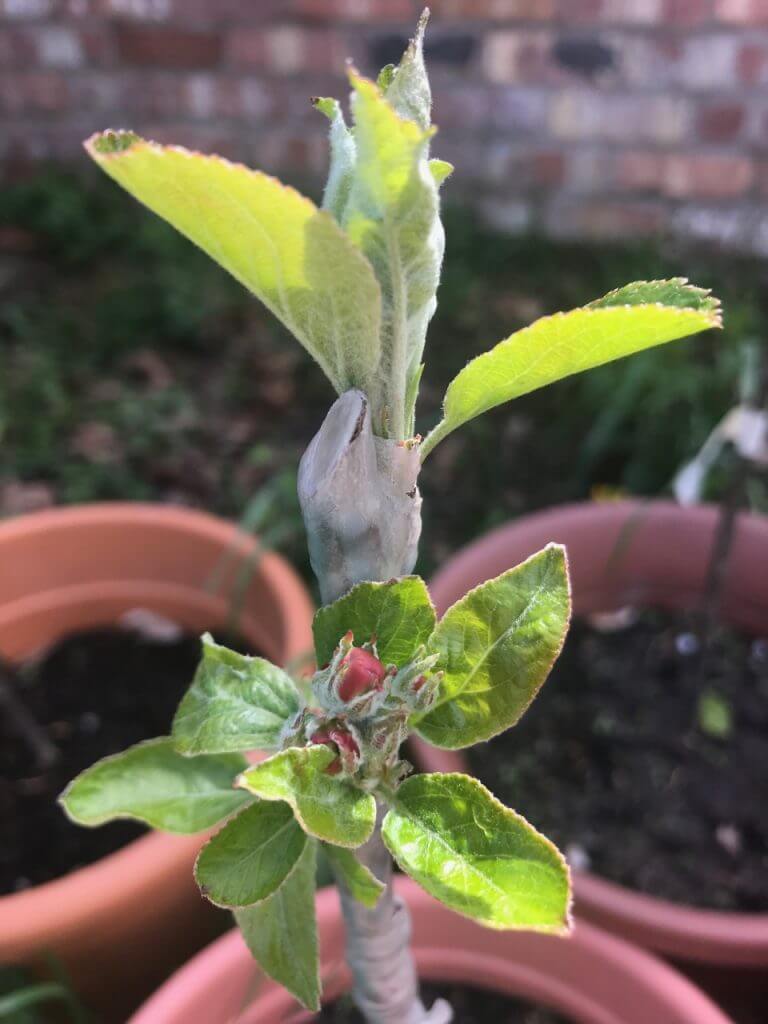
My grafts were completed in early February. By May, just four months later, the buds on the scions had swollen visibly, then pushed through the grafting wax and opened into proper leaves. All five of the trees I grafted at Ordsall Hall took successfully, which surprised even Peter, who told me a 70 to 80 per cent take rate is more typical for beginners.
May, four months after grafting, and the scions are budding. This is the moment you wait for
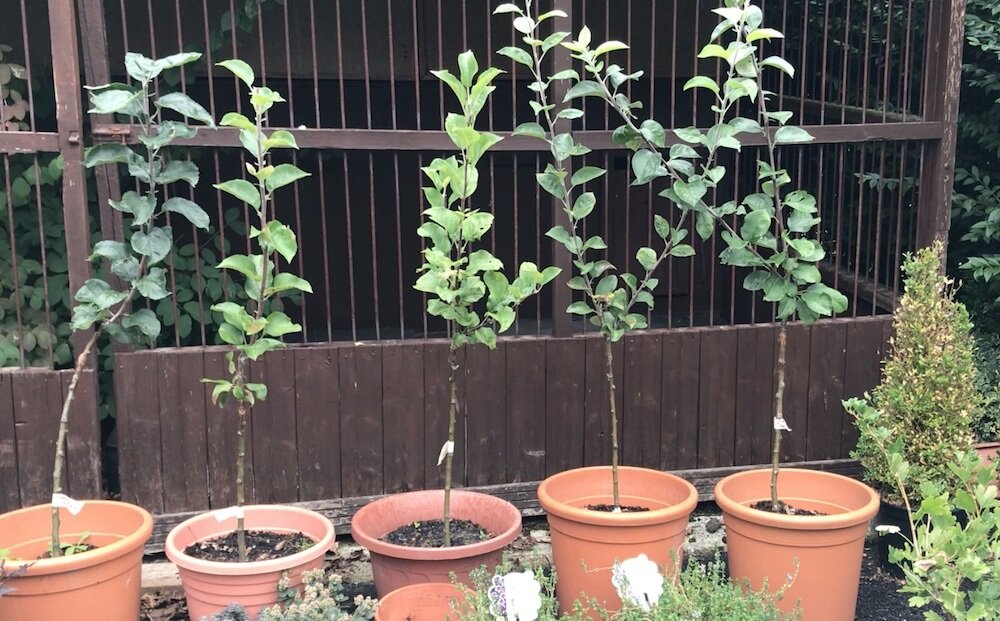
By August, the trees had grown on considerably and the graft scars were already beginning to smooth over. The joins were clean and uniform, a direct result of taking the time to practise the cutting motion on scrap material first and making sure both cambium layers were aligned before binding.
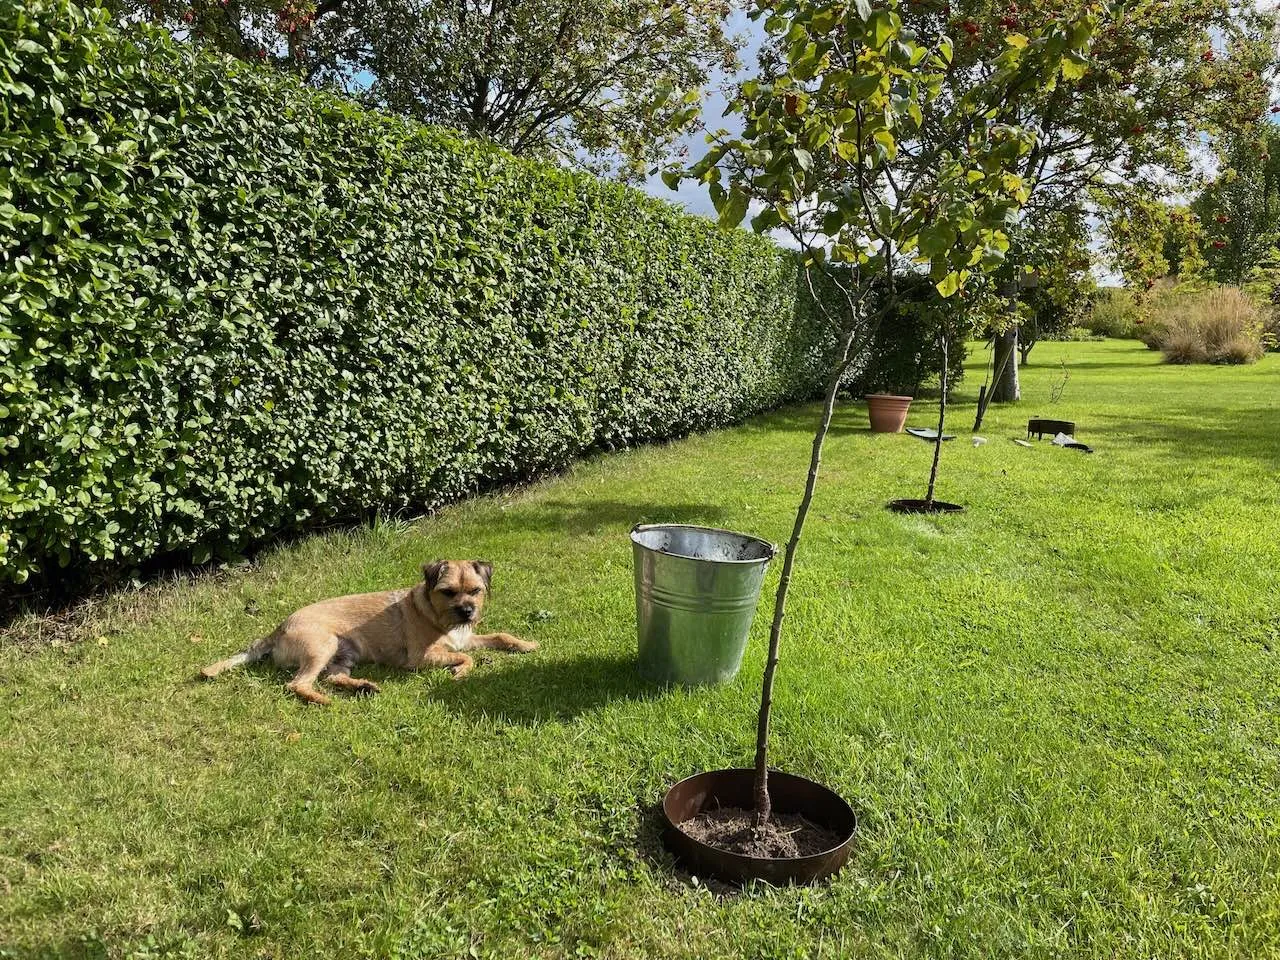
Six months on and the mini orchard is taking shapeA clean, smooth scar. This will fade to near invisible over time
In March the following year, all five trees went into the orchard next to the Exploding Atom Garden, staked and protected with foil wraps around the base to deter rabbit damage. They are still growing there now, each one producing a different variety of apple from a tree I made with my own hands from a cutting and a bare root. There is very little in gardening that beats that feeling.
If you want to see more about how I planted the grafted trees out and potted them on, the video below covers that stage in detail.
Frequently asked questions about tree grafting
Can you graft any fruit tree onto any rootstock?
No. Rootstock and scion must be compatible, which generally means they need to be within the same genus. Apple varieties can be grafted onto apple rootstocks, pears onto quince rootstock, and stone fruits (plums, cherries, apricots, peaches) can often be grafted within the Prunus genus. Attempting to graft incompatible species together will usually result in the union appearing to form but then breaking down over the following months or years as the tissues cannot properly exchange water and nutrients.
What is the best time of year to graft apple trees in the UK?
Late January to mid-March is the ideal window for whip and tongue grafting in the UK, when the trees are still dormant but sap is beginning to rise. Chip budding and T-budding can be done from mid-summer into early autumn (July to September). Scion wood for spring grafting should be collected and stored while still fully dormant, ideally in January or February.
Why has my graft failed?
The most common causes of graft failure are poor cambium contact (usually from uneven cuts), dehydration of the scion before the union forms, contamination of the cut surfaces with bacteria or fungal spores, and using scion wood that was too old, diseased, or improperly stored. Working quickly, keeping tools sterile, and sealing thoroughly with grafting wax addresses the majority of these issues. A take rate of 70 to 80 per cent is realistic for beginners on a first attempt, improving considerably with practice.
How long does it take to know if a graft has been successful?
You should see the first signs of bud swelling on a successful graft within six to eight weeks of grafting in early spring. Full leaf opening typically follows a few weeks after that. If a scion shows no movement at all after ten weeks while conditions are warm enough for growth, it has almost certainly failed. The rootstock may still be viable for a chip budding attempt later in the summer.
Do I need to remove grafting tape after the graft takes?
Yes. Once the scion growth has reached approximately 46 centimetres, the tape should be removed to prevent it from constricting the developing stem. Cut the knot carefully and unwind the tape rather than slitting it, to avoid any risk of damaging the bark at the graft union. Some degradable grafting tapes will break down naturally without removal, which is useful if you are grafting large numbers of trees and cannot monitor each one closely.
Can I graft onto an existing old apple tree?
Yes, and this technique, known as top-working or framework grafting, is used to change the variety of an established tree. It uses a different technique (rind or cleft grafting rather than whip and tongue) because the rootstock stems are too thick for whip grafting. It is an excellent way to add new varieties to an old tree and is commonly used in orchard restoration work. The principle of cambium contact, good sealing, and sterile tools remains exactly the same.
Where can I buy apple rootstock in the UK?
Specialist UK fruit nurseries are the best source. Look for bare root rootstocks available November through March. Local fruit growing groups, orcharding societies, and heritage orchard projects (such as the Northern Fruit Group, who ran the Ordsall Hall workshop) often supply rootstocks at reasonable cost and can offer advice on which is most suitable for your soil and intended variety. You can also find rootstocks from reputable online suppliers and through Amazon during the winter season.
Increase your Garden Design Skills with Garden Ninja’s Courses
Ready to elevate your gardening beyond basic tasks? My comprehensive online courses provide the expertise to transform you from enthusiastic beginner to confident garden creator.
With courses starting from just £29, you gain access to award-winning design knowledge.
29
Garden Design Examples for Small Gardens: 30 Design Templates & Planting Plans
Garden Design Examples for Small Gardens: 30 Design Templates & Planting Plans: In this online gardening course, I’ll walk you through 30 fantastic garden designs, explaining the logic behind the layout, the plant choices, and take-home tips for applying them in your own garden.
Weekend Garden Makeover: A Crash Course in Design for Beginners
Learn how to transform and design your own garden with Lee Burkhills crash course in garden design. Over 5 hours Lee will teach you how to design your own dream garden. Featuring practical design examples, planting ideas and video guides. Learn how to design your garden in one weekend!
Garden Design for Beginners: Create Your Dream Garden in Just 4 Weeks
Garden Design for Beginners Online Course: If you want to make the career jump to becoming a garden designer or to learn how to design your own garden, this is the beginner course for you. Join me, Lee Burkhill, an award-winning garden designer, as I train you in the art of beautiful garden design.
Tree grafting is genuinely one of the most rewarding skills a gardener can develop. It connects you to a tradition thousands of years old, gives you access to heritage varieties you will never find in a garden centre, and puts you in complete control of the size and character of the fruit trees you grow. The technique is learnable in an afternoon, and with every attempt your take rates improve.
Choose compatible rootstock and scion material. Work in late winter while the trees are dormant. Make clean, flat cuts that align the cambium layers on both pieces. Bind firmly, seal generously with wax, label immediately, and keep the roots consistently moist. Five simple principles that, when followed carefully, produce results that feel genuinely remarkable the first time those buds swell and push through.
Your subscription could not be saved. Please try again.
Your subscription has been successful.
Lee Burkhill
Lee Burkhill, known as the Garden Ninja, is an award-winning garden designer and horticulturist with over 30 years of gardening experience and 15 years as a professional garden designer. A qualified RHS (Royal Horticultural Society) professional, Lee specialises in sustainable garden design and practical horticultural advice. He designs and presents on BBC1’s Garden Rescue and in leading gardening publications. Lee combines three decades of hands-on gardening knowledge with professional design qualifications to help gardeners create beautiful, functional outdoor spaces.
Apparently, grafting pliers can make the cutting much easier — someone recommended an Italian make which I can’t remember but a search on Amazon brings up quite a few choices.
Apparently, grafting pliers can make the cutting much easier — someone recommended an Italian make which I can’t remember but a search on Amazon brings up quite a few choices.
Hey Jake. I’ve seen those grafting pliers. They look really innovative. However I really wanted to learn the old fashioned way. Fingers crossed my grafted trees take! Have you grafted anything? Lee


Apparently, grafting pliers can make the cutting much easier — someone recommended an Italian make which I can’t remember but a search on Amazon brings up quite a few choices.
Apparently, grafting pliers can make the cutting much easier — someone recommended an Italian make which I can’t remember but a search on Amazon brings up quite a few choices.
Hey Jake. I’ve seen those grafting pliers. They look really innovative. However I really wanted to learn the old fashioned way. Fingers crossed my grafted trees take! Have you grafted anything? Lee