Lee Burkhill: Award Winning Designer & BBC 1's Garden Rescue Presenters Official Blog
Intermediate level
Ground elder (Aegopodium podagraria) is one of the most tenacious invasive weeds here in the UK. Whilst many gardeners moan on about dandelions and nettles popping up, any one who has experienced ground elder knows its the next level of hard
to remove plants. If you've suddenly noticed beautiful prolific leaves emerging from your flower beds that spread like wildfire it is probably ground elder. Let me explain how to tackle getting rid of it!
If you’ve ever wrestled with ground elder (Aegopodium podagraria), you’ll know just how tenacious this plant can be. One minute you spot a few innocent-looking leaves at the back of the border, and the next thing you know, it’s elbowing your perennials out of the way. Shoots appear seemingly everywhere across your flower beds, smothering Geraniums and anything else in their path. The big question is why ground elder seems to be everywhere and why it is so remarkably difficult to eradicate.
Having dealt with ground elder in my own garden and on garden design projects across the UK, I know how disheartening it can be. But there is hope. Let me walk you through everything you need to know about this plant, from understanding why it behaves the way it does to the most effective methods for getting it under control.
Quick Answer
Ground elder (Aegopodium podagraria) is a rhizomatous perennial weed that spreads via underground stems. The most effective removal method is careful hand digging with a hori hori or Japanese hand weeder to extract the full root system. Even a fingernail-sized fragment of root can regenerate, so persistence over several seasons is essential. Avoid hoeing, digging with a spade, or flame weeding as these all spread the problem further.
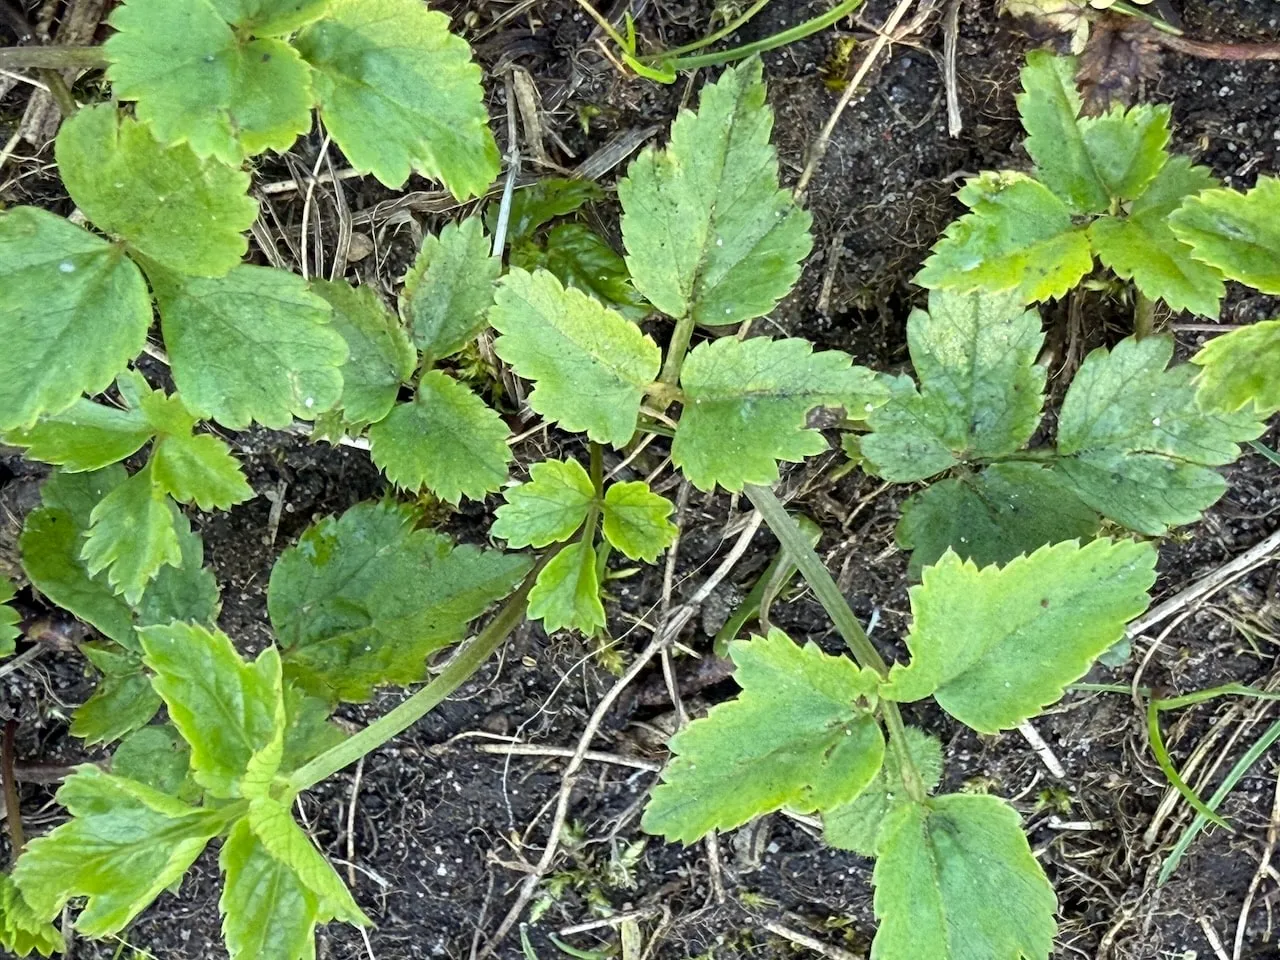
Ground elder is one of those plants that most UK gardeners know by sight before they know its name. The fresh apple-green leaves appear in early spring, looking almost innocent at first glance, with their toothed, compound leaflets and hollow stems. It belongs to the Apiaceae family, making it a relative of cow parsley, hogweed, and fennel. When it flowers in late spring and summer, it produces those characteristic flat-topped white umbel flower heads beloved by hoverflies and other pollinators.
Its Latin name, podagraria, derives from the Greek word for gout, reflecting its long history as a medicinal herb used to treat gout. You might also hear it called goutweed, bishop’s weed, or herb Gerard, depending on where you’re from. In the RHS classification, it sits as an archaeophyte, meaning it was introduced to Britain before 1500 and is now so thoroughly naturalised that it functions as a native plant for ecological purposes.
Let me be very clear about one thing before we go any further: ground elder is a long game. There is no overnight fix. Anyone promising you a single-season solution is setting you up for disappointment. What I can give you is a reliable strategy that, applied consistently, will genuinely bring it under control and, in many cases, eradicate it entirely.
🌿 Ground Elder At A Glance
Botanical Name
Aegopodium podagraria
Common Names
Ground elder, goutweed, bishop’s weed, herb Gerard
Plant Type
Rhizomatous herbaceous perennial (archaeophyte)
Height
30 to 60cm when in leaf; up to 90cm in flower
Flowering Period
Late spring to midsummer (white umbel flowers)
Spread Rate
Rhizomes can travel several feet per year if unchecked
Food plant for 25+ invertebrate species; excellent for pollinators
Edible?
Yes: young leaves edible raw or cooked in spring
2. Underground Invasion: How Ground Elder Roots Work
The primary reason ground elder is so prevalent is its rapid underground spread. It is a rhizomatous perennial, meaning it sends out underground stems, known as rhizomes, that spread widely beneath the soil surface. These rhizomes are incredibly tough, fast-growing, and persistent. You might think you’ve dug it all out, only for a tiny segment of root left behind to regenerate and sprout again. Even a fingernail-sized bit of root can grow into a full plant within a matter of weeks.
These rhizomes are particularly adept at navigating tight, shady spaces, such as under shrubs, hedges, and fences. This means they can remain undetected for years in neglected areas of the garden, or be passed between neighbours without anyone realising. The rhizomes look like white spaghetti strands beneath the soil surface, which makes them identifiable when you’re sieving through soil, but the sheer volume of them makes removal such a commitment.
💡 Top Tip
When removing ground elder rhizomes, look for those distinctive cream-white root strands. Washing the roots of nearby perennials under a tap when transplanting them temporarily makes it far easier to pick out every last ground elder root hiding in the root ball.
This is the biggest problem with ground elder: it is not simply a case of removing it once. It is a continual battle to remove every trace of the plant, sometimes for years before it’s completely gone. I am the eternal optimist when it comes to ground elder, and I do believe it can be fully cleared from most gardens with the right approach and enough persistence. However, in heavily invaded areas or where it is coming in from neighbouring land, complete eradication may not be achievable, in which case management becomes the realistic goal.
3. It Was Brought Here by the Romans
Ground elder is not technically a native UK plant in the strictest sense, even though it has been part of the landscape for so long that it might as well be. The Romans introduced it not as a pest but as a valuable culinary and medicinal herb. I do take issue with people who dismiss it as foreign. It has been growing here for over a thousand years, which in my book earns it the right to be treated as a naturalised native.
Historically, it was eaten in soups and stews, especially in spring when other fresh greens were scarce. The young leaves are edible, tasting somewhere between parsley and spinach. Ground elder was also used as a remedy for gout and arthritis, hence the Latin name podagraria, which relates to foot pain. Because of its usefulness, it was planted deliberately around monasteries, gardens, and estates as an early-season crop. Over time, it escaped cultivation and found its way into wild and semi-wild places, where its survival tactics allowed it to thrive entirely unchecked.
4. Ground Elder Is Shade-Loving and Hard as Nails
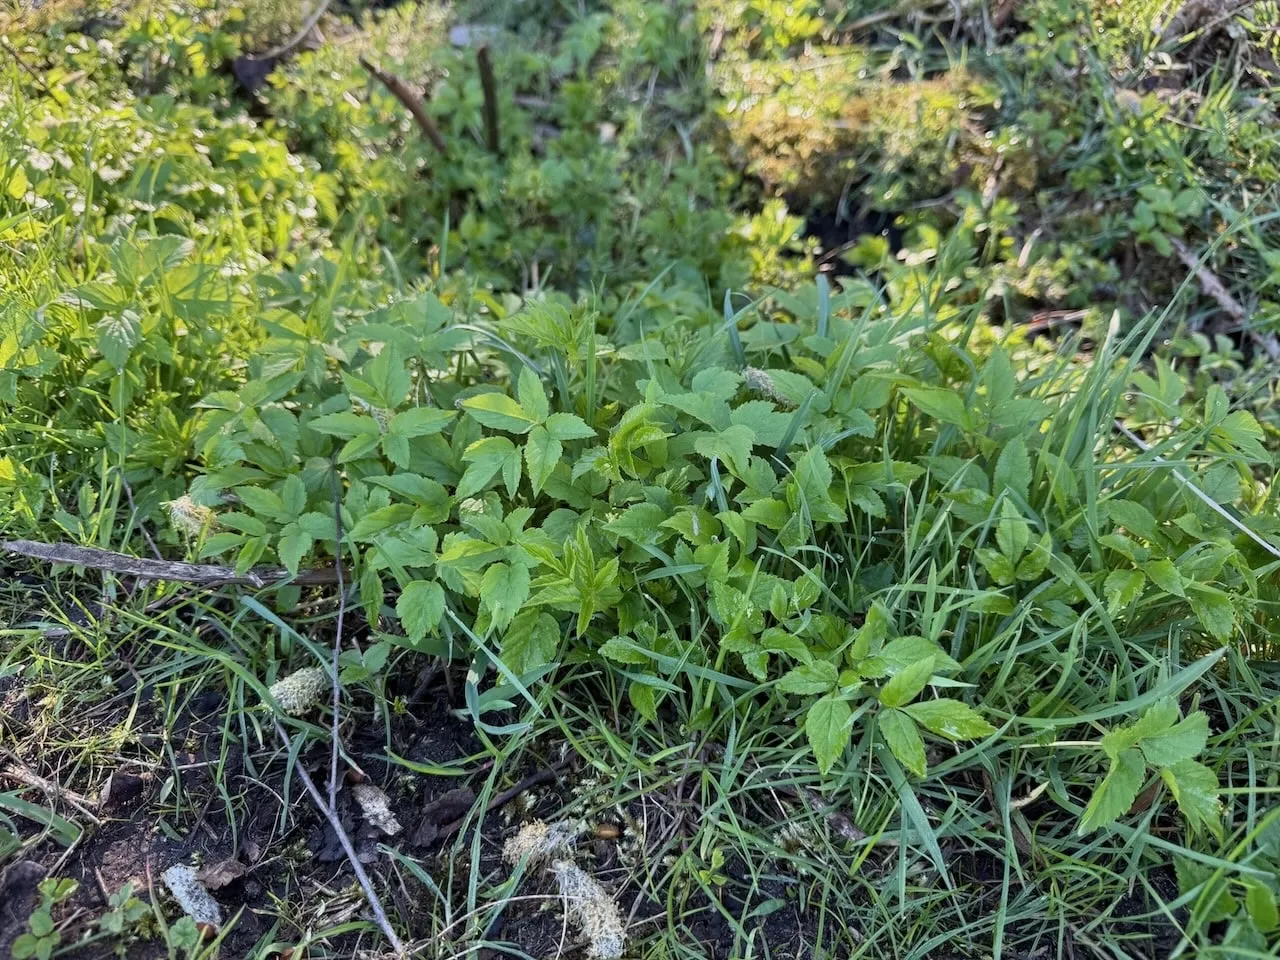
Unlike many garden plants that need sun and rich soil, ground elder is an adaptable survivor. It grows happily in deep shade, tolerates drought once established, and is not remotely fussy about soil type, whether you have sand, clay, or silty soil. This gives it a distinct advantage over fussier perennials and allows it to colonise neglected areas where very little else will grow. You’ll most commonly find it on woodland edges, under hedgerows, or at the back of borders where light is limited, and competition from other plants is minimal.
Because it can photosynthesise and establish itself quickly in early spring, it gets a fast head start on other plants. Usually, by March here in the UK, it is in full leaf, which is why early-season vigilance matters so much. By the time you notice its distinctive, toothed, apple-green leaves, it has already bulked up underground and sent out new rhizomes, ready to colonise any free space in your garden flower beds.
5. How Ground Elder Spreads Into Your Garden
Another reason ground elder is so widespread is the unintentional spread by gardeners. Ground elder can easily hitch a ride in the root balls of other plants, in gifted divisions from well-meaning friends, or in topsoil and compost from contaminated sources. One plant pot can carry the start of a whole new infestation. It is not always easy to spot the young leaves when you’re planting something new, especially when the shoots are tangled among desirable plants.
Even well-managed gardens can suddenly find themselves hosting ground elder after a landscaping project, hedge planting, or compost top-up. Once it is in, the rhizomes can travel several feet per year if left unchecked. One key thing the RHS emphasises, which I strongly agree with, is that you should also consider installing a physical root barrier along shared boundaries where ground elder is coming in from a neighbour’s land. A vertical barrier inserted at least 45cm deep in the soil along the fence line can dramatically reduce reinvasion.
💡 Top Tip
If ground elder is coming in from a neighbouring garden, it is worth having a friendly conversation with your neighbour. They may not even know they have it. A shared effort from both sides of the fence makes long-term control significantly more achievable.
6. Why Pulling Up Ground Elder Doesn’t Work
Because ground elder spreads underground, just pulling out the visible leaves achieves very little. In fact, it may stimulate more vigorous regrowth as the plant tries to regenerate. Digging can work, but it has to be meticulous. Every fragment of root needs to be removed and disposed of (absolutely not composted!), and even then, regular monitoring and repeat digging are usually required over several seasons.
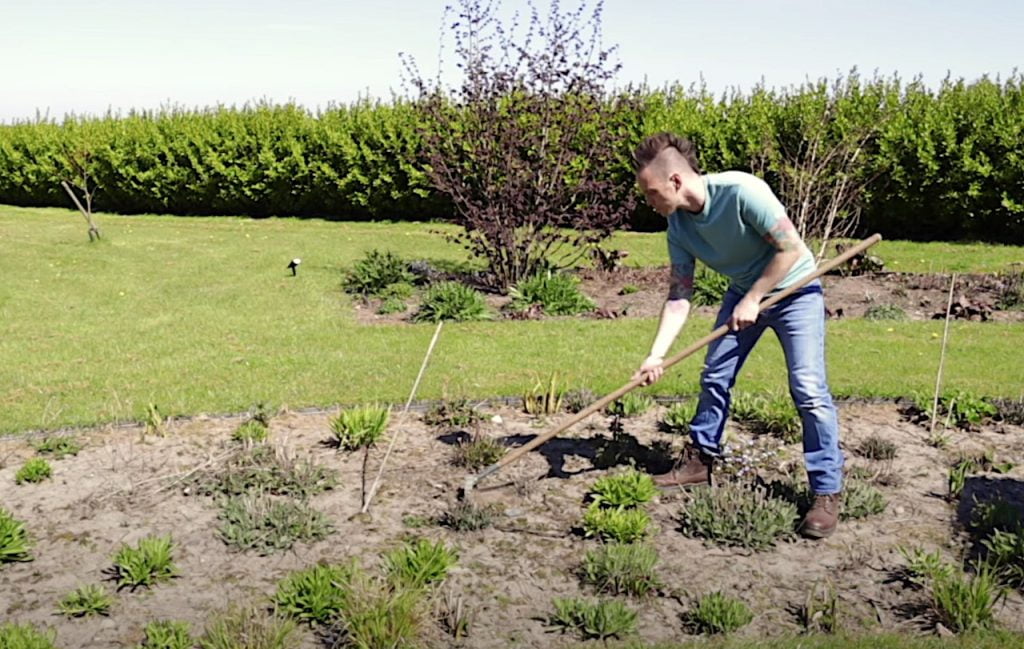
One of the worst things you can do is use a spade to chop through the soil where ground elder is growing. The spade will slice through those rhizomes, propagating them further rather than removing them. A garden fork is marginally better but still causes the roots to tear and snap, leaving fragments behind. This is why smaller, more precise hand tools are so important when tackling this weed seriously.
7. The Best Method for Getting Rid of Ground Elder
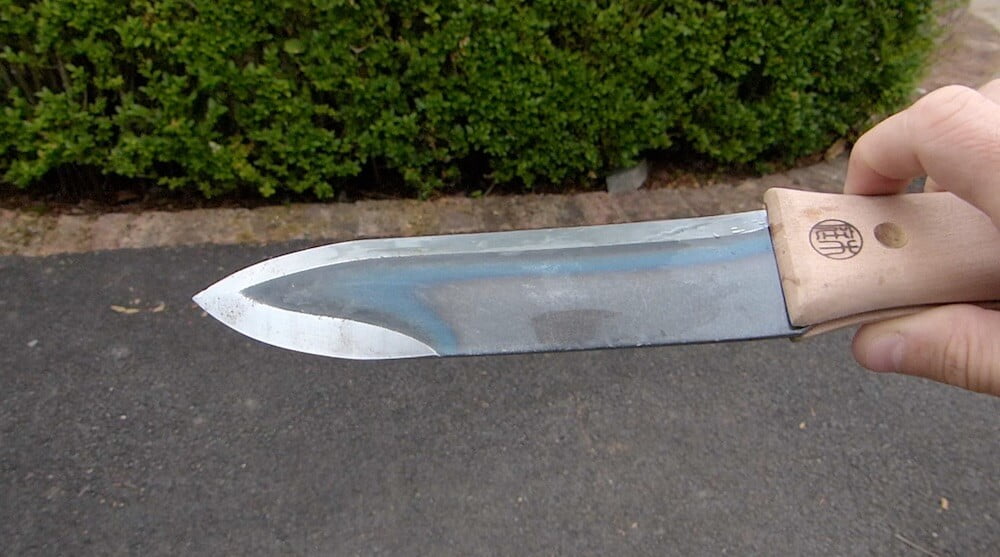
In my experience, the best way to remove ground elder is patient, methodical hand digging with a hori hori or Japanese hand weeder. Working through the soil carefully and extracting as much of the root system as possible in each session, then returning regularly to catch any regrowth, is the approach that genuinely works over time.
The technique that works best for me is to use the narrow blade of the hori hori to carefully work under large sections of rhizome and lever them out intact, then sieve through the surrounding soil by hand to find any remaining fragments. Yes, it is time-consuming. Yes, it can be uncomfortable on the knees. But chipping away at it frequently with this method is by far the most successful and environmentally responsible approach available to you.
What you want to avoid when digging up ground elder is using a spade to chop it or carelessly using a garden fork. You simply spread and propagate it even more. Smaller, accurate tools give you control over what you’re removing rather than inadvertently replanting it in tiny pieces throughout the bed.
💡 Top Tip
Work when the soil is moist but not waterlogged. Dry compacted soil makes it far harder to extract rhizomes cleanly, and you’ll break them into smaller fragments. After a day of light rain is ideal timing for a ground elder removal session.
8. The Best Tools for Removing Ground Elder
Having the right tool genuinely makes a significant difference when it comes to ground elder removal. Here are the tools I recommend based on years of dealing with this weed on garden projects across the country.
Hori Hori (Japanese Garden Knife)
The hori hori is my go-to tool for ground elder. Its narrow, concave blade lets you work precisely around the roots of desirable plants without disturbing them, while the serrated edge can slice through tougher sections of rhizome when needed. I use it to carefully extract large sections of leaf and root, then work through the soil, removing any broken bits by hand. The depth markings on the blade are also handy for gauging how deep you’re working. If you don’t already own one, it will rapidly become one of the most-used tools in your shed.
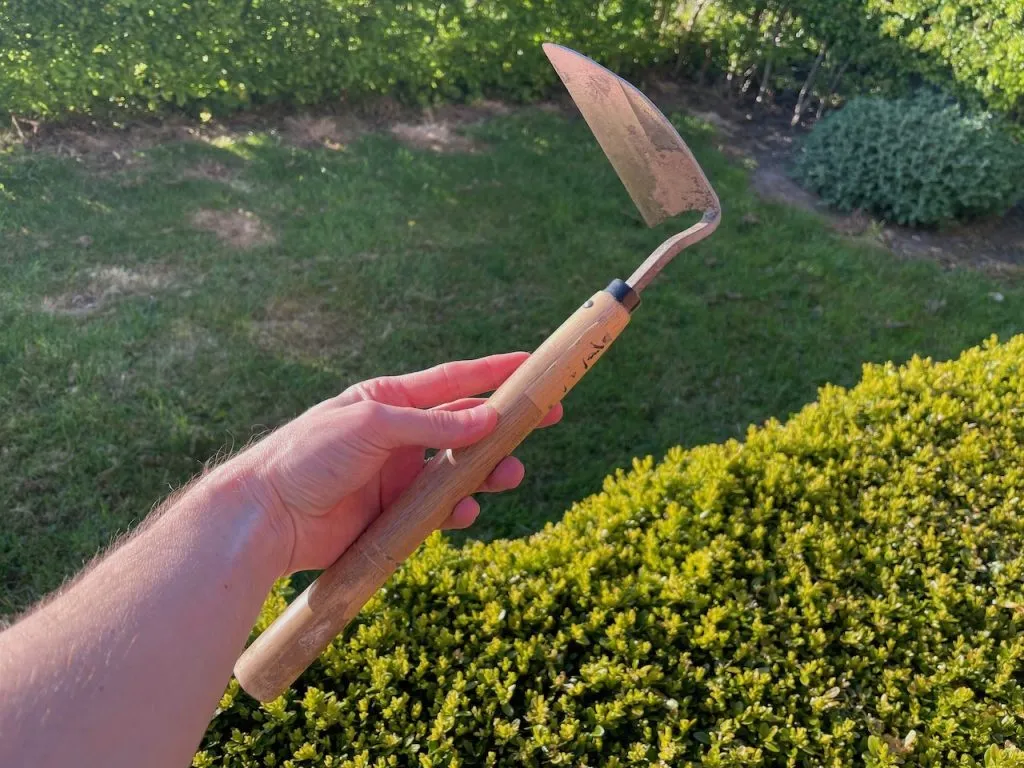
A Japanese hand weeder, sometimes called a hand cultivator or hand hoe, is excellent for working between established plants in a border. The forked or angled head lets you loosen the soil around rhizomes before extracting them, reducing the chance of snapping them mid-root. Used alongside the hori hori, these two tools form a very capable ground elder removal toolkit.
For areas where ground elder has established in open ground rather than among established planting, a border fork can be useful. The narrower head of a border fork (compared to a digging fork) gives you more precision. Use it to loosen large sections of soil to full depth before extracting rhizomes by hand. Always double back over the area to collect any fragments you’ve dislodged. Insert the fork to its full depth and lever soil upwards rather than chopping down through it.
Ground elder removal is not a quick job, and spending an extended session crouched or kneeling on the soil without proper support is hard on the body. A good garden kneeler pad or kneeler bench makes the whole process significantly more comfortable and lets you work longer without fatigue. I always recommend one to clients who are embarking on a serious ground elder removal programme.
There are plenty of other methods suggested online, in gardening books, and on social media reels. Let me share my honest perspective on each one, because a lot of what is recommended is simply not worth your time or, in some cases, is actively counterproductive.
1. Smothering with Mulch or Membrane
Blocking light from the ground elder is a valid organic approach. This involves covering the area with thick layers of cardboard, newspaper, or weed suppressing membrane, followed by a generous mulch of compost, bark, or straw. Without sunlight, the rhizomes gradually weaken and die off. This method works best over one to two growing seasons and has a minimal impact on wildlife. It can also improve soil health, retain moisture, and create a more favourable environment for beneficial insects and fungi.
The limitation is that ground elder grows and spreads so quickly that you really have to smother the entire affected area completely, leaving no gaps whatsoever. Any light reaching the soil through an incomplete covering will result in growth continuing. It is most realistic on a bare patch of ground rather than in an established border. That said, for larger areas where you’re prepared to sacrifice the planting for a season or two, this approach does deliver results.
For those who are less concerned about staying fully organic, systemic herbicides like glyphosate can be effective when applied directly to the plant’s foliage during active growth in spring or autumn. The critical point here is “applied directly”. If you are spraying it from a bottle or watering can across a mixed border, you will do far more harm than good to your other plants, soil life, pollinators, and the wider garden environment.
Pouring boiling water over ground elder shoots is often listed as a safe, chemical-free method. It isn’t worth your time. Boiling water kills only the foliage and has no meaningful impact on the root system whatsoever. You are wasting energy, water, and effort for a result that lasts all of a week before regrowth appears. Please don’t bother.
4. Hoeing or Cutting Back
Repeatedly cutting ground elder back to the soil surface is said to gradually exhaust its root reserves. In practice, it simply redirects the plant’s energy into root growth rather than top growth, making the underground problem worse while the garden looks temporarily tidy above ground. Avoid hoeing over ground elder-infested soil entirely, as hoeing also chops rhizomes into smaller pieces and spreads them further. This is one of the most commonly made mistakes with this weed.
5. Replanting with Dense Ground Cover
Some blogs suggest robust ground cover plants like hardy Geraniums, ferns, or spreading shrubs can suppress ground elder’s regrowth. In my experience, nothing reliably outcompetes ground elder once it is established. I have seen it growing happily through even the most vigorous Geranium rozanne. That said, in areas at the edges of your garden where ground elder is spreading in from wild land, dense planting can help slow its progress into the main borders.
6. Solarisation (Heat Treatment)
Covering the ground with clear plastic during the hot summer months to trap solar heat and warm the top layers of soil is sometimes suggested. When conditions are ideal, this technique can damage rhizomes and seeds. However, it also destroys beneficial soil bacteria, earthworms, and ground-nesting bees. The approach essentially nukes the soil biology along with the weed. Unless you’re starting from an absolutely bare and completely contaminated plot with no other option, I wouldn’t recommend it.
7. Flame Weeding
Using a flame gun to scorch ground elder leaves is not effective on its own. It kills only what’s above ground and leaves the rhizomes entirely untouched. It also poses a fire risk, especially in dry conditions, and can harm insects and ground-nesting pollinators. Not recommended for use in planted borders under any circumstances.
10. Tackling Ground Elder in Established Borders
Ground elder in an established border with lots of perennials is one of the most challenging weeding scenarios in gardening. You cannot simply clear the area because you’d lose the plants you want to keep. This is where a specific strategy is needed.
The approach I recommend for established borders is to temporarily lift your border plants, usually when they are dormant in autumn or early spring, before growth resumes. Once they are out of the ground, you can properly tackle the soil. Wash the root balls under a tap and carefully tease out every strand of ground elder root before replanting. This thorough root-washing step is often what makes the difference between success and simply moving the problem around.
With the border cleared of plants, you can work through the soil methodically, removing all root material. Once replanting, keep monitoring for any regrowth and tackle it immediately while the rhizomes are young and small. Catching it early at this stage is far easier than letting it re-establish.
💡 Top Tip
When lifting border plants to clear ground elder, keep them in pots with damp compost while you work. This gives you several weeks to clear the area properly without losing your plants. Autumn is ideal timing as plants are dormant and suffer far less root disturbance.
11. Preventing Ground Elder from Returning
Removal is only half the battle. Preventing ground elder from returning, whether from fragments you missed or from neighbouring land, requires some forward planning.
The most practical prevention steps are these. First, always inspect the root ball of any plant you introduce to your garden, whether a gift from a friend or a purchase from a plant fair. Ground elder rhizomes hidden in a new plant are among the most common routes of entry.
Second, if ground elder is coming in from next door, install a physical root barrier along the boundary. Specialist root barrier fabric inserted vertically at least 45cm deep and protruding about 7cm above soil level will intercept spreading rhizomes before they reach your borders.
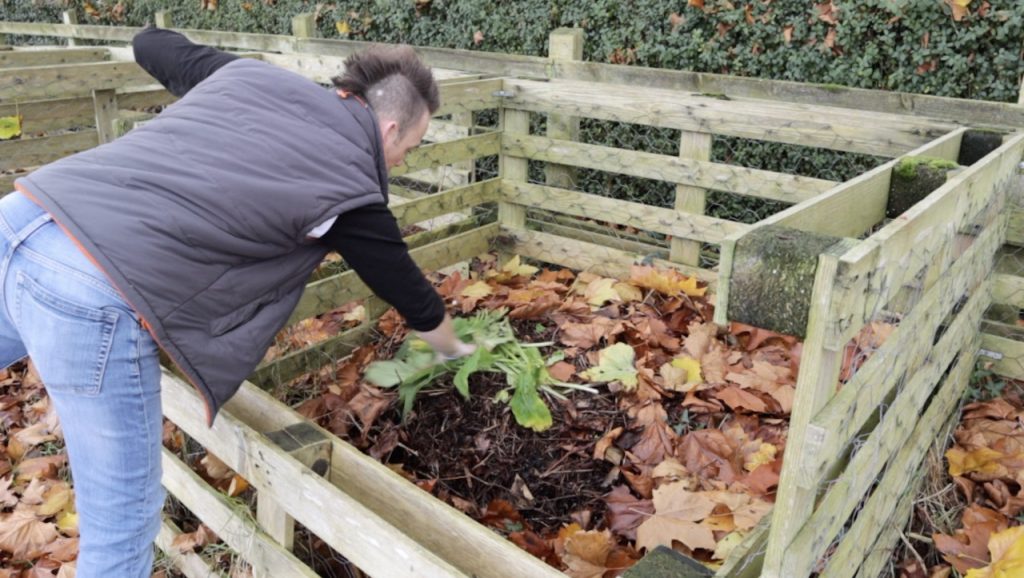
Third, do not add any ground elder roots, rhizomes, or seeds to your home compost bin. Home compost heaps rarely reach the sustained high temperatures needed to kill rhizomes, so composting ground elder simply creates a mechanism for redistributing it around your garden. Put it in your council green waste bin instead, or bag it for the recycling centre.
Finally, if ground elder is in flower, deadhead or remove the flower stems before they set seed. Ground elder does not spread primarily by seed, but it is worth eliminating any additional route of dispersal.
Before you go scorched-earth on your ground elder, it is worth noting that it has some genuine redeeming qualities, especially if you enjoy foraging or edible gardening. The young leaves, before they mature and toughen, are edible and nutritious. You can eat them raw in salads, sauté them like spinach, or add them to a spring soup. In herbal medicine, ground elder was once a go-to remedy for treating inflammation, particularly gout and rheumatism.
Pollinators genuinely love ground elder flowers. The umbrella-like umbellifer flower heads in late spring and early summer provide an excellent source of nectar and pollen for wildlife. They are particularly attractive to hoverflies, which are beneficial in controlling aphids. The RHS notes it is a food plant for over 25 different invertebrate species, which is a meaningful ecological contribution.
Most gardeners would gladly trade a hoverfly or two for a ground elder-free garden! That said, if you find it growing under your hedgerows and it is not threatening your flower beds, I would genuinely advise you to leave it be and let it do its ecological job. There is also a variegated cultivar, Aegopodium podagraria ‘Variegatum’, with attractive cream-edged leaves. It is slightly less vigorous than the plain green form and is occasionally grown as an ornamental ground cover in wilder, shadier spots.
13. Frequently Asked Questions About Ground Elder
How do I identify ground elder?
Ground elder has distinctive, toothed, compound leaves in a fresh apple-green colour, divided into leaflets in groups of three. The hollow stems are another identifying feature. In late spring and summer, it produces flat-topped white flower heads on taller stems, similar in appearance to cow parsley. The underground rhizomes look like strands of white spaghetti beneath the soil surface.
How long does it take to get rid of ground elder?
In most garden situations, expect a committed programme of hand removal over two to three growing seasons to bring ground elder fully under control. In more heavily infested areas or where it is continuously coming in from neighbouring land, ongoing management may be the more realistic expectation. Persistence and frequency of removal sessions matter far more than any single heroic digging effort.
Should I compost ground elder?
No. Home compost heaps very rarely reach the sustained temperatures needed to kill ground elder rhizomes. Composting removed ground elder roots risks creating a concentrated source of the weed that you’ll then distribute around your garden when you use the compost. Always dispose of ground elder roots via council green waste collection or at your local recycling centre.
Can I eat ground elder?
Yes. Young ground elder leaves in early spring are edible and nutritious, tasting somewhat like a cross between parsley and spinach. Use them raw in salads or cooked in soups and stews. Only use young leaves before the plant flowers, as the mature foliage becomes much tougher and less palatable. As with any foraging, make absolutely certain of your identification before eating any plant from the garden.
Does ground elder grow in lawns?
Yes, ground elder can and does establish in lawns. The good news is that regular mowing weakens it over time by repeatedly removing its growing tips, which ground elder cannot tolerate in the same way it tolerates disturbance in borders. Consistent weekly mowing during the growing season combined with a broadleaf lawn weedkiller (applied carefully according to instructions) can bring it under control in grass more effectively than in borders.
What is the difference between ground elder and elderflower?
These are completely different plants. Elderflower comes from the elder tree or shrub (Sambucus nigra), a woody plant that can grow several metres tall. Ground elder (Aegopodium podagraria) is a low-growing herbaceous perennial weed with no woody structure. The name “ground elder” refers to the superficial similarity of the leaves to those of the elder tree, but the two plants are entirely unrelated botanically.
If you’re ready to do more than just battle ground elder and want to start shaping a garden that truly works for you, why not level up your skills with one of my online gardening courses?
My Garden Design for Beginners course is the perfect next step. Whether you’re completely new to garden design or just need a more structured approach, this affordable online course guides you through the full process from blank canvas to brilliant layout.
I’m Lee Burkhill, award-winning garden designer and presenter on BBC1’s Garden Rescue, and I’ve packed this course with practical advice, insider tips, and easy-to-follow steps to help you design a garden that works in harmony with nature, and keeps ground elder firmly in its place!
Planting Techniques: Select and arrange plants like a professional.
Design Styles and Layout Options: Explore different styles to suit every garden.
Course Features:
20 Hours of Study Time
Flexible Online Learning
Engaging Video Lessons and Quizzes
Real-World Case Studies
Certification upon Completion
Taught by Award-Winning Designer Lee Burkhill
Enrol now for just £199 and start your journey toward garden design mastery!
29
Garden Design Examples for Small Gardens: 30 Design Templates & Planting Plans
Garden Design Examples for Small Gardens: 30 Design Templates & Planting Plans: In this online gardening course, I’ll walk you through 30 fantastic garden designs, explaining the logic behind the layout, the plant choices, and take-home tips for applying them in your own garden.
Weekend Garden Makeover: A Crash Course in Design for Beginners
Learn how to transform and design your own garden with Lee Burkhills crash course in garden design. Over 5 hours Lee will teach you how to design your own dream garden. Featuring practical design examples, planting ideas and video guides. Learn how to design your garden in one weekend!
Garden Design for Beginners: Create Your Dream Garden in Just 4 Weeks
Garden Design for Beginners Online Course: If you want to make the career jump to becoming a garden designer or to learn how to design your own garden, this is the beginner course for you. Join me, Lee Burkhill, an award-winning garden designer, as I train you in the art of beautiful garden design.
Getting rid of ground elder is a royal pain, but it is absolutely doable with the right precision hand tools and a commitment to regular sessions. For larger areas, you may need to either accept its presence temporarily, smother it under a membrane, or, in extreme cases, consider a very targeted and careful use of weed killer, which I always advocate against in borders. Focusing on early control with a hori hori and keeping on top of any regrowth is the best strategy available. Let me know in the comments if you’ve found any other approaches that have worked well for you.
Your subscription could not be saved. Please try again.
Your subscription has been successful.
Lee Burkhill
Lee Burkhill, known as the Garden Ninja, is an award-winning garden designer and horticulturist with over 30 years of gardening experience and 15 years as a professional garden designer. A qualified RHS (Royal Horticultural Society) professional, Lee specialises in sustainable garden design and practical horticultural advice. He designs and presents on BBC1’s Garden Rescue and in leading gardening publications. Lee combines three decades of hands-on gardening knowledge with professional design qualifications to help gardeners create beautiful, functional outdoor spaces.