How to Design a Triangle Shaped Garden: Expert Solutions for Awkward Plots
Lee Burkhill: Award Winning Designer & BBC 1's Garden Rescue Presenters Official Blog
Intermediate level
Designing a triangle shaped garden can strike fear even into some garden designers. That pointy end draws your attention for the wrong reasons. Often gardeners are unsure where to site the patio, flower beds or the awkward shed. But fear not intrepid garden designers and plant loves, this guide will show you all the tricks I use when designing triangle shaped stunning gardens!
Standing at your patio doors staring out at that wedge of green space narrowing away into a sharp point, you might be wondering what possessed the original planner to carve up gardens into geometric nightmares. Triangle shaped gardens are one of those design challenges that can make even experienced gardeners throw their hands up in defeat. The converging boundaries feel claustrophobic, the pointed end seems utterly useless, and trying to fit a functional garden into those sharp angles can feel like solving a particularly sadistic puzzle.
Here’s the thing, though: I’ve been designing gardens professionally for over 15 years, presented over 60 episodes of BBC Garden Rescue across five series, and transformed countless triangle plots from awkward afterthoughts into stunning outdoor spaces.
Triangle gardens aren’t design disasters; they’re opportunities. The very features that make them feel challenging are exactly what will make your finished garden unique and memorable. You just need to understand how to work with the geometry rather than against it.
This comprehensive guide will walk you through exactly how to transform your triangle garden using the same design principles I teach in my Garden Design for Beginners course. Whether your triangle is wide and shallow, long and narrow, or somewhere in between, you’ll discover practical solutions that actually work in real British gardens with real British weather and real budget constraints.
Why Triangle Gardens Feel So Challenging
Before we dive into solutions, let’s address why triangle plots feel so bloody awkward in the first place. Understanding the problem is half the battle when it comes to solving it.
Triangle gardens create several specific design challenges that rectangular plots simply don’t have.
First, those converging boundary lines naturally draw your eye towards the pointed end, creating an uncomfortable sense of being funnelled into a dead end. It’s the exact opposite of what most garden design principles aim to achieve, which is a sense of space and discovery.
Second, the sharp corners are genuinely difficult spaces to utilise. They’re too tight for most garden furniture, too small for meaningful planting beds, and often end up becoming dumping grounds for the compost bin and that broken lawnmower you keep meaning to fix.
The third challenge is proportion. In my guide to designing small gardens, I emphasise the importance of getting the balance right between hard landscaping and planting. With triangle gardens, this balance becomes even trickier because the narrowing shape constantly changes the proportion as you move through the space. What works at the wide end creates entirely different spatial relationships at the pointed end.
But here’s what I’ve learned from dozens of triangle transformations: these challenges are entirely solvable once you stop trying to fight the shape and start embracing it as a unique design feature.
The Three Golden Rules for Triangle Garden Design
After years of wrestling with awkward plots, I’ve distilled triangle garden design into three fundamental principles that apply whether you’re working with ten square metres or a hundred.
Rule One: Break the Sight Lines
The biggest mistake I see with triangle gardens is leaving them open plan. When you can see straight from your patio doors to that pointed end in one uninterrupted view, the awkward shape dominates everything. Instead, you need to break up the visual journey through strategic placement of screening, vertical elements, or bold planting. This is exactly the same principle I discuss in my overlooked garden design guide, where breaking sight lines creates privacy and intimacy.
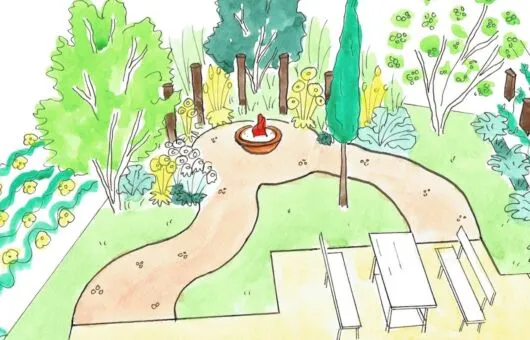
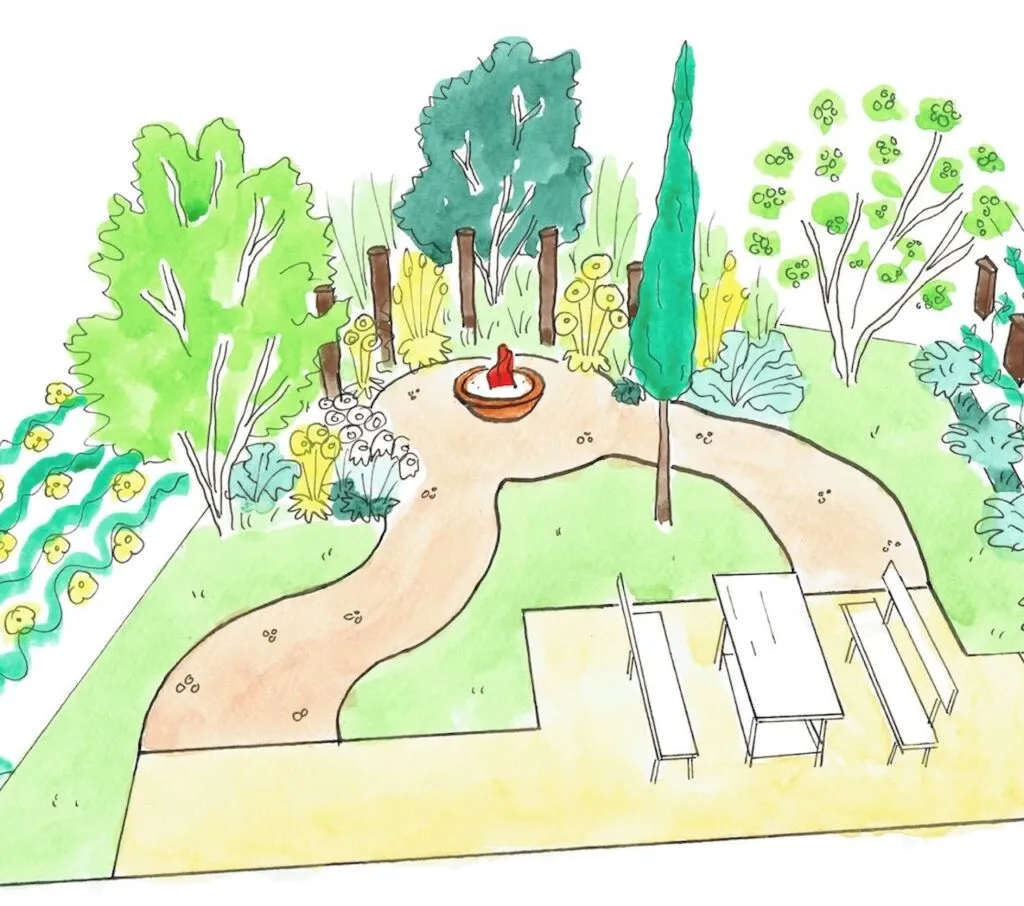
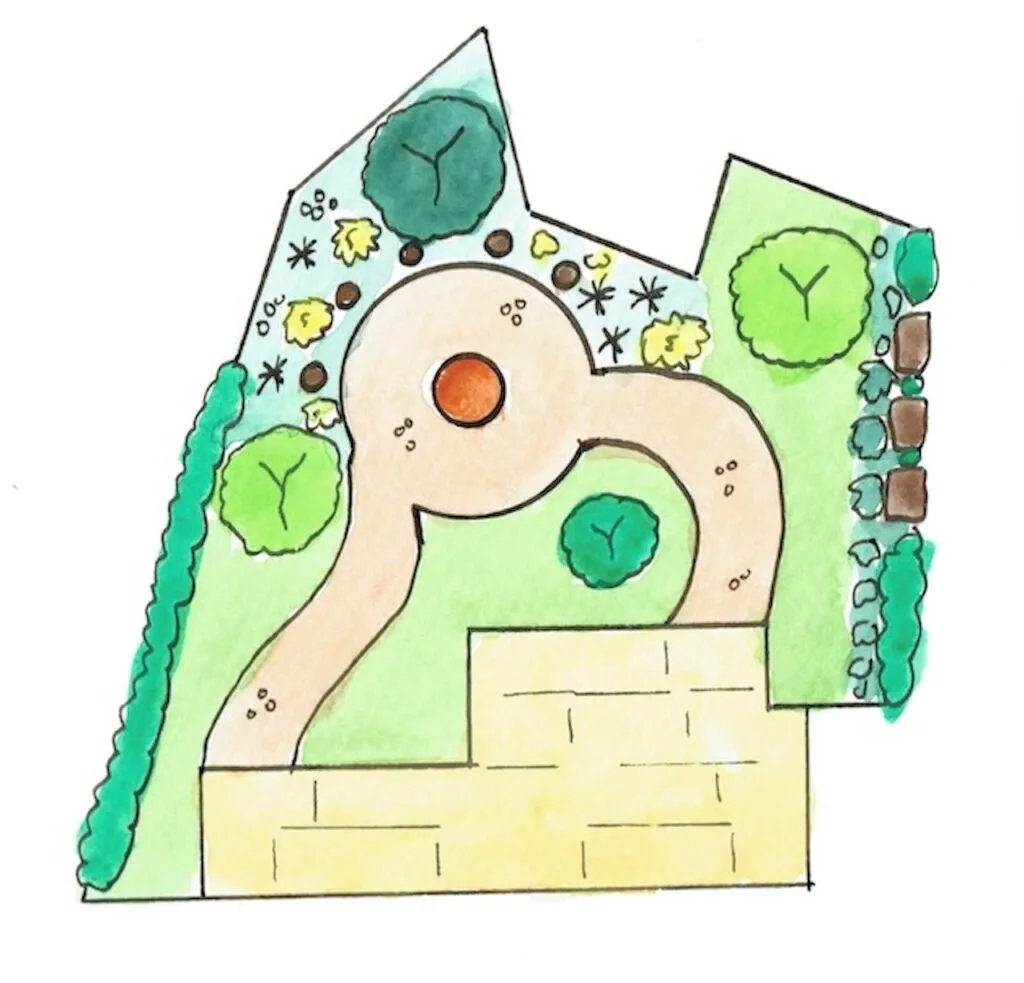
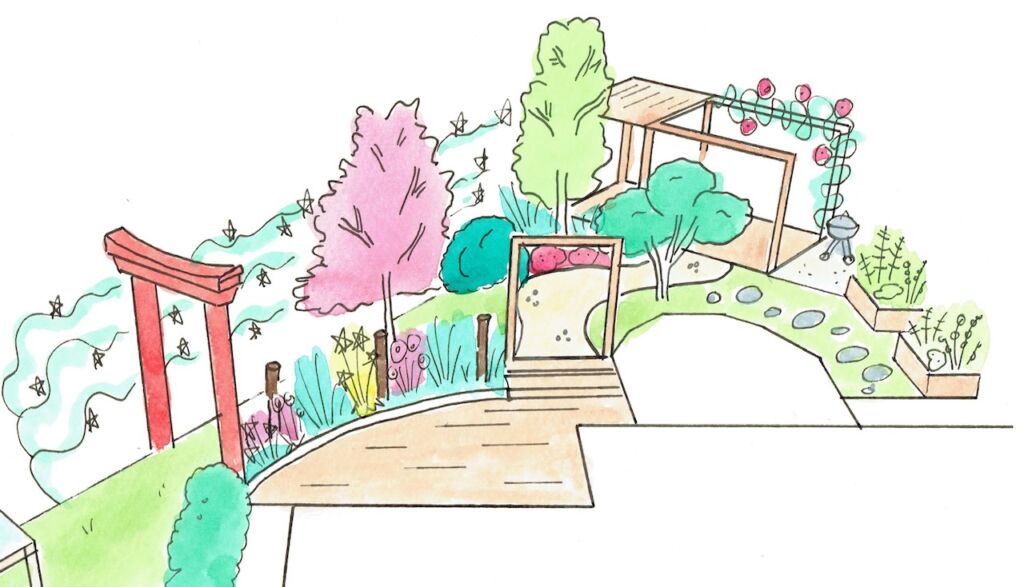
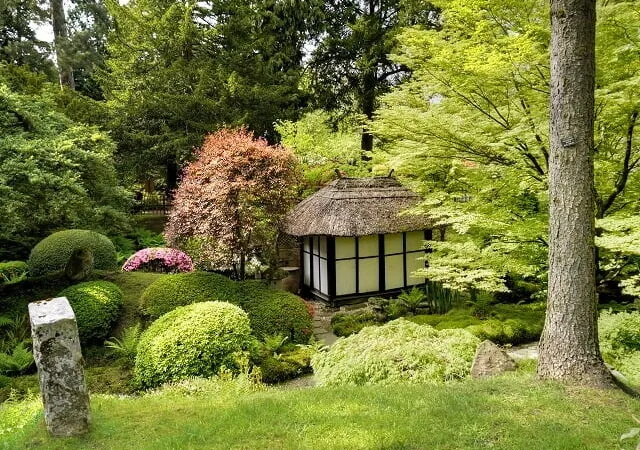
The above design shows a fire pit and seating area as the main focal point, which shelters the pointed triangle tip behind it!
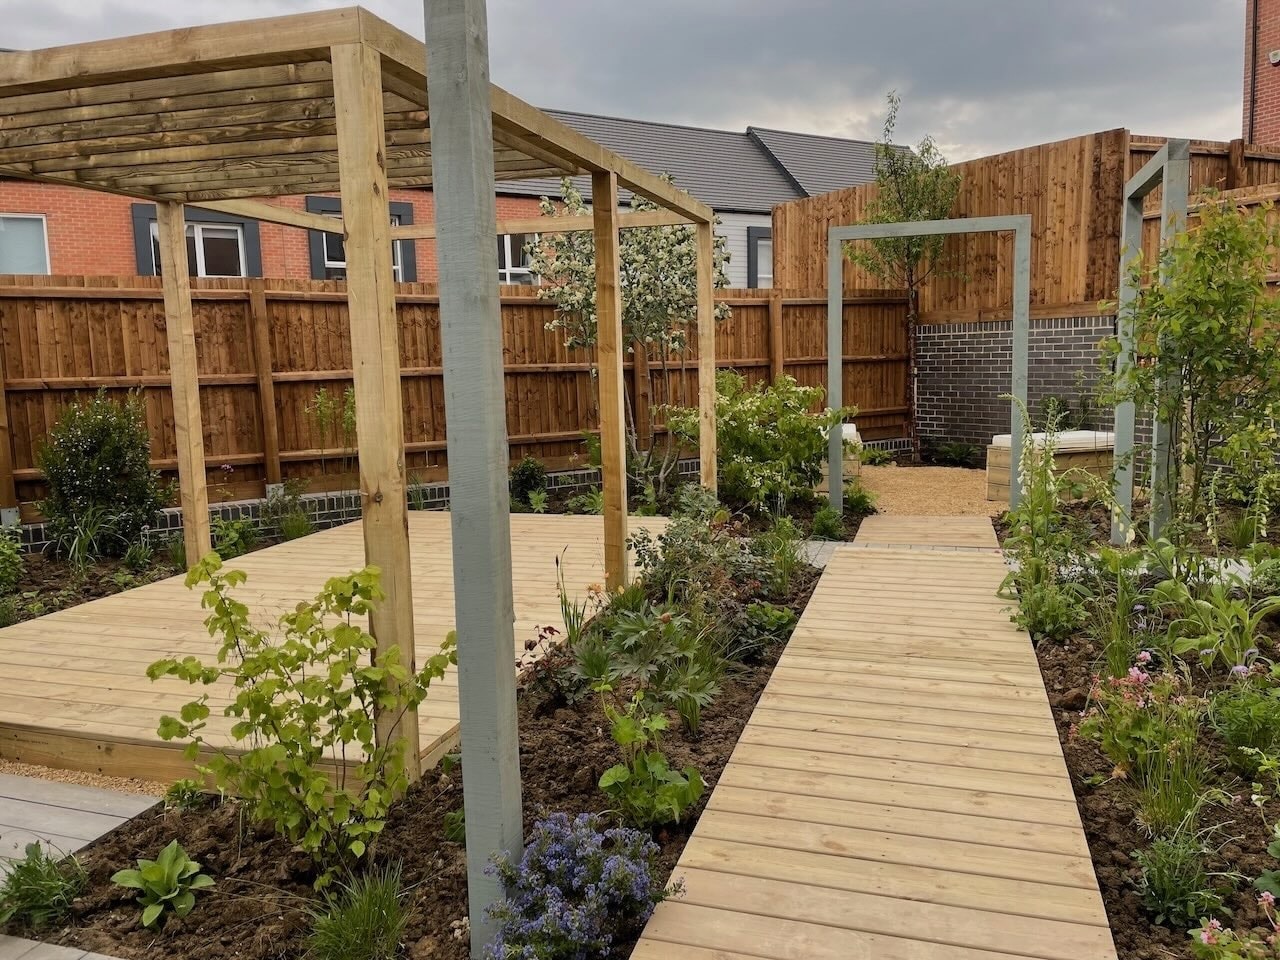
In triangle gardens, I typically use three methods to break sight lines. Standard trees positioned off-centre draw the eye upwards and create vertical interest that disrupts the horizontal lines of the boundaries. Tall perennial borders that curve away from the main viewing point create mystery and hide the full shape. Architectural features like pergolas, arches, or even strategically placed large planters force you to move through the space rather than taking in the whole awkward geometry at once.
I sometimes call breaking the furthest part of the triangle ‘cutting off the nose’, which I discuss in detail further on. It’s basically drawing a horizontal line before the point, creating a triangle within the triangle and cutting the nose off, making a neater line to work with!
Rule Two: Zone with Purpose
Triangle gardens absolutely demand zoning. Trying to use the entire space for one purpose simply emphasises the awkward shape. Instead, divide your triangle into two or three distinct zones, each with its own clear function. This approach mirrors what I teach in my how to design a garden guide about creating functional outdoor rooms.
Think of it like this: the wide end near your house is prime real estate for entertaining, dining, or lounging. This is where you’ll spend most of your time, so it deserves the most space and investment. The middle section becomes your transition zone, perfect for pathways, focal features, or practical elements like raised beds. The pointed end? That’s your opportunity to create either a dramatic focal point that draws people through the garden, or a tucked-away utility area for compost bins and storage hidden behind attractive screening which ‘cuts the nose off’.
Rule Three: Use Curves to Soften Angles
This might sound counterintuitive, but one of the best ways to handle a triangle garden is to ignore the straight boundaries entirely. Curved lawn areas, circular patios, and flowing borders all work to soften those harsh angles and trick the eye into forgetting about the underlying triangular shape. As I explain in my Chinese garden design guide, working with natural curves rather than rigid geometry creates spaces that feel more relaxed and inviting.
I’ve lost count of how many triangle gardens I’ve transformed simply by installing a circular or oval lawn area in the widest section, then surrounding it with bold curved borders as you move towards the point. The eye follows those curves rather than the boundary lines, and suddenly the awkward shape becomes irrelevant. See the awkward triangle points in the plan garden design below that have been cut off by using circles and thus disguised? This is what I mean by ‘cutting off the nose’ in garden design speak.
Practical Design Solutions for Different Triangle Types
Not all triangles are created equal. The specific design approach you’ll need depends largely on the proportions and orientation of your particular wedge of green space.
Wide Shallow Triangles
If your triangle is relatively wide at the house end but doesn’t extend very far back, you’re actually in quite a fortunate position. These plots often occur in corner properties or at the end of terraces, and whilst they feel limiting, they’re actually easier to design than long, narrow triangles.
For wide shallow triangles, I recommend creating a single curved entertaining space that takes up most of the width, leaving the pointed sides for border planting. Imagine a large circular patio or lawn occupying the central space, with deep borders running along both angled boundaries. These borders can be planted with layered perennials and shrubs that gradually increase in height as they approach the corners, helping to soften those sharp angles.
The pointed end in a wide shallow triangle is usually quite accessible, making it perfect for a statement feature. I’ve successfully used small water features, sculpture, distinctive specimen trees, and even compact summerhouses in these positions. The key is ensuring whatever you place there has enough visual weight to justify drawing the eye through the space, but isn’t so large that it overwhelms the scale of the garden.
Long Narrow Triangles
Long, narrow triangles are trickier beasts. These often result from plots squeezed between two properties or carved from former field boundaries, and they can feel like green corridors tapering away into nothingness. The temptation is to emphasise the length with a straight path running to the point, but this is exactly what you don’t want to do.
Instead, create a diagonal (45 degree) or serpentine path that moves across the width of the garden rather than straight down its length. This forces visitors to experience the space from the side, making it feel wider and disguising the narrowing effect. Along this path, establish distinct zones: perhaps a paved dining area near the house, a lawn area in the middle section, and a planted area at the pointed end, where access becomes restricted.
For long, narrow triangles, vertical planting is your best friend. Climbers on the boundary fences, standard trees positioned to break up the view, and tall perennials in the borders all help lift the eye upwards rather than drag it relentlessly towards that vanishing point. I discuss this vertical approach extensively in my work on new build gardens, where space is often similarly constrained.
Right Angle Triangles
Right-angle triangles where one boundary meets the house at ninety degrees, whilst the other angles away, create an interesting asymmetric challenge. These gardens often feel like they’re falling away to one side, which can be disconcerting when you’re trying to relax with your morning coffee.
The solution here is to create strong horizontal elements that counterbalance the diagonal. A square or rectangular patio in the very centre of the garden can provide visual stability, especially if wrapped with deep herbaceous perennial borders, doing one thing well rather than lots of bits and pieces. Think of the square patio as an anchor point, then allow the design to flow naturally away from it following softer, more natural lines.
In right-angle triangles, I often position the main focal point not at the triangle’s tip but along the diagonal boundary at roughly the one-third or two-thirds point. This creates asymmetric balance, which is far more interesting than symmetry, whilst still feeling composed and intentional. It’s a technique I’ve borrowed from modernist garden design principles, where asymmetry creates visual tension in a good way.
Creating Functional Zones in Triangle Gardens
Now we get to the practical bit: actually deciding what goes where in your triangle plot. This is where proper garden design training makes all the difference between a space that looks okay and one that genuinely functions brilliantly for your lifestyle.
Zone One: The Wide End Entertainment Area
The area immediately adjacent to your house is usually your primary zone for beginner gardeners. However, sometimes this makes the triangle garden feel even pointier as everything is at the widest point near the house. If your patio is too close to the house, the chances are you will never use it, opting to stay in the house and look out. Give your guests and your visitors a reason to journey into the garden!
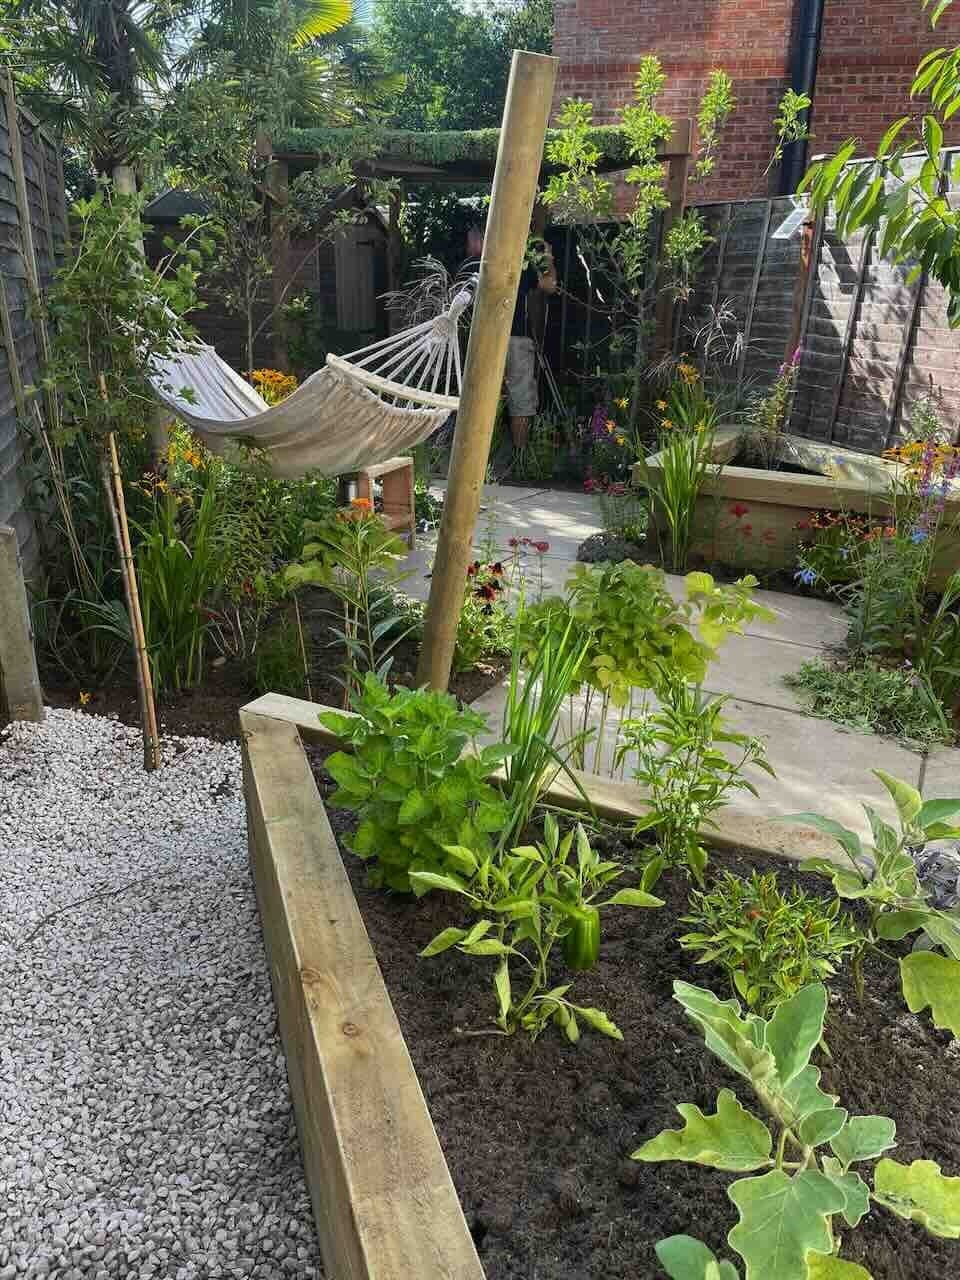
What would work better is putting the seating area in the middle of the triangle, or 2/3 down the garden, with a path and wider herbaceous borders.
Don’t also fall into the trap of a tiny patio that can barely fit two chairs; it’s pointless. It’s better to have one properly sized functional area than multiple inadequate ones.
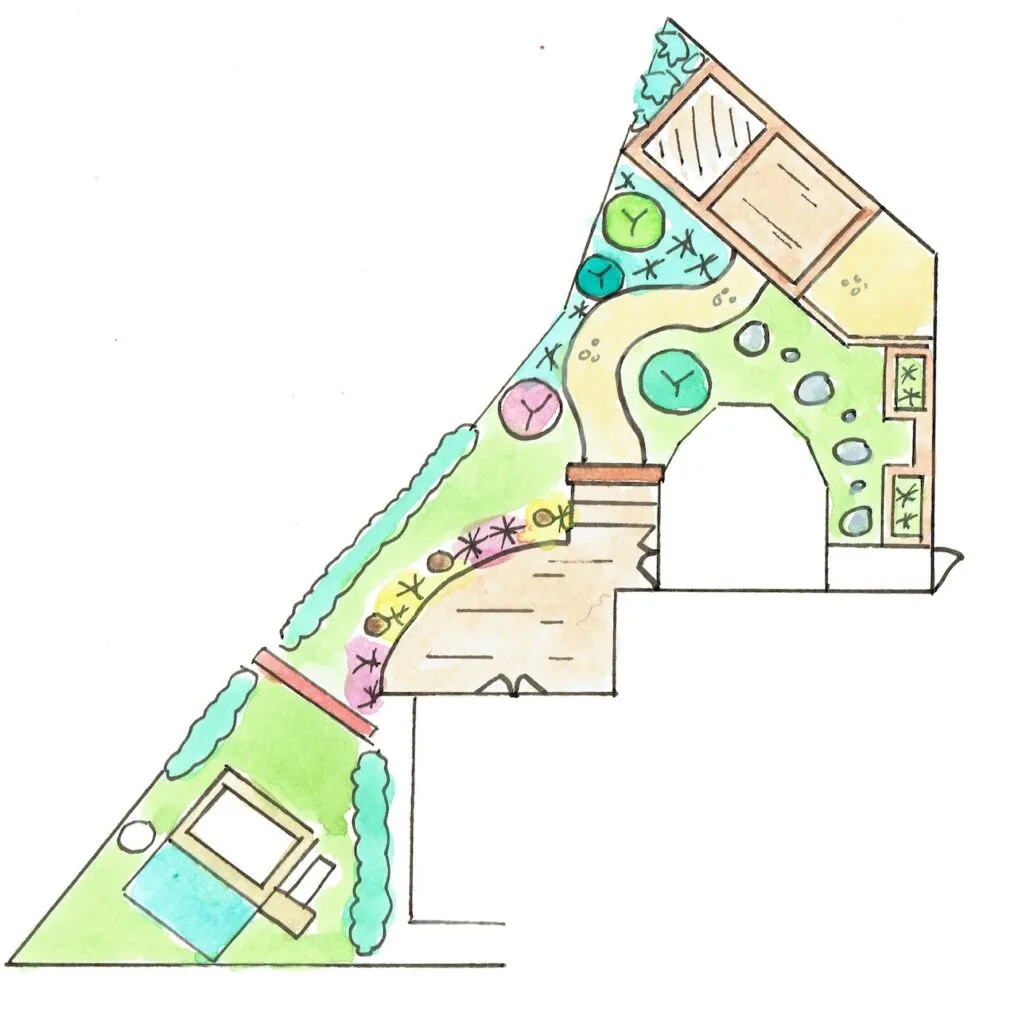
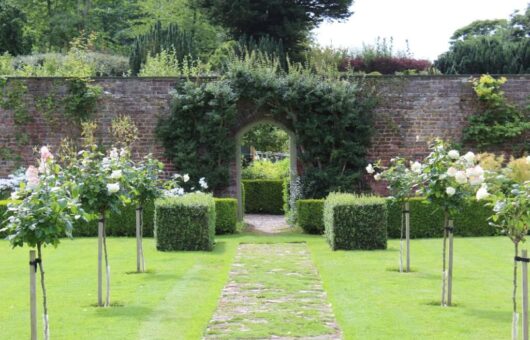
Below is an example of a seating area in the top right, at a 45-degree angle to the triangle, helping cut off the nose and disguise the strange, thin triangle-shaped plot!
Consider the aspect carefully here as well. If your wide end is north-facing, you might want to extend your patio area further into the garden to catch available sun, even if this means your lawn or planting areas become smaller. Function must drive form, not the other way around. I bang on about this constantly in my garden design courses because it’s where most amateur designers fall down.
Zone Two: The Middle Transition Space
This middle ground is where your garden’s character emerges. Depending on your priorities, this could be a lawn for children to play on, vegetable beds for growing food, or delicious ornamental borders for pure horticultural pleasure. The key is making this zone feel connected to both the entertaining area and whatever feature you’ve planned for the pointed end.
Pathways through this middle section should never run straight unless you’re deliberately going for a formal look and your triangle is perfectly symmetrical, which is rare. Curved or diagonal paths create journey and discovery, two qualities that transform adequate gardens into memorable ones. If using curves, make sure they are bold enough; if the garden is too narrow for a bold curve, stick to straight-edged paths at 45 degrees instead. Even something as simple as stepping stones meandering through a lawn area works infinitely better than a straight concrete path.
For families with children, this middle zone is perfect for incorporating play without letting plastic domination take over. As I discuss in my family friendly garden design guide, strategic zoning means children can have their play space whilst adults maintain areas for relaxation.
Zone Three: The Pointed End Solution
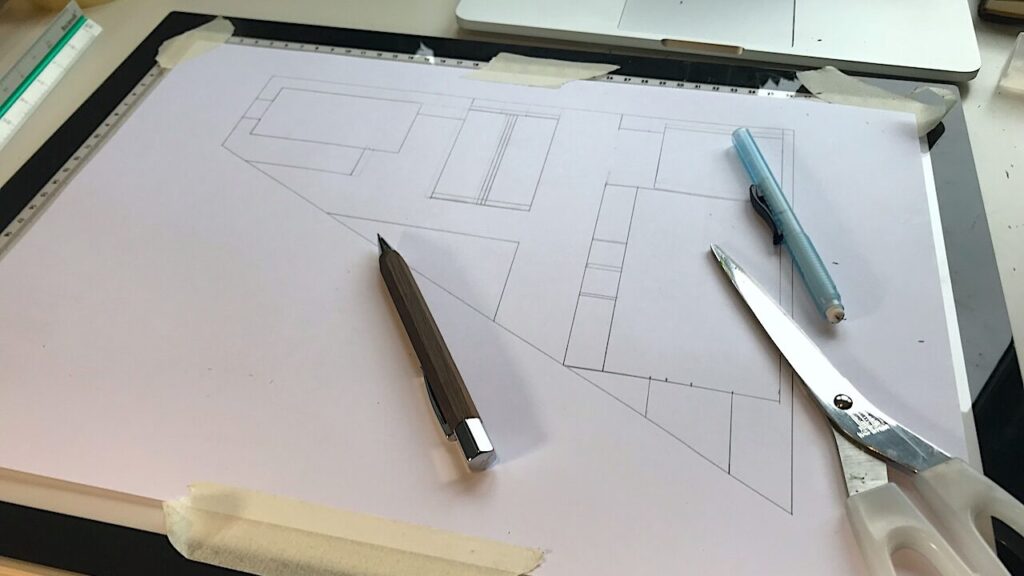
This is where creativity matters most. That narrowing point can become either your garden’s greatest feature or its weakest element, depending entirely on how you handle it. I like to use a trick call ‘cutting off the nose’, which I do a lot in triangular-shaped garden design. What I do is draw a line across the horizontal axis of the garden, giving me a clean break before the point and also creating a triangle within the triangle.
Cutting off the nose means that the final triangle can become a big flower bed, a focal point or something other than an awkward, tiny, pointed area of the garden.
If the pointed end that you’ve just ‘cut the nose off’ is shaded by neighbouring trees or buildings, accept this and work with it rather than fighting nature. Create a planted area with shade-tolerant species such as ferns, hostas, and woodland perennials. Add a simple bench tucked into the planting for a quiet reading spot. Suddenly, that awkward corner becomes a peaceful retreat.
Cutting off the nose also distracts from the sharpest point and gives the illusion of a more generously proportioned garden layout.
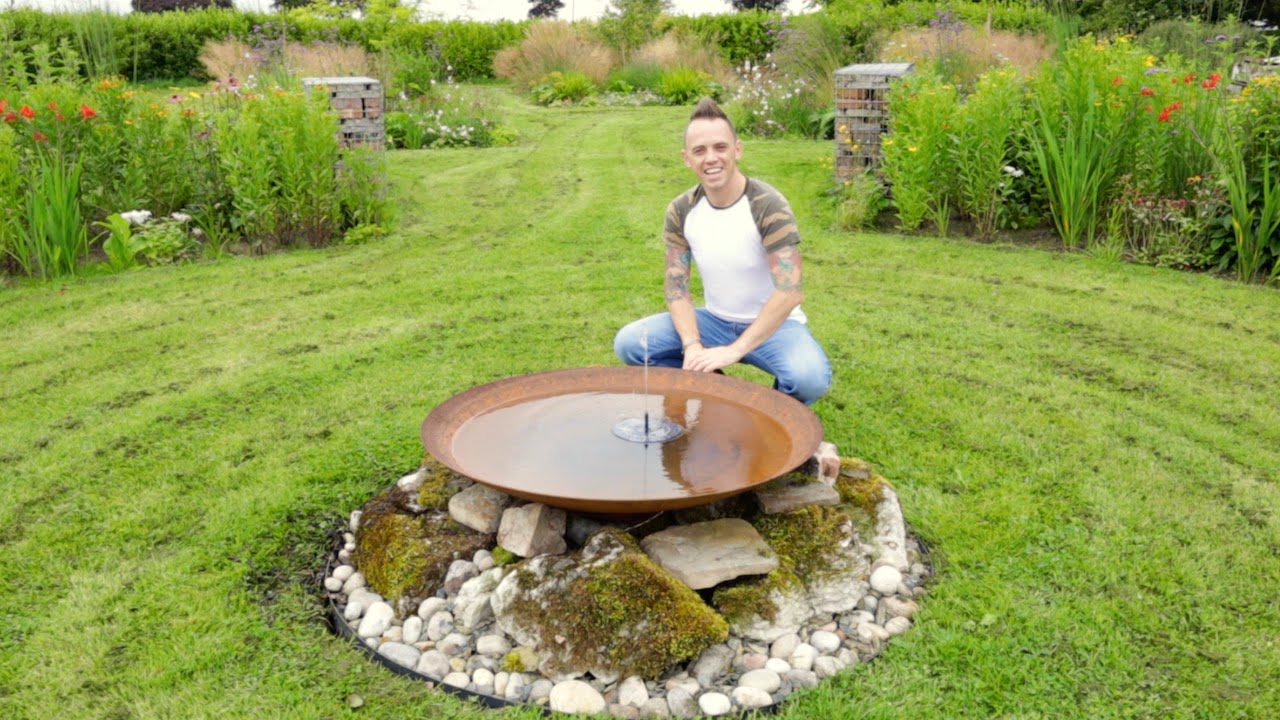
If the pointed end receives decent light, consider making it your show-stopping focal point. A small fountain or water feature creates sound and movement that draws people through the garden. A distinctive specimen tree, like a multi-stem Birch, provides year-round structure and interest. Even something as simple as a carefully positioned mirror on the end fence can create the illusion of the garden extending further, though I’ll warn you that this trick needs careful execution to work properly.
For the practical-minded, that pointed end is also ideal for screening utility areas. Compost bins, tool storage, recycling, and all the unglamorous necessities of garden life can be tucked away behind trellis panels clothed in climbing plants. Just ensure you leave adequate access, because nothing is more frustrating than realising you can’t actually reach your compost heap when you need it.
Your subscription could not be saved. Please try again.
Your subscription has been successful.
Planting Strategies for Triangle Gardens
Getting the planting right in triangle gardens requires particular attention to scale, proportion, and visual flow. The biggest mistake I see is planting that either emphasises the awkward shape or completely ignores the boundaries, neither of which creates a cohesive design.
Start by establishing your structural planting along the boundaries. We don’t want to create solid hedges that emphasise the triangle’s edges. What great designers want to do is use a mix of evergreen shrubs and small garden trees, plus plenty of herbaceous perennials on repeat, to create depth and soften those boundary lines. I typically plant in drifts that curve away from the boundary itself, with the tallest plants positioned in the corners where they help disguise those sharp angles.
Along the converging boundary lines, graduated planting works brilliantly. Begin with taller specimens near the wide end, gradually reducing height as you move towards the point. This creates a sense of perspective that makes the garden feel larger than it actually is, whilst preventing that feeling of being funnelled into a dead end.
For the middle section, bold perennial planting in generous drifts creates impact without fussiness. Triangle gardens have no space for complicated planting schemes with dozens of different species dotted about, creating visual chaos. Instead, choose five to seven reliable perennials suited to your soil type and aspect, then plant them in substantial groups of three, five, or seven. This repetition creates rhythm and cohesion, exactly the principles I teach in my Garden Design Examples for Small Gardens course.
Avoid the temptation to line your pathways with uniform planting. This only emphasises the linear nature of the path and, by extension, the triangular shape you’re trying to soften. Instead, allow plants to spill over path edges in places, creating informal edges that blur the boundaries between different zones.
Quick Reference Design Decisions
Design Element
Best Practice for Long Thin Gardens
What to Avoid
Main pathway
Curved or diagonal crossing width
Straight path running full length
Lawn position
Curved shape in one section
Rectangular strip running full length
Border depth
Generous on alternating sides
Narrow strips on both sides
Screening
Partial barriers between zones
Complete openness or solid walls
Focal points
Destination at far end plus intermediate features
Single focal point at back only
Planting rhythm
Repeated species at intervals down length
Complete variety with no repetition
Common Triangle Garden Mistakes to Avoid
After designing dozens of triangle gardens, I’ve seen the same mistakes crop up repeatedly. Learning from other people’s errors is far cheaper than making them yourself, so here’s what not to do.
Mistake One: Fighting the Shape
Some designers try to follow the existing lines in a triangle plot, creating awkward leftover spaces in the corners that serve no purpose. This never works. Your design should acknowledge the triangle’s existence whilst cleverly disguising its visual impact through curves, screening, and strategic focal points.
Mistake Two: Symmetrical Solutions
Because triangles are geometric shapes, there’s a temptation to treat them with geometric symmetry. Resist this urge. Symmetrical designs in asymmetric spaces create tension rather than harmony. Asymmetric balance using the rule of thirds creates far more sophisticated and successful results.
Mistake Three: Neglecting the Corners
Those sharp corners deserve thought and investment. Whether you’re screening them with planting, softening them with curved borders, or deliberately placing features there, ignoring them means they’ll inevitably become problem areas where weeds take hold and junk accumulates.
Mistake Four: Inadequate Zoning
Trying to do too much in a triangle garden because you’re anxious about the limited space usually means doing nothing well. Three properly considered zones will always beat five inadequate ones. This is fundamental garden design thinking that I drill into every student in my courses because it applies regardless of garden shape or size.
Making Your Triangle Garden Work for Your Budget
Triangle gardens don’t require unlimited budgets to succeed. Some of the most effective transformations I’ve designed have been achieved through clever phasing and strategic investment rather than throwing money at the problem.
Start with the essentials: decent hard landscaping in your primary zone near the house. This is where you’ll spend most of your time, so getting quality paving or decking installed properly is worth prioritising. You can phase the rest of the garden over subsequent seasons.
Next, establish your key structural plants. A few well chosen trees and large shrubs will do more for your triangle garden than just a smattering of smaller perennials or worse annuals in containers! These structural elements can be planted in year one, then filled in with less expensive perennials and grasses over time as budget allows.
For pathways through the middle and pointed end of the garden, consider more affordable options like gravel, bark chip, or even well maintained grass paths. These can always be upgraded to paving later if you want, but they provide immediate functionality without the significant cost.
If professional design feels out of reach budget-wise, that’s exactly why I created my online courses. My Garden Design for Beginners course provides comprehensive training on design principles, layout planning, and plant selection for just £199. It’s specifically designed to take complete novices and give them the confidence and knowledge to tackle their own garden design, including awkward shapes like triangles. You’ll learn the same principles I use professionally, adapted for self-builders working within realistic budgets.
29
Garden Design Examples for Small Gardens: 30 Design Templates & Planting Plans
Garden Design Examples for Small Gardens: 30 Design Templates & Planting Plans: In this online gardening course, I’ll walk you through 30 fantastic garden designs, explaining the logic behind the layout, the plant choices, and take-home tips for applying them in your own garden.
Weekend Garden Makeover: A Crash Course in Design for Beginners
Learn how to transform and design your own garden with Lee Burkhills crash course in garden design. Over 5 hours Lee will teach you how to design your own dream garden. Featuring practical design examples, planting ideas and video guides. Learn how to design your garden in one weekend!
Garden Design for Beginners: Create Your Dream Garden in Just 4 Weeks
Garden Design for Beginners Online Course: If you want to make the career jump to becoming a garden designer or to learn how to design your own garden, this is the beginner course for you. Join me, Lee Burkhill, an award-winning garden designer, as I train you in the art of beautiful garden design.
Alternatively, if you’d rather have professional input without the full design service cost, my online garden design consultations start at £250 and can provide invaluable guidance on layout, zoning, and plant selection specifically for your triangle plot. Sometimes an hour of expert advice at the planning stage can save you thousands in costly mistakes during implementation.
Transform Your Triangle Garden with Confidence
Triangle gardens are undeniably challenging, but they’re far from impossible. Every awkward angle represents an opportunity for creative problem solving, and the finished results can be genuinely distinctive and memorable in ways that standard rectangular plots rarely achieve.
The key to success lies in understanding fundamental design principles rather than trying to copy generic layouts from magazines or Instagram. Proper zoning, broken sight lines, and thoughtful use of curves over straight lines will transform even the most awkward triangle into a functional, beautiful outdoor space you’ll actually want to use.
If you’re standing at those patio doors looking out at your wedge-shaped plot, wondering where on earth to start, you’re not alone. Triangle gardens perplex even experienced gardeners. But with the right approach grounded in solid design principles rather than guesswork, your triangle can become one of your property’s greatest assets rather than its most frustrating feature.
Ready to tackle your triangle garden with professional-level knowledge? My Garden Design for Beginners course covers everything from site surveying to planting plans, giving you the skills to design any awkward space with confidence. Or if you’d prefer personalised guidance specific to your plot, book an online consultation where we can discuss your triangle’s specific challenges and opportunities in detail.
Your triangle garden is waiting to be transformed. Let’s make it happen.
So be bold and get designing, Ninjas!
Lee Burkhill
Lee Burkhill, known as the Garden Ninja, is an award-winning garden designer and horticulturist with over 30 years of gardening experience and 15 years as a professional garden designer. A qualified RHS (Royal Horticultural Society) professional, Lee specialises in sustainable garden design and practical horticultural advice. He designs and presents on BBC1’s Garden Rescue and in leading gardening publications. Lee combines three decades of hands-on gardening knowledge with professional design qualifications to help gardeners create beautiful, functional outdoor spaces.